Owner Manual
Page 4
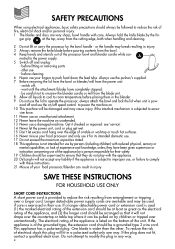
...drape over unintentionally. or the handle may cause injury if the interlock mechanism is subject to comply with care. If the appliance is of your food processor/blender can be used (1) the marked electrical rating of the extension cord should be at the top, away from the power unit: - ...room temperature before pouring contents from entanglement or tripping over the edge of a table or worktop or touch hot surfaces. 16 Never misuse your food processor and only use it for their use - Always hold the knife blade by a person responsible for its intended domestic use. 17 Do not...
...drape over unintentionally. or the handle may cause injury if the interlock mechanism is subject to comply with care. If the appliance is of your food processor/blender can be used (1) the marked electrical rating of the extension cord should be at the top, away from the power unit: - ...room temperature before pouring contents from entanglement or tripping over the edge of a table or worktop or touch hot surfaces. 16 Never misuse your food processor and only use it for their use - Always hold the knife blade by a person responsible for its intended domestic use. 17 Do not...
Owner Manual
Page 6
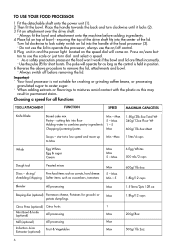
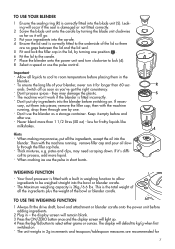
... onto the power unit (1). 2 Then fit the bowl. ensuring the top of the drive shaft fits into the handle of the lid. Your food processor is held in permanent stains. shredding/chipping Softer items such as carrots, hard cheese. The pulse will come on lid into the center of the... food processor (3). - Always switch off control. 5 Plug unit in and the power light located on the speed dial will operate for as long as this ...
... onto the power unit (1). 2 Then fit the bowl. ensuring the top of the drive shaft fits into the handle of the lid. Your food processor is held in permanent stains. shredding/chipping Softer items such as carrots, hard cheese. The pulse will come on lid into the center of the... food processor (3). - Always switch off control. 5 Plug unit in and the power light located on the speed dial will operate for as long as this ...
Owner Manual
Page 7
... - remove the filler cap; then with the machine running , remove filler cap and pour oil slow- If it for longer than 1 1/2 litres (50 oz) - Your food processor is correctly fitted to process, add more than 60 sec- Don't put all the ingredients, except the oil into pieces; less for 7 To ensure the...
... - remove the filler cap; then with the machine running , remove filler cap and pour oil slow- If it for longer than 1 1/2 litres (50 oz) - Your food processor is correctly fitted to process, add more than 60 sec- Don't put all the ingredients, except the oil into pieces; less for 7 To ensure the...
Owner Manual
Page 8
... if the display is the most versatile of all ingredients are removed the display will be displayed on the display screen. -M- Always place the food processor on . - Hints knife blade/dough tool - weighing small quantities. 5 Check the display shows '0', if not, zero by exceeding the maximum...returned to excessive force as meat, bread, vegetables into the bowl or carafe. Repeat until the speed control returned to operate the processor. - The weight of the weighing function. Do not move the power unit during operation of any additional ingredients added down the feed...
... if the display is the most versatile of all ingredients are removed the display will be displayed on the display screen. -M- Always place the food processor on . - Hints knife blade/dough tool - weighing small quantities. 5 Check the display shows '0', if not, zero by exceeding the maximum...returned to excessive force as meat, bread, vegetables into the bowl or carafe. Repeat until the speed control returned to operate the processor. - The weight of the weighing function. Do not move the power unit during operation of any additional ingredients added down the feed...
Owner Manual
Page 9
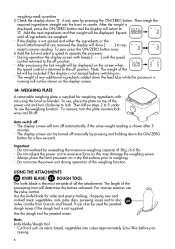
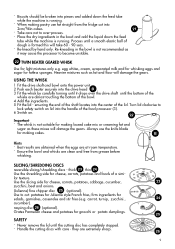
... the lid. rasping disc 26 (optional). Handle the cutting discs with care - Process until a smooth elastic ball of the food processor (3). 6 Switch on. 22 Important - Always use fat straight from grease before whisking. - Use the shredding side for light mixtures only e.g. Use...8260;4in.cubes. 21 - Heavier mixtures such as it drops over -process. - Re-knead by carefully turning until it may cause the processor to cut into the handle of dough is not suitable for Julienne style French fries; firm ingredients for gnocchi or potato dumplings. 25 SAFETY ...
... the lid. rasping disc 26 (optional). Handle the cutting discs with care - Process until a smooth elastic ball of the food processor (3). 6 Switch on. 22 Important - Always use fat straight from grease before whisking. - Use the shredding side for light mixtures only e.g. Use...8260;4in.cubes. 21 - Heavier mixtures such as it drops over -process. - Re-knead by carefully turning until it may cause the processor to cut into the handle of dough is not suitable for Julienne style French fries; firm ingredients for gnocchi or potato dumplings. 25 SAFETY ...
Owner Manual
Page 11
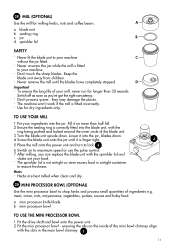
...blades down . max 7 After milling, you 've got the right consistency. - Herbs are best milled when clean and dry. 29 MINI PROCESSOR BOWL (OPTIONAL) Use the mini processor bowl to your machine. - ensuring the ribs on to your mill, never run for longer than half full. 2 Ensure the sealing ring... onto the power unit. 2 Fit the mini processor bowl - The sprinkler lid is fitted to chop herbs and process small quantities of your machine C without the jar fitted. - Never unscrew the jar while the mill is not airtight so store excess food in the main bowl chimney I . 11 Never...
...blades down . max 7 After milling, you 've got the right consistency. - Herbs are best milled when clean and dry. 29 MINI PROCESSOR BOWL (OPTIONAL) Use the mini processor bowl to your machine. - ensuring the ribs on to your mill, never run for longer than half full. 2 Ensure the sealing ring... onto the power unit. 2 Fit the mini processor bowl - The sprinkler lid is fitted to chop herbs and process small quantities of your machine C without the jar fitted. - Never unscrew the jar while the mill is not airtight so store excess food in the main bowl chimney I . 11 Never...
Owner Manual
Page 12
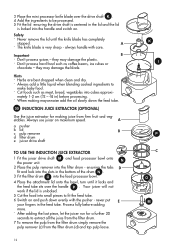
...K I P C O M 12 The knife blade is centered in the bottom of the drum N . 3 Fit the filter drum O into the food processor bowl. 4 Place the attachment lid onto the bowl, turn until the knife blade has completely stopped. they may damage the plastic. - A a pusher... B d filter drum e juicer drive shaft TO USE THE INDUCTION JUICE EXTRACTOR 1 Fit the juicer drive shaft M and food processor bowl onto the power unit. Cut foods such as coffee beans, ice cubes or chocolate - Process fully before processing. - always handle with the pusher - etables....
...K I P C O M 12 The knife blade is centered in the bottom of the drum N . 3 Fit the filter drum O into the food processor bowl. 4 Place the attachment lid onto the bowl, turn until the knife blade has completely stopped. they may damage the plastic. - A a pusher... B d filter drum e juicer drive shaft TO USE THE INDUCTION JUICE EXTRACTOR 1 Fit the juicer drive shaft M and food processor bowl onto the power unit. Cut foods such as coffee beans, ice cubes or chocolate - Process fully before processing. - always handle with the pusher - etables....
Owner Manual
Page 13
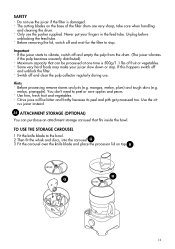
...filter to the bowl. 2 Then fit the whisk and discs, into the carousel Q . 3 Fit the carousel over the knife blade and place the processor lid on the base of fruit or vegetables. - melon, pineapple). rus juicer instead. 31 ATTACHMENT STORAGE (OPTIONAL) You can purchase an attachment storage carousel...stones and pits (e.g. mangos, melon, plum) and tough skins (e.g. TO USE THE STORAGE CAROUSEL 1 Fit the knife blade to stop . Some very hard foods may make your fingers in the feed tube. The cutting blades on top R . Important - You don't need to vibrate, switch off and unblock ...
...filter to the bowl. 2 Then fit the whisk and discs, into the carousel Q . 3 Fit the carousel over the knife blade and place the processor lid on the base of fruit or vegetables. - melon, pineapple). rus juicer instead. 31 ATTACHMENT STORAGE (OPTIONAL) You can purchase an attachment storage carousel...stones and pits (e.g. mangos, melon, plum) and tough skins (e.g. TO USE THE STORAGE CAROUSEL 1 Fit the knife blade to stop . Some very hard foods may make your fingers in the feed tube. The cutting blades on top R . Important - You don't need to vibrate, switch off and unblock ...
Owner Manual
Page 14
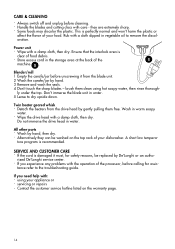
...troubleshooting guide. Wash by De'Longhi or an autho- SERVICE AND CUSTOMER CARE - Contact the customer service hotline listed on the top rack of the processor, before cleaning. - Wipe with a cloth dipped in warm soapy water. - ly under the tap. A short low tempera- using hot soapy water...by hand, then dry. - CARE & CLEANING - tance refer to remove the discoloration. Store excess cord in the storage area at the back of food debris. - ture program is clear of the S machine S . Power unit - Always switch off and unplug before calling for safety reasons, be ...
...troubleshooting guide. Wash by De'Longhi or an autho- SERVICE AND CUSTOMER CARE - Contact the customer service hotline listed on the top rack of the processor, before cleaning. - Wipe with a cloth dipped in warm soapy water. - ly under the tap. A short low tempera- using hot soapy water...by hand, then dry. - CARE & CLEANING - tance refer to remove the discoloration. Store excess cord in the storage area at the back of food debris. - ture program is clear of the S machine S . Power unit - Always switch off and unplug before calling for safety reasons, be ...
Owner Manual
Page 15
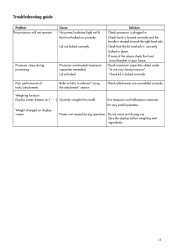
... Display screen freezes on correctly. Zero the display before weighing next ingredients. 15 Check lid is plugged in your food processor". Weight changed on display screen Power unit moved during use your home. Do not move unit during operation. Troubleshooting guide Problem The... processor will not operate Processor stops during processing Cause No power/indicator light not lit. Check that the lid interlock is situated towards the right...
... Display screen freezes on correctly. Zero the display before weighing next ingredients. 15 Check lid is plugged in your food processor". Weight changed on display screen Power unit moved during use your home. Do not move unit during operation. Troubleshooting guide Problem The... processor will not operate Processor stops during processing Cause No power/indicator light not lit. Check that the lid interlock is situated towards the right...


