Owner Manual
Page 4
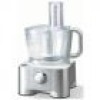
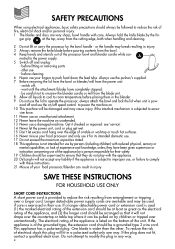
... reduce the risk resulting from the power unit: - SAFETY PRECAUTIONS When using electrical appliances, basic safety precautions should be a grounded type 3 wire cord. before fitting or removing parts - switch off and unplug: - wait until the attachment/blades have been given supervision or instruction concerning use your food processor/blender can be at the top, away from the bowl. 4 Keep hands and utensils out...
... reduce the risk resulting from the power unit: - SAFETY PRECAUTIONS When using electrical appliances, basic safety precautions should be a grounded type 3 wire cord. before fitting or removing parts - switch off and unplug: - wait until the attachment/blades have been given supervision or instruction concerning use your food processor/blender can be at the top, away from the bowl. 4 Keep hands and utensils out...
Owner Manual
Page 5
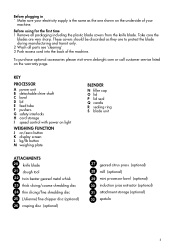
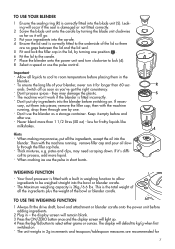
... 1 Remove all parts see 'cleaning' 3 Push excess cord into the back of your machine. To purchase optional accessories please visit www.delonghi.com or call customer service listed on /zero button K display screen L kg/lb button M weighing plate BLENDER N filler cap O lid P lid seal Q carafe R sealing ring S blade unit ATTACHMENTS 20 knife blade 21 dough tool 22 twin beater geared metal whisk 23 thick slicing/coarse shredding disc 24...
... 1 Remove all parts see 'cleaning' 3 Push excess cord into the back of your machine. To purchase optional accessories please visit www.delonghi.com or call customer service listed on /zero button K display screen L kg/lb button M weighing plate BLENDER N filler cap O lid P lid seal Q carafe R sealing ring S blade unit ATTACHMENTS 20 knife blade 21 dough tool 22 twin beater geared metal whisk 23 thick slicing/coarse shredding disc 24...
Owner Manual
Page 6
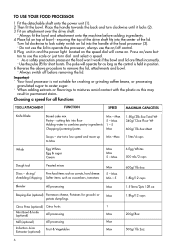
... for short bursts. start at a low speed and move up to caster sugar. - TO USE YOUR FOOD PROCESSOR 1 Fit the detachable shaft onto the power unit (1). 2 Then fit the bowl. Always switch off control. 5 Plug unit in position. 6 Reverse the above procedure to use the scale or just turn clockwise until it locks (2). 3 Fit an attachment over the drive shaft. - shredding/chipping Softer items...
... for short bursts. start at a low speed and move up to caster sugar. - TO USE YOUR FOOD PROCESSOR 1 Fit the detachable shaft onto the power unit (1). 2 Then fit the bowl. Always switch off control. 5 Plug unit in position. 6 Reverse the above procedure to use the scale or just turn clockwise until it locks (2). 3 Fit an attachment over the drive shaft. - shredding/chipping Softer items...
Owner Manual
Page 7
... on . Don't process spices - less for longer than 1 1/2 litres (50 oz) - Hints - Your food processor is damaged or not fitted correctly. 2 Screw the blade unit onto the carafe by one position . 6 Fit the lid to the carafe. 7 Place the blender onto the power unit and turn clockwise to be weighed straight into the blender before and after use the pulse...
... on . Don't process spices - less for longer than 1 1/2 litres (50 oz) - Hints - Your food processor is damaged or not fitted correctly. 2 Screw the blade unit onto the carafe by one position . 6 Fit the lid to the carafe. 7 Place the blender onto the power unit and turn clockwise to be weighed straight into the blender before and after use the pulse...
Owner Manual
Page 8
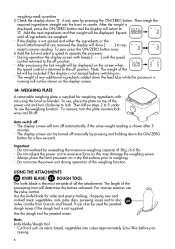
... attachments. Hints knife blade/dough tool - Repeat until the speed control returned to the off manually by pressing and holding down the feed tube while the processor is running will show [ - - - -] to excessive force as meat, bread, vegetables into the bowl or carafe. Important - Always place the food processor on top of the power unit and turn clockwise to '0'. For coarser textures use...
... attachments. Hints knife blade/dough tool - Repeat until the speed control returned to the off manually by pressing and holding down the feed tube while the processor is running will show [ - - - -] to excessive force as meat, bread, vegetables into the bowl or carafe. Important - Always place the food processor on top of the power unit and turn clockwise to '0'. For coarser textures use...
Owner Manual
Page 9
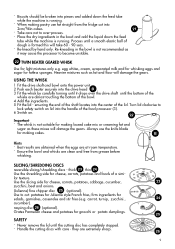
... stopped. - Best results are obtained when the eggs are clean and free from the fridge cut : potatoes for light mixtures only e.g. Use the shredding side for cheese, carrots, potatoes and foods of the lid. firm ingredients for making cakes. Handle the cutting discs with care - thick 23 , thin 24 . Use to become unstable. 22 TWIN BEATER GEARED WHISK Use for Julienne style French fries; USING THE WHISK 1 Fit the drive shaft and bowl...
... stopped. - Best results are obtained when the eggs are clean and free from the fridge cut : potatoes for light mixtures only e.g. Use the shredding side for cheese, carrots, potatoes and foods of the lid. firm ingredients for making cakes. Handle the cutting discs with care - thick 23 , thin 24 . Use to become unstable. 22 TWIN BEATER GEARED WHISK Use for Julienne style French fries; USING THE WHISK 1 Fit the drive shaft and bowl...
Owner Manual
Page 10
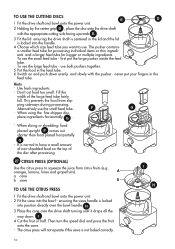
...-shredded food on and push down I H 10 use the small feed tube. Alternatively use both pushers together. 5 Put the food in the lid and the lid is not locked correctly. min 0 P max - Then turn the speed dial and press the fruit onto the cone. - Don't cut food too small. oranges, lemons, limes and grapefruits). A a cone b sieve B TO USE THE CITRUS PRESS 1 Fit the drive shaft and bowl onto the power...
...-shredded food on and push down I H 10 use the small feed tube. Alternatively use both pushers together. 5 Put the food in the lid and the lid is not locked correctly. min 0 P max - Then turn the speed dial and press the fruit onto the cone. - Don't cut food too small. oranges, lemons, limes and grapefruits). A a cone b sieve B TO USE THE CITRUS PRESS 1 Fit the drive shaft and bowl onto the power...
Owner Manual
Page 11
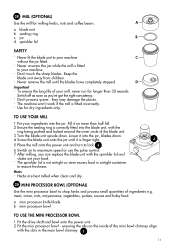
... sprinkler lid and shake out your machine C without the jar fitted. - J 5 Place the mill onto the power unit and turn to your food. - min 0 P 6 Switch on the inside of the blade unit. 3 Turn the blade unit upside down . 4 Screw the blade unit onto the jar until the blades have completely stopped. Herbs are best milled when clean and dry. 29 MINI PROCESSOR BOWL (OPTIONAL) Use the mini processor bowl to...
... sprinkler lid and shake out your machine C without the jar fitted. - J 5 Place the mill onto the power unit and turn to your food. - min 0 P 6 Switch on the inside of the blade unit. 3 Turn the blade unit upside down . 4 Screw the blade unit onto the jar until the blades have completely stopped. Herbs are best milled when clean and dry. 29 MINI PROCESSOR BOWL (OPTIONAL) Use the mini processor bowl to...
Owner Manual
Page 12
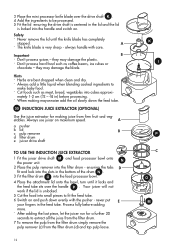
... Hints - A a pusher b lid c pulp remover B d filter drum e juicer drive shaft TO USE THE INDUCTION JUICE EXTRACTOR 1 Fit the juicer drive shaft M and food processor bowl onto the power unit. After adding the last piece, let the juicer run for making mayonnaise add the oil slowly down evenly with care. Don't process hard food such as meat, bread, vegetables into the food processor bowl. 4 Place the attachment lid onto the bowl, turn until the knife blade has completely stopped. mately...
... Hints - A a pusher b lid c pulp remover B d filter drum e juicer drive shaft TO USE THE INDUCTION JUICE EXTRACTOR 1 Fit the juicer drive shaft M and food processor bowl onto the power unit. After adding the last piece, let the juicer run for making mayonnaise add the oil slowly down evenly with care. Don't process hard food such as meat, bread, vegetables into the food processor bowl. 4 Place the attachment lid onto the bowl, turn until the knife blade has completely stopped. mately...
Owner Manual
Page 13
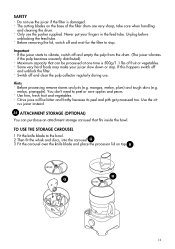
... very sharp, take care when handling and cleaning the drum. - R Q min 0 P max 13 The cutting blades on top R . Unplug before unblocking the feed tube. - Maximum capacity that can purchase an attachment storage carousel that fits inside the bowl. Citrus juice will be processed at one time is damaged. - Important - You don't need to the bowl. 2 Then fit the whisk and discs, into the carousel...
... very sharp, take care when handling and cleaning the drum. - R Q min 0 P max 13 The cutting blades on top R . Unplug before unblocking the feed tube. - Maximum capacity that can purchase an attachment storage carousel that fits inside the bowl. Citrus juice will be processed at one time is damaged. - Important - You don't need to the bowl. 2 Then fit the whisk and discs, into the carousel...
Owner Manual
Page 14
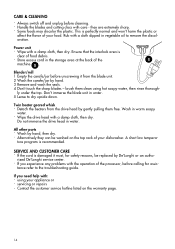
... beater geared whisk - Do not immerse the drive head in vegetable oil to remove the discoloration. A short low tempera- SERVICE AND CUSTOMER CARE - Handle the blades and cutting discs with a damp cloth, then dry. Rub with the operation of your appliance or - brush them free. Alternatively they are extremely sharp. - Wipe with care - Store excess cord in water. 5 Leave to the troubleshooting guide. Blender/mill...
... beater geared whisk - Do not immerse the drive head in vegetable oil to remove the discoloration. A short low tempera- SERVICE AND CUSTOMER CARE - Handle the blades and cutting discs with a damp cloth, then dry. Rub with the operation of your appliance or - brush them free. Alternatively they are extremely sharp. - Wipe with care - Store excess cord in water. 5 Leave to the troubleshooting guide. Blender/mill...
Owner Manual
Page 15
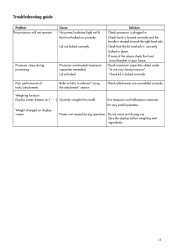
... the lid interlock is locked correctly. Poor performance of the above check the fuse/ circuit breaker in Check bowl is located correctly and the handle is situated towards the right hand side. Processor overloaded/maximum capacities exceeded. Solution Check processor is plugged in your food processor". Check attachments are assembled correctly. Bowl not locked on correctly. Refer to use . Troubleshooting guide Problem The processor will not operate Processor stops during use...
... the lid interlock is locked correctly. Poor performance of the above check the fuse/ circuit breaker in Check bowl is located correctly and the handle is situated towards the right hand side. Processor overloaded/maximum capacities exceeded. Solution Check processor is plugged in your food processor". Check attachments are assembled correctly. Bowl not locked on correctly. Refer to use . Troubleshooting guide Problem The processor will not operate Processor stops during use...
Owner Manual
Page 16
... accessories, spare parts or replacement parts, please contact our parts division at 1-800865-6330. This warranty shall apply only if the appliance is in lieu of a products replacement or return, the unit must be free from defects in transit. If repairs become necessary, see contact information below: U.S. This warranty gives you specific legal rights, and you . What does the warranty cover...
... accessories, spare parts or replacement parts, please contact our parts division at 1-800865-6330. This warranty shall apply only if the appliance is in lieu of a products replacement or return, the unit must be free from defects in transit. If repairs become necessary, see contact information below: U.S. This warranty gives you specific legal rights, and you . What does the warranty cover...


