Owner Manual
Page 4
..., both when handling and cleaning. 2 Do not lift or carry the processor by the fin- switch off and unplug: - wait until the attachment/blades have been given supervision or instruction concerning use of the appliance by a person responsible for their use. The electrical rating of electrical shock this... is provided to reduce the risk resulting from the blade unit. 8 Allow all liquids to cool to excessive force. 11 Never use an unauthorized attachment. 12 Never leave the machine on unattended. 13 Never use the on/off and use a damaged machine. This appliance has a polarized plug. ...
..., both when handling and cleaning. 2 Do not lift or carry the processor by the fin- switch off and unplug: - wait until the attachment/blades have been given supervision or instruction concerning use of the appliance by a person responsible for their use. The electrical rating of electrical shock this... is provided to reduce the risk resulting from the blade unit. 8 Allow all liquids to cool to excessive force. 11 Never use an unauthorized attachment. 12 Never leave the machine on unattended. 13 Never use the on/off and use a damaged machine. This appliance has a polarized plug. ...
Owner Manual
Page 5
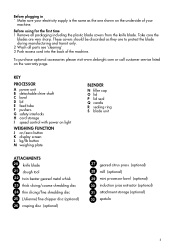
...as the one shown on the underside of the machine. Before plugging in - Make sure your machine. To purchase optional accessories please visit www.delonghi.com or call customer service listed on /zero button K display screen L kg/lb button M weighing plate BLENDER N filler cap O lid ...disc (optional) 27 geared citrus press (optional) 28 mill (optional) 29 mini processor bowl (optional) 30 induction juice extractor (optional) 31 attachment storage (optional) 32 spatula 5 Take care the blades are to protect the blade during manufacturing and transit only. 2 Wash all packaging including...
...as the one shown on the underside of the machine. Before plugging in - Make sure your machine. To purchase optional accessories please visit www.delonghi.com or call customer service listed on /zero button K display screen L kg/lb button M weighing plate BLENDER N filler cap O lid ...disc (optional) 27 geared citrus press (optional) 28 mill (optional) 29 mini processor bowl (optional) 30 induction juice extractor (optional) 31 attachment storage (optional) 32 spatula 5 Take care the blades are to protect the blade during manufacturing and transit only. 2 Wash all packaging including...
Owner Manual
Page 6
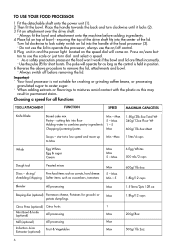
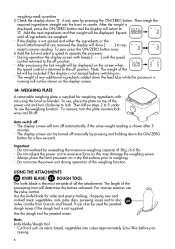
.../1lb 6oz 1.8kg/12 cups Blender All processing Max 1.5 liters/2pts 12fl.oz Rasping disc (optional) Parmesan cheese, Potatoes for all functions TOOL/ATTACHMENT FUNCTION SPEED MAXIMUM CAPACITIES Knife Blade Boxed cake mix Pastry - Press on/zero button to caster sugar. - Max 5 - slicing/ Firm food ... low speed and move up to operate the processor, always use the scale or just turn clockwise until it locks (2). 3 Fit an attachment over the drive shaft. - shredding/chipping Softer items such as this may result in position. 6 Reverse the above procedure to mixtures avoid ...
.../1lb 6oz 1.8kg/12 cups Blender All processing Max 1.5 liters/2pts 12fl.oz Rasping disc (optional) Parmesan cheese, Potatoes for all functions TOOL/ATTACHMENT FUNCTION SPEED MAXIMUM CAPACITIES Knife Blade Boxed cake mix Pastry - Press on/zero button to caster sugar. - Max 5 - slicing/ Firm food ... low speed and move up to operate the processor, always use the scale or just turn clockwise until it locks (2). 3 Fit an attachment over the drive shaft. - shredding/chipping Softer items such as this may result in position. 6 Reverse the above procedure to mixtures avoid ...
Owner Manual
Page 7
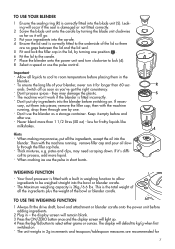
.... Your food processor is correctly fitted to kg/g when first switched on . min 0 P TO USE THE WEIGHING FUNCTION 1 Always fit the drive shaft, bowl and attachment or blender carafe onto the power unit before placing them through the filler cap hole. the display screen will remain blank. 3 Press the ON/ZERO...
.... Your food processor is correctly fitted to kg/g when first switched on . min 0 P TO USE THE WEIGHING FUNCTION 1 Always fit the drive shaft, bowl and attachment or blender carafe onto the power unit before placing them through the filler cap hole. the display screen will remain blank. 3 Press the ON/ZERO...
Owner Manual
Page 8
...to 5 under min 0 P 'to the off automatically if the same weight reading is not zeroed and either the ingredients or the bowl/attachment/lid are weighed. - For coarser textures use the weighing function'. If the display is shown after 5 minutes. - out using the ... time will return to represent a minus reading. Use the dough tool for weighing ingredients with freeze [- - - -] until all the attachments. Then weigh the required ingredients straight into cubes approximately 2cm/3⁄4in before switching on. - After the weight is supplied for yeasted mixes...
...to 5 under min 0 P 'to the off automatically if the same weight reading is not zeroed and either the ingredients or the bowl/attachment/lid are weighed. - For coarser textures use the weighing function'. If the display is shown after 5 minutes. - out using the ... time will return to represent a minus reading. Use the dough tool for weighing ingredients with freeze [- - - -] until all the attachments. Then weigh the required ingredients straight into cubes approximately 2cm/3⁄4in before switching on. - After the weight is supplied for yeasted mixes...
Owner Manual
Page 12
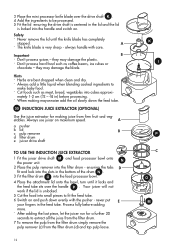
... bowl onto the power unit. N 2 Place the pulp remover into cubes approxi- ensuring the tabs D fit and lock into the food processor bowl. 4 Place the attachment lid onto the bowl, turn until the knife blade has completely stopped. After adding the last piece, let the juicer run for making mayonnaise add...
... bowl onto the power unit. N 2 Place the pulp remover into cubes approxi- ensuring the tabs D fit and lock into the food processor bowl. 4 Place the attachment lid onto the bowl, turn until the knife blade has completely stopped. After adding the last piece, let the juicer run for making mayonnaise add...
Owner Manual
Page 13
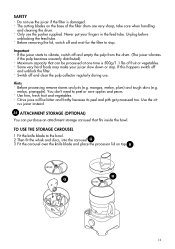
...and empty the pulp from the drum. (The juicer vibrates if the pulp becomes unevenly distributed). - Maximum capacity that can purchase an attachment storage carousel that fits inside the bowl. mangos, melon, plum) and tough skins (e.g. melon, pineapple). Unplug before unblocking the feed ...tube. - Hints - Use the cit- rus juicer instead. 31 ATTACHMENT STORAGE (OPTIONAL) You can be bitter and frothy because its peel and pith get processed too. Only use . TO USE THE STORAGE CAROUSEL...
...and empty the pulp from the drum. (The juicer vibrates if the pulp becomes unevenly distributed). - Maximum capacity that can purchase an attachment storage carousel that fits inside the bowl. mangos, melon, plum) and tough skins (e.g. melon, pineapple). Unplug before unblocking the feed ...tube. - Hints - Use the cit- rus juicer instead. 31 ATTACHMENT STORAGE (OPTIONAL) You can be bitter and frothy because its peel and pith get processed too. Only use . TO USE THE STORAGE CAROUSEL...
Owner Manual
Page 15
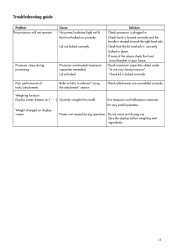
...and the handle is correctly locked in place. Poor performance of the above check the fuse/ circuit breaker in relevant "using the attachment" section. Use teaspoon and tablespoon measures for very small quantities. Refer to use . Do not move unit during processing Cause ...No power/indicator light not lit. Check maximum capacities stated under "to hints in your food processor". Check attachments are assembled correctly. Bowl not locked on [- - - -] Quantity weighed too small. Check lid is locked correctly. Weight changed on ...
...and the handle is correctly locked in place. Poor performance of the above check the fuse/ circuit breaker in relevant "using the attachment" section. Use teaspoon and tablespoon measures for very small quantities. Refer to use . Do not move unit during processing Cause ...No power/indicator light not lit. Check maximum capacities stated under "to hints in your food processor". Check attachments are assembled correctly. Bowl not locked on [- - - -] Quantity weighed too small. Check lid is locked correctly. Weight changed on ...