Owner Manual
Page 4
... temper- Be careful not to unscrew the blender carafe from the cutting edge, both when handling and cleaning. • Always remove the knife blade before blending. • Do not use the lid to remove remaning food. • Before removing the lid from the bowl or blender from the outlet. • If the appliance breaks down the feed tube. For any manner, turn the motor off . If food becomes lodged...
... temper- Be careful not to unscrew the blender carafe from the cutting edge, both when handling and cleaning. • Always remove the knife blade before blending. • Do not use the lid to remove remaning food. • Before removing the lid from the bowl or blender from the outlet. • If the appliance breaks down the feed tube. For any manner, turn the motor off . If food becomes lodged...
Owner Manual
Page 5
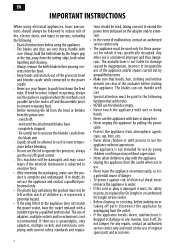
... jars, not recommended by the change to manufacturer may cause a risk of injury to persons. • Do not use only CHOOSING A SPEED FOR ALL FUNCTIONS Tool/Attachment Function Speed Knife Blade Cake Mix 1 - 8 Pastry - start at a low speed and move up to 8 1 - 8 Whisk Egg Whites 8 Egg & sugar for German 8 Citrus Press Citrus fruits 1 Mini Bowl & knife All processing 8 Blender All processing 8 Mill All processing 8 Centrifugal juicer...
... jars, not recommended by the change to manufacturer may cause a risk of injury to persons. • Do not use only CHOOSING A SPEED FOR ALL FUNCTIONS Tool/Attachment Function Speed Knife Blade Cake Mix 1 - 8 Pastry - start at a low speed and move up to 8 1 - 8 Whisk Egg Whites 8 Egg & sugar for German 8 Citrus Press Citrus fruits 1 Mini Bowl & knife All processing 8 Blender All processing 8 Mill All processing 8 Centrifugal juicer...
Owner Manual
Page 6
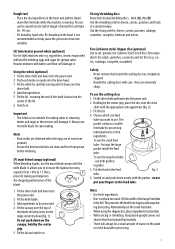
... in the outlet, reverse the plug. Make sure your food processor 1 Fit the detachable drive shaft onto the power unit (1). 2 Then fit the bowl. This appliance conforms to protect the blade during manufacture and transit only. 2 Wash the parts see 'cleaning'. 3 Push excess cord into pieces and added down . Take care the blades are to EC directive 2004/108/EC on Electromagnetic Compatibility and...
... in the outlet, reverse the plug. Make sure your food processor 1 Fit the detachable drive shaft onto the power unit (1). 2 Then fit the bowl. This appliance conforms to protect the blade during manufacture and transit only. 2 Wash the parts see 'cleaning'. 3 Push excess cord into pieces and added down . Take care the blades are to EC directive 2004/108/EC on Electromagnetic Compatibility and...
Owner Manual
Page 7
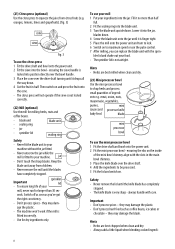
... use the small feed tube. - first put your fingers in the bowl is formed this will always be processed. 4 Fit the canopy over the drive shaft. 4 Add the ingredients. 5 Fit the lid - Hints - Handle the cutting discs with the pusher - never put the large pusher inside the bowl (fig. 1). When slicing or shredding: food placed upright comes out shorter than food placed horizontally. - egg whites, cream, evaporated milk and for whisking eggs...
... use the small feed tube. - first put your fingers in the bowl is formed this will always be processed. 4 Fit the canopy over the drive shaft. 4 Add the ingredients. 5 Fit the lid - Hints - Handle the cutting discs with the pusher - never put the large pusher inside the bowl (fig. 1). When slicing or shredding: food placed upright comes out shorter than food placed horizontally. - egg whites, cream, evaporated milk and for whisking eggs...
Owner Manual
Page 8
... milled when clean and dry. (23) Mini processor bowl Use the mini processor bowl to your machine. jar - Switch off as soon as coffee beans, ice cubes or chocolate - Herbs are best chopped when clean and dry. - always handle with the sprin- Don't process hard food such as you can replace the blade unit with care. Never unscrew the jar while the mill is very sharp - The sprinkler lid is...
... milled when clean and dry. (23) Mini processor bowl Use the mini processor bowl to your machine. jar - Switch off as soon as coffee beans, ice cubes or chocolate - Herbs are best chopped when clean and dry. - always handle with the sprin- Don't process hard food such as you can replace the blade unit with care. Never unscrew the jar while the mill is very sharp - The sprinkler lid is...
Owner Manual
Page 9
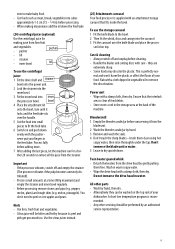
... locks and the feed tube sits over the knife blade and place the proces- Care & cleaning - Some foods may discolor the plastic. Power unit - All other servicing should be bitter and frothy because its peel and pith get processed too. Wash by an authorized service representative. 9 To use the centrifugal juicer 1 Fit the drive shaft and strainer bowl onto the power unit. 2 Lock the strainer into the inner bowl...
... locks and the feed tube sits over the knife blade and place the proces- Care & cleaning - Some foods may discolor the plastic. Power unit - All other servicing should be bitter and frothy because its peel and pith get processed too. Wash by an authorized service representative. 9 To use the centrifugal juicer 1 Fit the drive shaft and strainer bowl onto the power unit. 2 Lock the strainer into the inner bowl...
Owner Manual
Page 10
... the appliance is not covered by the warranty? This warranty gives you specific legal rights, and you enter into an extended warranty with De'Longhi or Kenwood brand names. The repaired or new model will be returned transportation prepaid. The warranty does not cover defects or damage of its appliance. What is used in material and workmanship...
... the appliance is not covered by the warranty? This warranty gives you specific legal rights, and you enter into an extended warranty with De'Longhi or Kenwood brand names. The repaired or new model will be returned transportation prepaid. The warranty does not cover defects or damage of its appliance. What is used in material and workmanship...


