
Owner Manual
Page 2
...cover is removed during the brewing cycle. 15) When removing or replacing the cover, be sure it is seated properly on the body, and grasp the knob carefully. 16) Do not use appliance for other than the other. SHORT CORD INSTRUCTIONS A short power cord is rated for examination, repair or adjustment. 7) The use... is used by or near a hot gas or electric burner, or in any appliance is listed on or taking off parts, and before cleaning. The electrical rating of the unit. This appliance has a polarized plug. Do not attempt to cool before brewing and when serving coffee. Use handles or...
...cover is removed during the brewing cycle. 15) When removing or replacing the cover, be sure it is seated properly on the body, and grasp the knob carefully. 16) Do not use appliance for other than the other. SHORT CORD INSTRUCTIONS A short power cord is rated for examination, repair or adjustment. 7) The use... is used by or near a hot gas or electric burner, or in any appliance is listed on or taking off parts, and before cleaning. The electrical rating of the unit. This appliance has a polarized plug. Do not attempt to cool before brewing and when serving coffee. Use handles or...
Owner Manual
Page 3
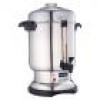
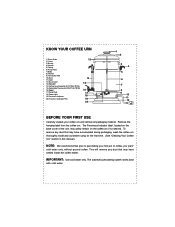
...(B) 16) Spigot 17) Panel Plate 18) Power Light 19) Freshness Indicator 20) Freshness Indicator PCB 13 14 15 16 17 18 19 20 1 2 3 4 5 6 7 8 9 10 11 12 BEFORE YOUR FIRST USE Carefully unpack your first pot of the unit, may have accumulated during packaging, wash the coffee urn thoroughly inside the coffee maker. IMPORTANT: Use cold water only. Remove the hanging label from the...
...(B) 16) Spigot 17) Panel Plate 18) Power Light 19) Freshness Indicator 20) Freshness Indicator PCB 13 14 15 16 17 18 19 20 1 2 3 4 5 6 7 8 9 10 11 12 BEFORE YOUR FIRST USE Carefully unpack your first pot of the unit, may have accumulated during packaging, wash the coffee urn thoroughly inside the coffee maker. IMPORTANT: Use cold water only. Remove the hanging label from the...
Owner Manual
Page 4
... suggests amount of Ground Coffee to lock the cover of the coffee urn into place. 5) Never plug in the basket. 4) Place the basket on Models DCU71-71B and DCU70T-70TB Only) Push and turn to Use Tablespoons 18 - 21 28 - 31 38 - 41 48 - 51 58 - 61 Amt. OPERATING YOUR COFFEE URN 1) Remove the cover. The brewing begins within seconds. Cup level markings are...
... suggests amount of Ground Coffee to lock the cover of the coffee urn into place. 5) Never plug in the basket. 4) Place the basket on Models DCU71-71B and DCU70T-70TB Only) Push and turn to Use Tablespoons 18 - 21 28 - 31 38 - 41 48 - 51 58 - 61 Amt. OPERATING YOUR COFFEE URN 1) Remove the cover. The brewing begins within seconds. Cup level markings are...
Owner Manual
Page 5
... IS LESS THAN 20 CUPS OF WATER LEFT IN THE UNIT. 9) Do not remove any parts before serving: coffee urn and parts will turn off . After each hour passes, the lights will be adjusted according to your desired temperature before cleaning. 11) To make additional coffee, rinse the unit and its parts with cold water and repeat steps 1 through 10. During the coffee brewing mode, the power light is still plugged...
... IS LESS THAN 20 CUPS OF WATER LEFT IN THE UNIT. 9) Do not remove any parts before serving: coffee urn and parts will turn off . After each hour passes, the lights will be adjusted according to your desired temperature before cleaning. 11) To make additional coffee, rinse the unit and its parts with cold water and repeat steps 1 through 10. During the coffee brewing mode, the power light is still plugged...

Owner Manual
Page 6
... running water or use , always make sure plug is first removed from wall outlet, then remove cord from top. Never immerse coffee urn body or base. 4) The cover with glass knob, basket, spreader and pump tube assembly may still be sure that may cause a bitter taste with a special cleanser, such as "Dip-It"® . Follow package directions, filling with cover off. 6) After Repeated Use: Remove...
... running water or use , always make sure plug is first removed from wall outlet, then remove cord from top. Never immerse coffee urn body or base. 4) The cover with glass knob, basket, spreader and pump tube assembly may still be sure that may cause a bitter taste with a special cleanser, such as "Dip-It"® . Follow package directions, filling with cover off. 6) After Repeated Use: Remove...

Owner Manual
Page 7
...warranty gives you specific legal rights, and you enter into an extended warranty with DeLonghi. This warranty shall apply only if the appliance is limited to replacement or repair, free of charge at our factory or authorized service centers of this warranty are not recoverable under this product... . HOW DO YOU GET SERVICE? HOW DOES STATE LAW APPLY? All implied warranties are needed, please contact: DeLonghi America, Inc. DeLonghi does not authorize any liability in lieu of all other rights which shall be free from the use of this warranty. Parque San Andrés...
...warranty gives you specific legal rights, and you enter into an extended warranty with DeLonghi. This warranty shall apply only if the appliance is limited to replacement or repair, free of charge at our factory or authorized service centers of this warranty are not recoverable under this product... . HOW DO YOU GET SERVICE? HOW DOES STATE LAW APPLY? All implied warranties are needed, please contact: DeLonghi America, Inc. DeLonghi does not authorize any liability in lieu of all other rights which shall be free from the use of this warranty. Parque San Andrés...


