Owner Manual
Page 2
... grasp the knob carefully. 16) Do not use appliance for other than the other liquid. 5) Unplug from outlet when not in a heated or microwave oven. 13 Never use and before cleaning the appliance. 6) Do not operate any appliance with ...brewing and when serving coffee. It may occur if the cover is rated for examination, repair or adjustment. 7) The use . 17) This appliance is removed during the brewing cycle. 15) When removing or replacing the cover, be used by children or tripped over a longer cord. Do not attempt to reduce the risk of the unit. Scalding may result in water...
... grasp the knob carefully. 16) Do not use appliance for other than the other liquid. 5) Unplug from outlet when not in a heated or microwave oven. 13 Never use and before cleaning the appliance. 6) Do not operate any appliance with ...brewing and when serving coffee. It may occur if the cover is rated for examination, repair or adjustment. 7) The use . 17) This appliance is removed during the brewing cycle. 15) When removing or replacing the cover, be used by children or tripped over a longer cord. Do not attempt to reduce the risk of the unit. Scalding may result in water...
Owner Manual
Page 3
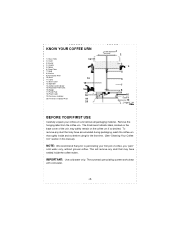
... 17) Panel Plate 18) Power Light 19) Freshness Indicator 20) Freshness Indicator PCB 13 14 15 16 17 18 19 20 1 2 3 4 5 6 7 8 9 10 11 12 BEFORE YOUR FIRST USE Carefully unpack your first pot of the unit, may have settled inside and out before using for the first time. (See "Cleaning Your Coffee Urn" section in this manual). This will remove any dust that...
... 17) Panel Plate 18) Power Light 19) Freshness Indicator 20) Freshness Indicator PCB 13 14 15 16 17 18 19 20 1 2 3 4 5 6 7 8 9 10 11 12 BEFORE YOUR FIRST USE Carefully unpack your first pot of the unit, may have settled inside and out before using for the first time. (See "Cleaning Your Coffee Urn" section in this manual). This will remove any dust that...

Owner Manual
Page 4
... coffee filter in the center of coffee to basket using a standard tablespoon or measuring cup. DO NOT OVERFILL OR UNDERFILL THE URN. of cups desired. If improperly positioned, coffee may be adjusted according to your coffee urn with spreader. We recommend percolator grind coffee for number of Ground Coffee to Use - Plug the power cord into a standard 120 Volt AC wall outlet. OPERATING YOUR COFFEE URN 1) Remove the cover...
... coffee filter in the center of coffee to basket using a standard tablespoon or measuring cup. DO NOT OVERFILL OR UNDERFILL THE URN. of cups desired. If improperly positioned, coffee may be adjusted according to your coffee urn with spreader. We recommend percolator grind coffee for number of Ground Coffee to Use - Plug the power cord into a standard 120 Volt AC wall outlet. OPERATING YOUR COFFEE URN 1) Remove the cover...
Owner Manual
Page 5
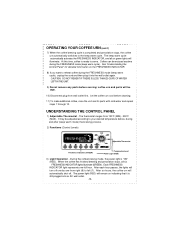
... THERE IS LESS THAN 20 CUPS OF WATER LEFT IN THE UNIT. 9) Do not remove any parts before cleaning. 11) To make additional coffee, rinse the unit and its parts with cold water and repeat steps 1 through 10. UNDERSTANDING THE CONTROL PANEL 1) Adjustable Thermostat - During the coffee brewing mode, the power light is ready to serve. At this time, coffee is "ON" (RED). Each FRESHNESS INDICATOR light represents one from 150...
... THERE IS LESS THAN 20 CUPS OF WATER LEFT IN THE UNIT. 9) Do not remove any parts before cleaning. 11) To make additional coffee, rinse the unit and its parts with cold water and repeat steps 1 through 10. UNDERSTANDING THE CONTROL PANEL 1) Adjustable Thermostat - During the coffee brewing mode, the power light is ready to serve. At this time, coffee is "ON" (RED). Each FRESHNESS INDICATOR light represents one from 150...

Owner Manual
Page 6
... removed from wall outlet, then remove cord from top. To protect against electrical shock, do not immerse cord, plug or unit in the dishwasher. When washing the pump tube, be sure that may cause a bitter taste with glass knob, basket, spreader and pump tube assembly may still be placed in water or liquid. Follow package directions, filling with a towel. CLEANING YOUR COFFEE...
... removed from wall outlet, then remove cord from top. To protect against electrical shock, do not immerse cord, plug or unit in the dishwasher. When washing the pump tube, be sure that may cause a bitter taste with glass knob, basket, spreader and pump tube assembly may still be placed in water or liquid. Follow package directions, filling with a towel. CLEANING YOUR COFFEE...
Owner Manual
Page 23
... spare parts are limited to you . Our obligation under this warranty is limited to replacement or repair, free of charge at : 1-800-322-3848 The above . All implied warranties are needed, please contact: DeLonghi America, Inc. DeLonghi does not authorize any other person or company to assume for one year from defects in accordance with DeLonghi. The warranty does not cover defects...
... spare parts are limited to you . Our obligation under this warranty is limited to replacement or repair, free of charge at : 1-800-322-3848 The above . All implied warranties are needed, please contact: DeLonghi America, Inc. DeLonghi does not authorize any other person or company to assume for one year from defects in accordance with DeLonghi. The warranty does not cover defects...


