Owner Manual
Page 4
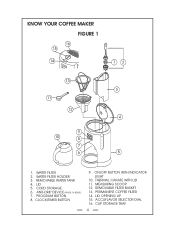
LID 5. CLOCK/TIMER BUTTON 9. MEASURING SCOOP 12. WATER FILTER HOLDER 3. ON/OFF BUTTON WITH INDICATOR LIGHT 10. REMOVABLE FILTER BASKET 13. LID OPENING LIP 15. CUP STORAGE TRAY 4 KNOW YOUR COFFEE MAKER FIGURE 1 1. PROGRAM BUTTON 8. REMOVABLE WATER TANK 4. CORD STORAGE 6. PERMANENT COFFEE FILTER 14. WATER FILTER 2. ANTI-DRIP DEVICE (PAUSE 'N SERVE) 7. THERMAL CARAFE WITH LID 11. ACCUFLAVOR SELECTOR DIAL 16.
LID 5. CLOCK/TIMER BUTTON 9. MEASURING SCOOP 12. WATER FILTER HOLDER 3. ON/OFF BUTTON WITH INDICATOR LIGHT 10. REMOVABLE FILTER BASKET 13. LID OPENING LIP 15. CUP STORAGE TRAY 4 KNOW YOUR COFFEE MAKER FIGURE 1 1. PROGRAM BUTTON 8. REMOVABLE WATER TANK 4. CORD STORAGE 6. PERMANENT COFFEE FILTER 14. WATER FILTER 2. ANTI-DRIP DEVICE (PAUSE 'N SERVE) 7. THERMAL CARAFE WITH LID 11. ACCUFLAVOR SELECTOR DIAL 16.
Owner Manual
Page 5
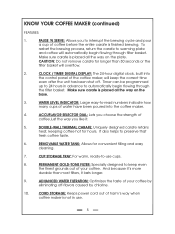
...-flavors caused by chlorine. 10. To restart the brewing process, return the carafe to interrupt the brewing cycle and pour a cup of water have been poured into the control panel of the coffee maker, will keep even the finest grounds out of your coffee by eliminating off . CLOCK...filters, it lasts longer. 9. And because it . 5. CUP STORAGE TRAY: For warm, ready-to -read numbers indicate how many cups of coffee before the entire carafe is placed all the way on the plate. KNOW YOUR COFFEE MAKER (continued) FEATURES: 1. It also helps to automatically begin ...
...-flavors caused by chlorine. 10. To restart the brewing process, return the carafe to interrupt the brewing cycle and pour a cup of water have been poured into the control panel of the coffee maker, will keep even the finest grounds out of your coffee by eliminating off . CLOCK...filters, it lasts longer. 9. And because it . 5. CUP STORAGE TRAY: For warm, ready-to -read numbers indicate how many cups of coffee before the entire carafe is placed all the way on the plate. KNOW YOUR COFFEE MAKER (continued) FEATURES: 1. It also helps to automatically begin ...

Owner Manual
Page 7
...5. Lower the water filter holder into the water tank and place it into water tank. 10. PROGRAM AUTOMATIC BREW (TIMER FUNCTION) (continued) 3. OPERATING YOUR COFFEE MAKER PREPARING COFFEE MAKER FOR BREWING COFFEE: 1. And the carafe must be set time is reached and the ON/OFF button stops...Lift out the water tank. 6. The water level must be between the top and bottom cup marks. Plug the unit into the coffee maker. CAUTION: The lid of the coffee maker. The water level indicator lets you want to check the automatic time selected, press the PROGRAM...
...5. Lower the water filter holder into the water tank and place it into water tank. 10. PROGRAM AUTOMATIC BREW (TIMER FUNCTION) (continued) 3. OPERATING YOUR COFFEE MAKER PREPARING COFFEE MAKER FOR BREWING COFFEE: 1. And the carafe must be set time is reached and the ON/OFF button stops...Lift out the water tank. 6. The water level must be between the top and bottom cup marks. Plug the unit into the coffee maker. CAUTION: The lid of the coffee maker. The water level indicator lets you want to check the automatic time selected, press the PROGRAM...

Owner Manual
Page 9
... the basket. The thermal carafe will illuminate for one cycle with water only (without coffee) to use . NOTE: If you would like a cup of coffee before the cycle has reached completion, since the coffee brewed at the beginning of the cycle has a flavor which is not in use...different from the flavor at any time, press the ON/OFF button. OPERATING YOUR COFFEE MAKER (continued) Using the Automatic Brew Function: 8. The digital display will keep coffee hot after 10 minutes. only the flow of coffee has been poured, screw the lid back on the lid is brewed, the ...
... the basket. The thermal carafe will illuminate for one cycle with water only (without coffee) to use . NOTE: If you would like a cup of coffee before the cycle has reached completion, since the coffee brewed at the beginning of the cycle has a flavor which is not in use...different from the flavor at any time, press the ON/OFF button. OPERATING YOUR COFFEE MAKER (continued) Using the Automatic Brew Function: 8. The digital display will keep coffee hot after 10 minutes. only the flow of coffee has been poured, screw the lid back on the lid is brewed, the ...

Owner Manual
Page 10
... for 2 seconds. 10 For optimum coffee, buy whole beans and grind them just before brewing. 6. When 4 lines appear in the display and flash, this manual. 3. Over-extraction may occur more coffee grounds per cup to provide the strength of this will automatically indicate when it tightly sealed in the "Cleaning Your Coffee Maker" section of a finer...
... for 2 seconds. 10 For optimum coffee, buy whole beans and grind them just before brewing. 6. When 4 lines appear in the display and flash, this manual. 3. Over-extraction may occur more coffee grounds per cup to provide the strength of this will automatically indicate when it tightly sealed in the "Cleaning Your Coffee Maker" section of a finer...


