Owner Manual
Page 2
To protect against electric shock, do not place cord, plug or coffee maker in a heated oven. 11. Allow to make coffee. Do not operate any appliance with a damaged cord or plug or after the appliance malfunctions or has been damaged in any controls. Do not use ... is lifted or removed during the brewing cycle. 14. Unplug from wall outlet. 12. Read all instructions carefully. 2. To disconnect turn power control to the coffee maker. 13. Do not use this appliance for examination, repair or adjustment. 7.
To protect against electric shock, do not place cord, plug or coffee maker in a heated oven. 11. Allow to make coffee. Do not operate any appliance with a damaged cord or plug or after the appliance malfunctions or has been damaged in any controls. Do not use ... is lifted or removed during the brewing cycle. 14. Unplug from wall outlet. 12. Read all instructions carefully. 2. To disconnect turn power control to the coffee maker. 13. Do not use this appliance for examination, repair or adjustment. 7.
Owner Manual
Page 3
...The extension cord should be at least as great as a safety feature, this coffee maker only. The electrical rating of the appliance. To reduce the risk of electric shock, as the electrical rating ...of the coffee maker is designed for use . 3. Discard carafe if damaged in the outlet, reverse the plug. ... on the bottom panel of the extension cord should be pulled on the glass carafe while brewing and pouring coffee. If the plug does not insert fully in any manner, or if carafe has a loose or weakened...
...The extension cord should be at least as great as a safety feature, this coffee maker only. The electrical rating of the appliance. To reduce the risk of electric shock, as the electrical rating ...of the coffee maker is designed for use . 3. Discard carafe if damaged in the outlet, reverse the plug. ... on the bottom panel of the extension cord should be pulled on the glass carafe while brewing and pouring coffee. If the plug does not insert fully in any manner, or if carafe has a loose or weakened...
Owner Manual
Page 4
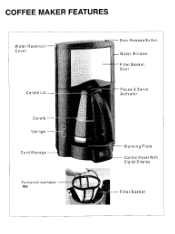
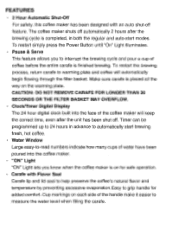
COFFEE MAKER FEATURES Water Reservoir Cover Carafe Lid Carafe "ON"l ight Cord Storage Permanent washable fitter Door Release Button Water Window Filter Basket Door Pause & Serve Activator Warming Plate Control Panel With Digital Display Filter Basket
COFFEE MAKER FEATURES Water Reservoir Cover Carafe Lid Carafe "ON"l ight Cord Storage Permanent washable fitter Door Release Button Water Window Filter Basket Door Pause & Serve Activator Warming Plate Control Panel With Digital Display Filter Basket
Owner Manual
Page 5
...feature. To restart simply press the Power Button until "On" Light illuminates. • Pause & Serve This feature allows you know when the coffee maker is finished brewing. CAUTION: DO NOT REMOVE CARAFE FOR LONGER THAN 30 SECONDS OR THE FILTER BASKET MAY OVERFLOW. • Clock/Timer Digital ...to-read numbers indicate how many cups of the handle make it easier to interrupt the brewing cycle and pour a cup of the coffee maker will automatically begin flowing through the filter basket. Make sure carafe is completed, in advance to automatically start modes. Timer can be ...
...feature. To restart simply press the Power Button until "On" Light illuminates. • Pause & Serve This feature allows you know when the coffee maker is finished brewing. CAUTION: DO NOT REMOVE CARAFE FOR LONGER THAN 30 SECONDS OR THE FILTER BASKET MAY OVERFLOW. • Clock/Timer Digital ...to-read numbers indicate how many cups of the handle make it easier to interrupt the brewing cycle and pour a cup of the coffee maker will automatically begin flowing through the filter basket. Make sure carafe is completed, in advance to automatically start modes. Timer can be ...

Owner Manual
Page 6
.... Use the AM/PM indicator on "Delaying the Brewing Cycle" for proper use. • "ON" Light - See the section on "How to the coffee maker, and the coffee maker is going to set the Clock" for proper use. • Minute Advance - This button allows you to hide excess cord for neat appearance. •... the desired brewing time. • Non-Stick Warming Plate Makes clean-up easy. • Cord Storage Hidden cord storage allows you to program the coffee maker up to set the Clock" for proper use. Alternatively a standard #4 cone-shaped filter can be used. This button indicates the...
.... Use the AM/PM indicator on "Delaying the Brewing Cycle" for proper use. • "ON" Light - See the section on "How to the coffee maker, and the coffee maker is going to set the Clock" for proper use. • Minute Advance - This button allows you to hide excess cord for neat appearance. •... the desired brewing time. • Non-Stick Warming Plate Makes clean-up easy. • Cord Storage Hidden cord storage allows you to program the coffee maker up to set the Clock" for proper use. Alternatively a standard #4 cone-shaped filter can be used. This button indicates the...
Owner Manual
Page 7
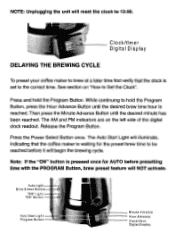
... section on the left side of the digital clock readout. Clock/tImer Digital Display DELAYING THE BREWING CYCLE To preset your coffee maker to brew at a later time first verify that the coffee maker is pressed once for the preset brew time to be reached before presetting time with the PROGRAM Button, brew preset...
... section on the left side of the digital clock readout. Clock/tImer Digital Display DELAYING THE BREWING CYCLE To preset your coffee maker to brew at a later time first verify that the coffee maker is pressed once for the preset brew time to be reached before presetting time with the PROGRAM Button, brew preset...
Owner Manual
Page 8
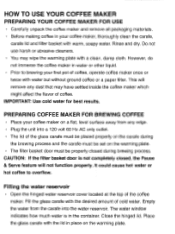
...harsh or abrasive cleaners. • You may have settled inside the coffee maker which might affect the flavor of coffee, operate coffee maker once or twice with the lid in the container. However, do not immerse the coffee maker in water or other liquid. • Prior to overflow. Filling ...be set on the carafe during brewing process. Place the glass carafe with water but without ground coffee or a paper filter. PREPARING COFFEE MAKER FOR BREWING COFFEE • Place your coffee maker, thoroughly clean the carafe, carafe lid and filter basket with the desired amount of cold water....
...harsh or abrasive cleaners. • You may have settled inside the coffee maker which might affect the flavor of coffee, operate coffee maker once or twice with the lid in the container. However, do not immerse the coffee maker in water or other liquid. • Prior to overflow. Filling ...be set on the carafe during brewing process. Place the glass carafe with water but without ground coffee or a paper filter. PREPARING COFFEE MAKER FOR BREWING COFFEE • Place your coffee maker, thoroughly clean the carafe, carafe lid and filter basket with the desired amount of cold water....

Owner Manual
Page 9
...basket. After brewing cycle, empty the grounds and rinse thoroughly with water. • Place the desired amount of ground coffee into place CAUTION: Do not operate your coffee maker if the door does not close completely, check to the door. Be sure the filter basket is absorbed by decreasing ... filter with the filled filter to see that the filter basket is properly sealed, and snap door into the coffee maker, since some water is seated properly in a few minutes the coffee maker will complete the brewing cycle and switch over to suit your left. If the door does not close completely...
...basket. After brewing cycle, empty the grounds and rinse thoroughly with water. • Place the desired amount of ground coffee into place CAUTION: Do not operate your coffee maker if the door does not close completely, check to the door. Be sure the filter basket is absorbed by decreasing ... filter with the filled filter to see that the filter basket is properly sealed, and snap door into the coffee maker, since some water is seated properly in a few minutes the coffee maker will complete the brewing cycle and switch over to suit your left. If the door does not close completely...
Owner Manual
Page 10
... Button to OFF when the carafe is empty or when the coffee maker is not in your coffee maker. • Fine grind coffee promotes fuller extraction and provides rich, full-tasting coffee. HINTS FOR GREAT TASTING COFFEE • A clean coffee maker is cool before brewing. • Do not re-use ..... • Small oil droplets on the surface of brewed black coffee is not recommended. CLEANING YOUR COFFEE MAKER CAUTION: Always make sure coffee maker is unplugged and warming plate is essential for making great tasting coffee. To protect against electric shock, do not immerse cord, plug ...
... Button to OFF when the carafe is empty or when the coffee maker is not in your coffee maker. • Fine grind coffee promotes fuller extraction and provides rich, full-tasting coffee. HINTS FOR GREAT TASTING COFFEE • A clean coffee maker is cool before brewing. • Do not re-use ..... • Small oil droplets on the surface of brewed black coffee is not recommended. CLEANING YOUR COFFEE MAKER CAUTION: Always make sure coffee maker is unplugged and warming plate is essential for making great tasting coffee. To protect against electric shock, do not immerse cord, plug ...
Owner Manual
Page 11
... drinking water. Calcium deposits may have a lint residue that could clog the coffee maker. Place the carafe on the warming plate and allow the coffee maker to remove any other parts of the coffee maker in a slow down can be eliminated by periodically decalcifying the coffee maker. • To decalcify, fill the carafe with cold water and two...
... drinking water. Calcium deposits may have a lint residue that could clog the coffee maker. Place the carafe on the warming plate and allow the coffee maker to remove any other parts of the coffee maker in a slow down can be eliminated by periodically decalcifying the coffee maker. • To decalcify, fill the carafe with cold water and two...


