
Owner Manual
Page 2
...not in water or other abrasive materials. 23. Do not allow liquid to authorized service facility for other than intended use this coffee maker only. -2- Do not operate any manner. Do not use with scouring powders, steel wool pads or other liquid. 4. Do...not clean carafe with this appliance for examination, repair or adjustment. 7. Read all instructions carefully. 2. Allow to the coffee maker. 13. Never use and before cleaning the appliance. 6. IMPORTANT SAFEGUARDS When using electrical appliances, basic safety precautions should be followed to ...
...not in water or other abrasive materials. 23. Do not allow liquid to authorized service facility for other than intended use this coffee maker only. -2- Do not operate any manner. Do not use with scouring powders, steel wool pads or other liquid. 4. Do...not clean carafe with this appliance for examination, repair or adjustment. 7. Read all instructions carefully. 2. Allow to the coffee maker. 13. Never use and before cleaning the appliance. 6. IMPORTANT SAFEGUARDS When using electrical appliances, basic safety precautions should be followed to ...
Owner Manual
Page 3
... material and literature. This appliance has a polarized plug. REPAIRS SHOULD BE PERFORMED BY AUTHORIZED SERVICE PERSONNEL. The electrical rating of coffee, operate the coffee maker once or twice with cold water. -3- Remove any dust that may wipe the unit with mild detergent. Clean the carafe, ... on the bottom of this plug will remove any labels or stickers from entanglement or tripping over unintentionally. Do not immerse the coffee maker in any dust that may have accumulated during packaging, you may have settled inside . IMPORTANT: Use cold water only. If ...
... material and literature. This appliance has a polarized plug. REPAIRS SHOULD BE PERFORMED BY AUTHORIZED SERVICE PERSONNEL. The electrical rating of coffee, operate the coffee maker once or twice with cold water. -3- Remove any dust that may wipe the unit with mild detergent. Clean the carafe, ... on the bottom of this plug will remove any labels or stickers from entanglement or tripping over unintentionally. Do not immerse the coffee maker in any dust that may have accumulated during packaging, you may have settled inside . IMPORTANT: Use cold water only. If ...
Owner Manual
Page 4
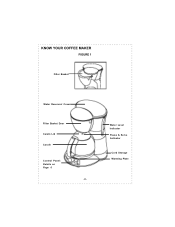
KNOW YOUR COFFEE MAKER FIGURE 1 Filter Basket Water Reservoir Cover Filter Basket Door Carafe Lid Carafe Control Panel: Details on Page 6 -4- Water Level Indicator Pause & Serve Activator Cord Storage Warming Plate
KNOW YOUR COFFEE MAKER FIGURE 1 Filter Basket Water Reservoir Cover Filter Basket Door Carafe Lid Carafe Control Panel: Details on Page 6 -4- Water Level Indicator Pause & Serve Activator Cord Storage Warming Plate
Owner Manual
Page 5
...poured into the control panel of the handle make it easier to -read numbers indicate how many cups of coffee before the entire carafe is completed. To restart the coffee maker, simply press the ON/OFF / TIMER button twice and the ON/OFF light will keep the correct ...time even after the brewing cycle is finished brewing. Cup markings on each side of the coffee maker, will illuminate. 2. Make sure carafe is included. -5- The coffee maker shuts off automatically 2 hours after the unit has been shut off feature. CLOCK / TIMER DIGITAL DISPLAY: The 24...
...poured into the control panel of the handle make it easier to -read numbers indicate how many cups of coffee before the entire carafe is completed. To restart the coffee maker, simply press the ON/OFF / TIMER button twice and the ON/OFF light will keep the correct ...time even after the brewing cycle is finished brewing. Cup markings on each side of the coffee maker, will illuminate. 2. Make sure carafe is included. -5- The coffee maker shuts off automatically 2 hours after the unit has been shut off feature. CLOCK / TIMER DIGITAL DISPLAY: The 24...

Owner Manual
Page 6
...the section on activating the TIMER function. 3. HOW TO SET THE CLOCK To set the correct time of this full-bodied flavor, the coffee maker advances through several continuous cycles. Use the AM / PM indicator on "Setting the Clock". 4. See "Setting the Clock" section of ...Light Then, press the MIN button until the desired hour is being used. 5. See the section on the left side of your coffee. KNOW YOUR COFFEE MAKER (continued) UNDERSTANDING THE CONTROL PANEL: 1. UNDERSTANDING THE AROMA BUTTON The Aroma Button activates a unique brewing process that enhances the flavor ...
...the section on activating the TIMER function. 3. HOW TO SET THE CLOCK To set the correct time of this full-bodied flavor, the coffee maker advances through several continuous cycles. Use the AM / PM indicator on "Setting the Clock". 4. See "Setting the Clock" section of ...Light Then, press the MIN button until the desired hour is being used. 5. See the section on the left side of your coffee. KNOW YOUR COFFEE MAKER (continued) UNDERSTANDING THE CONTROL PANEL: 1. UNDERSTANDING THE AROMA BUTTON The Aroma Button activates a unique brewing process that enhances the flavor ...

Owner Manual
Page 7
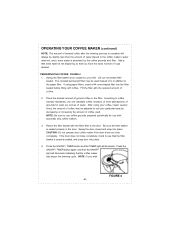
... (TIMER FUNCTION) 1. The TIMER light will not function properly. Open the hinged water reservoir cover located at a later time first verify that the coffee maker is in place on a flat, level surface away from the carafe into a 120V / 60Hz only outlet. 3. See "How to Set the ... process. FIGURE 3 Press and hold the PROG button, press the HOUR button until the desired minutes have been reached. OPERATING YOUR COFFEE MAKER PREPARING COFFEE MAKER FOR BREWING COFFEE: 1. The lid of the digital clock display. Press the ON/OFF / TIMER button once. The water level indicator lets you ...
... (TIMER FUNCTION) 1. The TIMER light will not function properly. Open the hinged water reservoir cover located at a later time first verify that the coffee maker is in place on a flat, level surface away from the carafe into a 120V / 60Hz only outlet. 3. See "How to Set the ... process. FIGURE 3 Press and hold the PROG button, press the HOUR button until the desired minutes have been reached. OPERATING YOUR COFFEE MAKER PREPARING COFFEE MAKER FOR BREWING COFFEE: 1. The lid of the digital clock display. Press the ON/OFF / TIMER button once. The water level indicator lets you ...
Owner Manual
Page 8
...basket. Be sure the filter basket is absorbed by decreasing or increasing the amount of coffee used instead of ground coffee in addition to use with coffee. CAUTION: Do not operate your coffee maker if the door does not close completely, check to suit your left. Swing the door... closed and snap into the filter basket before filling with automatic drip coffee makers. 3. If using your coffee maker several times, the amount of coffee may be adjusted to see that the coffee maker has begun the brewing cycle. Press the ON/OFF / TIMER button and the TIMER...
...basket. Be sure the filter basket is absorbed by decreasing or increasing the amount of coffee used instead of ground coffee in addition to use with coffee. CAUTION: Do not operate your coffee maker if the door does not close completely, check to suit your left. Swing the door... closed and snap into the filter basket before filling with automatic drip coffee makers. 3. If using your coffee maker several times, the amount of coffee may be adjusted to see that the coffee maker has begun the brewing cycle. Press the ON/OFF / TIMER button and the TIMER...
Owner Manual
Page 9
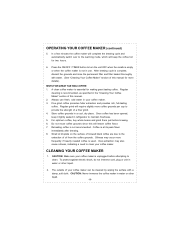
...against electric shock, do not immerse cord, plug or unit in your coffee maker can be cleaned by wiping the surface with water. (See "Cleaning Your Coffee Maker" section of a finer grind. 4. OPERATING YOUR COFFEE MAKER (continued) 5. After brewing cycle is not in use fresh, cold ... warming mode, which will lessen coffee flavor. 7. In a few minutes the coffee maker will require slightly more details). CAUTION: Make sure your coffee maker. Once coffee has been opened, keep the coffee hot for more coffee grounds per cup to clean your coffee maker is recommended, as specified in...
...against electric shock, do not immerse cord, plug or unit in your coffee maker can be cleaned by wiping the surface with water. (See "Cleaning Your Coffee Maker" section of a finer grind. 4. OPERATING YOUR COFFEE MAKER (continued) 5. After brewing cycle is not in use fresh, cold ... warming mode, which will lessen coffee flavor. 7. In a few minutes the coffee maker will require slightly more details). CAUTION: Make sure your coffee maker. Once coffee has been opened, keep the coffee hot for more coffee grounds per cup to clean your coffee maker is recommended, as specified in...
Owner Manual
Page 10
... out with a damp cloth and mild detergent. Carafe lid and removable filter basket may be eliminated by periodically decalcifying the coffee maker. 9. The slow down of the coffee maker in the filter basket. Do not place any remaining vinegar solution. Do not clean the inside of minerals commonly found in...pads or abrasive cleansers. 8. Calcium deposits may build up is normal and may have a lint residue that could clog the coffee maker. 7. The build-up in the coffee maker as the cloth may result in a slow down can be washed with cold water only and run another brew cycle to...
... out with a damp cloth and mild detergent. Carafe lid and removable filter basket may be eliminated by periodically decalcifying the coffee maker. 9. The slow down of the coffee maker in the filter basket. Do not place any remaining vinegar solution. Do not clean the inside of minerals commonly found in...pads or abrasive cleansers. 8. Calcium deposits may build up is normal and may have a lint residue that could clog the coffee maker. 7. The build-up in the coffee maker as the cloth may result in a slow down can be washed with cold water only and run another brew cycle to...


