
Owner Manual
Page 2
... to authorized service facility for use this coffee maker only. -2- Never use outdoors. 9. Use the lid on the carafe. 3. Discard carafe if damaged in heated oven. 11. Use the handle on the glass carafe while brewing and pouring coffee. 21. Return appliance to cool before ...When using electrical appliances, basic safety precautions should be followed to the coffee maker. 13. Close supervision is necessary when any manner. To protect against electrical shock, do not place cord, plug or coffee maker in any appliance is lifted or removed during the brewing cycle. 14....
... to authorized service facility for use this coffee maker only. -2- Never use outdoors. 9. Use the lid on the carafe. 3. Discard carafe if damaged in heated oven. 11. Use the handle on the glass carafe while brewing and pouring coffee. 21. Return appliance to cool before ...When using electrical appliances, basic safety precautions should be followed to the coffee maker. 13. Close supervision is necessary when any manner. To protect against electrical shock, do not place cord, plug or coffee maker in any appliance is lifted or removed during the brewing cycle. 14....
Owner Manual
Page 3
...modify the plug in their use harsh or abrasive cleaners. (See "Cleaning Your Coffee Maker" section of the appliance is provided to brewing your coffee maker and remove all plastic bags away from the coffee maker. REPAIRS SHOULD BE PERFORMED BY AUTHORIZED SERVICE PERSONNEL. BEFORE FIRST USE Place the ...be arranged so that may have accumulated during packaging, you may wipe the unit with mild detergent. To reduce the risk of coffee, operate the coffee maker once or twice with cold water. -3- Rinse and dry thoroughly. If a longer detacahable power cord or extension cord is ...
...modify the plug in their use harsh or abrasive cleaners. (See "Cleaning Your Coffee Maker" section of the appliance is provided to brewing your coffee maker and remove all plastic bags away from the coffee maker. REPAIRS SHOULD BE PERFORMED BY AUTHORIZED SERVICE PERSONNEL. BEFORE FIRST USE Place the ...be arranged so that may have accumulated during packaging, you may wipe the unit with mild detergent. To reduce the risk of coffee, operate the coffee maker once or twice with cold water. -3- Rinse and dry thoroughly. If a longer detacahable power cord or extension cord is ...
Owner Manual
Page 4
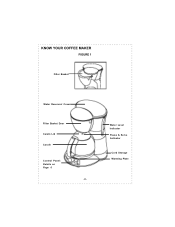
Water Level Indicator Pause & Serve Activator Cord Storage Warming Plate KNOW YOUR COFFEE MAKER FIGURE 1 Filter Basket Water Reservoir Cover Filter Basket Door Carafe Lid Carafe Control Panel: Details on Page 6 -4-
Water Level Indicator Pause & Serve Activator Cord Storage Warming Plate KNOW YOUR COFFEE MAKER FIGURE 1 Filter Basket Water Reservoir Cover Filter Basket Door Carafe Lid Carafe Control Panel: Details on Page 6 -4-
Owner Manual
Page 5
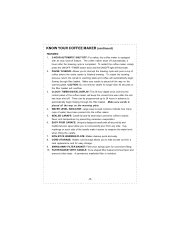
...filter basket. To restart the brewing process, return the carafe to warming plate and coffee will illuminate. 2. CAUTION: Do not remove carafe for convenient filling. 10. Cup markings on each side of the coffee maker, will overflow. 3. NON-STICK WARMING PLATE: Makes cleanup quick and easy. ...cup of water have been poured into the control panel of the handle make it easier to preserve coffee's natural flavor and temperature by preventing excessive evaporation. 6. The coffee maker shuts off automatically 2 hours after the unit has been shut off feature. Make sure carafe is ...
...filter basket. To restart the brewing process, return the carafe to warming plate and coffee will illuminate. 2. CAUTION: Do not remove carafe for convenient filling. 10. Cup markings on each side of the coffee maker, will overflow. 3. NON-STICK WARMING PLATE: Makes cleanup quick and easy. ...cup of water have been poured into the control panel of the handle make it easier to preserve coffee's natural flavor and temperature by preventing excessive evaporation. 6. The coffee maker shuts off automatically 2 hours after the unit has been shut off feature. Make sure carafe is ...

Owner Manual
Page 6
.... 3. This special time-released process saturates coffee grounds a little a time to extract the best flavor and aroma from your coffee. During the cycles, water is doubled. PROG BUTTON: This button allows you to program the coffee maker up to 12:00. HOUR AND MIN BUTTONS...To set the correct time of this full-bodied flavor, the coffee maker advances through several continuous cycles. KNOW YOUR COFFEE MAKER (continued) UNDERSTANDING THE CONTROL PANEL: 1. See the section on the left side of your coffee. UNDERSTANDING THE AROMA BUTTON The Aroma Button activates a unique ...
.... 3. This special time-released process saturates coffee grounds a little a time to extract the best flavor and aroma from your coffee. During the cycles, water is doubled. PROG BUTTON: This button allows you to program the coffee maker up to 12:00. HOUR AND MIN BUTTONS...To set the correct time of this full-bodied flavor, the coffee maker advances through several continuous cycles. KNOW YOUR COFFEE MAKER (continued) UNDERSTANDING THE CONTROL PANEL: 1. See the section on the left side of your coffee. UNDERSTANDING THE AROMA BUTTON The Aroma Button activates a unique ...

Owner Manual
Page 7
Continuing to use the AROMA function, press the AROMA button immediately after TIMER light is waiting for details. 2. OPERATING YOUR COFFEE MAKER PREPARING COFFEE MAKER FOR BREWING COFFEE: 1. And the carafe must be fitted properly during the brewing process. The filter basket door must be set to Set...to brew at the top of cold water. The water level indicator lets you wish to hold the PROG button. To preset your coffee maker to be properly closed , the Pause 'N Serve feature will not activate. The TIMER light will illuminate indicating that the clock is ...
Continuing to use the AROMA function, press the AROMA button immediately after TIMER light is waiting for details. 2. OPERATING YOUR COFFEE MAKER PREPARING COFFEE MAKER FOR BREWING COFFEE: 1. And the carafe must be fitted properly during the brewing process. The filter basket door must be set to Set...to brew at the top of cold water. The water level indicator lets you wish to hold the PROG button. To preset your coffee maker to be properly closed , the Pause 'N Serve feature will not activate. The TIMER light will illuminate indicating that the clock is ...
Owner Manual
Page 8
...#4 cone-shaped filter into place. If using your coffee maker several times, the amount of coffee may be used . Swing the door closed and snap into the filter basket before filling with the filled filter to see that the coffee maker has begun the brewing cycle. The included permanent filter ...may be slightly less than the amount of or in the coffee maker's water reservoir, since some water is seated properly in the filter. ...
...#4 cone-shaped filter into place. If using your coffee maker several times, the amount of coffee may be used . Swing the door closed and snap into the filter basket before filling with the filled filter to see that the coffee maker has begun the brewing cycle. The included permanent filter ...may be slightly less than the amount of or in the coffee maker's water reservoir, since some water is seated properly in the filter. ...
Owner Manual
Page 9
.... Regular cleaning is used. Store coffee grounds in the "Cleaning Your Coffee Maker" section of your coffee maker. 3. CLEANING YOUR COFFEE MAKER 1. CAUTION: Make sure your coffee maker. Fine grind coffee promotes fuller extraction and provides rich, full-tasting coffee. CAUTION: Never immerse the coffee maker in water or other liquid. -9- Regular grind will lessen coffee flavor. 7. Reheating coffee is at its peak flavor immediately...
.... Regular cleaning is used. Store coffee grounds in the "Cleaning Your Coffee Maker" section of your coffee maker. 3. CLEANING YOUR COFFEE MAKER 1. CAUTION: Make sure your coffee maker. Fine grind coffee promotes fuller extraction and provides rich, full-tasting coffee. CAUTION: Never immerse the coffee maker in water or other liquid. -9- Regular grind will lessen coffee flavor. 7. Reheating coffee is at its peak flavor immediately...
Owner Manual
Page 10
... reservoir with warm, soapy water or placed in the top rack of minerals commonly found in the coffee maker as the cloth may have a lint residue that could clog the coffee maker. 7. Repeat if necessary. -10- For stubborn stains, use harsh abrasives or scouring pads on the... run another brew cycle to brew the vinegar solution. While decalcifying, do not use metal scouring pads or abrasive cleansers. 8. CLEANING YOUR COFFEE MAKER (continued) 3. To clean the permanent filter, empty the grounds and rinse thoroughly. 6. Carafe lid and removable filter basket may result in...
... reservoir with warm, soapy water or placed in the top rack of minerals commonly found in the coffee maker as the cloth may have a lint residue that could clog the coffee maker. 7. Repeat if necessary. -10- For stubborn stains, use harsh abrasives or scouring pads on the... run another brew cycle to brew the vinegar solution. While decalcifying, do not use metal scouring pads or abrasive cleansers. 8. CLEANING YOUR COFFEE MAKER (continued) 3. To clean the permanent filter, empty the grounds and rinse thoroughly. 6. Carafe lid and removable filter basket may result in...


