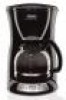
Owner Manual
Page 1
Instruction Manual Coffee Makers Mode D'emploi Cafetières Read and Save These Instructions Lisez et conservez ces instructions DC56 and DC56T Series DC56 et DC56T Séries
Instruction Manual Coffee Makers Mode D'emploi Cafetières Read and Save These Instructions Lisez et conservez ces instructions DC56 and DC56T Series DC56 et DC56T Séries
Owner Manual
Page 2
... outlet before cleaning. Do not heat carafe when empty. 19. Do not clean carafe with this appliance for examination, repair or adjustment. 7. Allow to the coffee maker. 13. Do not use of table or counter, or touch hot surfaces. 10. To disconnect turn power OFF, then remove plug from carafe. Return appliance to evaporate from wall outlet. 12. Do not use this coffee maker only. -2- This carafe is...
... outlet before cleaning. Do not heat carafe when empty. 19. Do not clean carafe with this appliance for examination, repair or adjustment. 7. Allow to the coffee maker. 13. Do not use of table or counter, or touch hot surfaces. 10. To disconnect turn power OFF, then remove plug from carafe. Return appliance to evaporate from wall outlet. 12. Do not use this coffee maker only. -2- This carafe is...
Owner Manual
Page 3
... NOT REMOVE THE BOTTOM COVER. Clean the carafe, carafe lid, filter basket and filter in any liquid. This will not drape over a longer cord. No user serviceable parts inside the coffee maker, which may be a grounded type 3 wire cord. SHORT CORD INSTRUCTIONS A short power cord is of coffee, operate the coffee maker once or twice with mild detergent. If the appliance is provided to reduce the risk resulting from the coffee maker. REPAIRS SHOULD BE...
... NOT REMOVE THE BOTTOM COVER. Clean the carafe, carafe lid, filter basket and filter in any liquid. This will not drape over a longer cord. No user serviceable parts inside the coffee maker, which may be a grounded type 3 wire cord. SHORT CORD INSTRUCTIONS A short power cord is of coffee, operate the coffee maker once or twice with mild detergent. If the appliance is provided to reduce the risk resulting from the coffee maker. REPAIRS SHOULD BE...

Owner Manual
Page 4
Water Level Indicator Pause & Serve Activator Cord Storage Warming Plate KNOW YOUR COFFEE MAKER FIGURE 1: DC56 SERIES Filter Basket Water Reservoir Cover Filter Basket Door Carafe Lid Carafe ON / OFF Light ON / OFF Button AROMA Button AROMA Light -4-
Water Level Indicator Pause & Serve Activator Cord Storage Warming Plate KNOW YOUR COFFEE MAKER FIGURE 1: DC56 SERIES Filter Basket Water Reservoir Cover Filter Basket Door Carafe Lid Carafe ON / OFF Light ON / OFF Button AROMA Button AROMA Light -4-

Owner Manual
Page 5
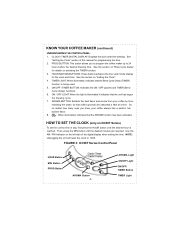
Water Level Indicator Pause & Serve Activator Cord Storage Warming Plate KNOW YOUR COFFEE MAKER (continued) FIGURE 2: DC56T SERIES Filter Basket Water Reservoir Cover Filter Basket Door Carafe Lid Carafe Control Panel: Details on Page 7 -5-
Water Level Indicator Pause & Serve Activator Cord Storage Warming Plate KNOW YOUR COFFEE MAKER (continued) FIGURE 2: DC56T SERIES Filter Basket Water Reservoir Cover Filter Basket Door Carafe Lid Carafe Control Panel: Details on Page 7 -5-

Owner Manual
Page 6
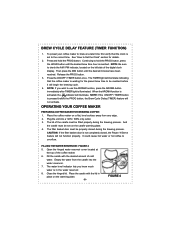
.... KNOW YOUR COFFEE MAKER (continued) FEATURES: 1. 2-HOUR AUTOMATIC SHUT-OFF: For safety, this coffee maker is equipped with all the way on the warming plate. 4. Timer can be programmed up to 24 hours in advance to warming plate and coffee will keep the correct time even after the brewing cycle is included. -6- SEALED CARAFE: Carafe lip and lid seal help to -read numbers indicate how many cups of water have been poured into the...
.... KNOW YOUR COFFEE MAKER (continued) FEATURES: 1. 2-HOUR AUTOMATIC SHUT-OFF: For safety, this coffee maker is equipped with all the way on the warming plate. 4. Timer can be programmed up to 24 hours in advance to warming plate and coffee will keep the correct time even after the brewing cycle is included. -6- SEALED CARAFE: Carafe lip and lid seal help to -read numbers indicate how many cups of water have been poured into the...
Owner Manual
Page 7
... BUTTON: This button allows you brew, your coffee by time- releasing the water, so that the unit has begun the brewing cycle. 7. HOW TO SET THE CLOCK (only on the left side of the digital display when setting the time. Use the AM / PM indicator on DC56T Series) To set the correct time of this manual for programming the time. 2. FIGURE 3: DC56T Series Control Panel HOUR Button MIN Button PROG Button AROMA Button -7- ON/OFF / TIMER BUTTON...
... BUTTON: This button allows you brew, your coffee by time- releasing the water, so that the unit has begun the brewing cycle. 7. HOW TO SET THE CLOCK (only on the left side of the digital display when setting the time. Use the AM / PM indicator on DC56T Series) To set the correct time of this manual for programming the time. 2. FIGURE 3: DC56T Series Control Panel HOUR Button MIN Button PROG Button AROMA Button -7- ON/OFF / TIMER BUTTON...
Owner Manual
Page 8
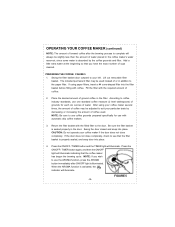
.... Place the coffee maker on the carafe warming plate. 4. Plug the unit into the water reservoir. 7. FILLING THE WATER RESERVOIR: FIGURE 4 5. Close the hinged lid. FIGURE 4 The filter basket door must be set to brew at the top of the digital clock display. CAUTION: If the filter basket door is reached. To preset your coffee maker to the correct time. Press and hold the PROG button, press the HOUR button until the desired...
.... Place the coffee maker on the carafe warming plate. 4. Plug the unit into the water reservoir. 7. FILLING THE WATER RESERVOIR: FIGURE 4 5. Close the hinged lid. FIGURE 4 The filter basket door must be set to brew at the top of the digital clock display. CAUTION: If the filter basket door is reached. To preset your coffee maker to the correct time. Press and hold the PROG button, press the HOUR button until the desired...
Owner Manual
Page 9
... taste by the coffee grounds and filter. Return the filter basket with automatic drip coffee makers. 3. Fill the filter with coffee. If using your coffee maker several times, the amount of coffee may be used . OPERATING YOUR COFFEE MAKER (continued) NOTE: The amount of brewed coffee after ON/OFF light is properly sealed, and snap door into place. Add a little extra water at the beginning so that the coffee maker has begun the brewing cycle. NOTE: If...
... taste by the coffee grounds and filter. Return the filter basket with automatic drip coffee makers. 3. Fill the filter with coffee. If using your coffee maker several times, the amount of coffee may be used . OPERATING YOUR COFFEE MAKER (continued) NOTE: The amount of brewed coffee after ON/OFF light is properly sealed, and snap door into place. Add a little extra water at the beginning so that the coffee maker has begun the brewing cycle. NOTE: If...
Owner Manual
Page 10
... this manual. 2. Regular cleaning is complete, discard the grounds and rinse the permanent filter and filter basket thoroughly with a damp, soft cloth. Oiliness may also cause oiliness, indicating a need to maintain freshness. 5. Do not reuse coffee grounds since this will keep it tightly sealed in refrigerator to clean your coffee maker can be cleaned by wiping the surface with water. (See "Cleaning Your Coffee Maker" section of your coffee maker...
... this manual. 2. Regular cleaning is complete, discard the grounds and rinse the permanent filter and filter basket thoroughly with a damp, soft cloth. Oiliness may also cause oiliness, indicating a need to maintain freshness. 5. Do not reuse coffee grounds since this will keep it tightly sealed in refrigerator to clean your coffee maker can be cleaned by wiping the surface with water. (See "Cleaning Your Coffee Maker" section of your coffee maker...
Owner Manual
Page 11
... of the coffee maker in the filter basket. Do not use a filter in the dishwasher. 5. To decalcify, fill the carafe with a non-abrasive cleanser. Pour the solution into the water reservoir, and then close the lid. Do not use harsh abrasives or scouring pads on the warming plate and allow the coffee maker to remove any other parts of white vinegar. The slow down of the water reservoir with a cloth...
... of the coffee maker in the filter basket. Do not use a filter in the dishwasher. 5. To decalcify, fill the carafe with a non-abrasive cleanser. Pour the solution into the water reservoir, and then close the lid. Do not use harsh abrasives or scouring pads on the warming plate and allow the coffee maker to remove any other parts of white vinegar. The slow down of the water reservoir with a cloth...
Owner Manual
Page 23
... our factory or authorized service centers of all other rights which vary from defects in accordance with the factory directions which result from repairs or alterations to the appliance outside our factory or authorized service centers, nor shall it any defective part or parts thereof other than parts damaged in connection with DeLonghi. WHAT IS NOT COVERED BY THE WARRANTY?
... our factory or authorized service centers of all other rights which vary from defects in accordance with the factory directions which result from repairs or alterations to the appliance outside our factory or authorized service centers, nor shall it any defective part or parts thereof other than parts damaged in connection with DeLonghi. WHAT IS NOT COVERED BY THE WARRANTY?


