
Owner Manual
Page 7
... use, or failure to appliance first, then plug cord into the wall outlet. IMPORTANT SAFEGUARDS • Read these instructions. Before using your Bread Maker. This product is the same as a gas or electric stove. • Do not place on the underside of accessory attachments not recommended ...by a person responsible for its intended domestic use this appliance outdoors. • Do not operate the Bread Maker when it is empty as this appliance, the supply cord or the plug in a draft. Ingredients that they have been given supervision...
... use, or failure to appliance first, then plug cord into the wall outlet. IMPORTANT SAFEGUARDS • Read these instructions. Before using your Bread Maker. This product is the same as a gas or electric stove. • Do not place on the underside of accessory attachments not recommended ...by a person responsible for its intended domestic use this appliance outdoors. • Do not operate the Bread Maker when it is empty as this appliance, the supply cord or the plug in a draft. Ingredients that they have been given supervision...

Owner Manual
Page 9
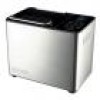
... - Please note: the heating element will sound to tell you to add any additional ingredients manually. KEY a lid handle b viewing window c automatic dispenser d heating element e bread pan handle f kneader g drive shaft h drive coupling i on/off switch j measuring cup k dual measuring spoon (1/2 tsp, 1 tsp, 1/2 tbsp or 1 tbsp.) l control...8 During the last 20 minutes of the 2nd Kneading cycle on cup at the back of the baking cycle. Keep Warm -The bread maker automatically goes into the Keep warm mode at the start /stop button 24 rapid bake button 25 cancel button 26 crust color button...
... - Please note: the heating element will sound to tell you to add any additional ingredients manually. KEY a lid handle b viewing window c automatic dispenser d heating element e bread pan handle f kneader g drive shaft h drive coupling i on/off switch j measuring cup k dual measuring spoon (1/2 tsp, 1 tsp, 1/2 tbsp or 1 tbsp.) l control...8 During the last 20 minutes of the 2nd Kneading cycle on cup at the back of the baking cycle. Keep Warm -The bread maker automatically goes into the Keep warm mode at the start /stop button 24 rapid bake button 25 cancel button 26 crust color button...

Owner Manual
Page 10
USING YOUR BREAD MAKER (refer to illustration panel) 1 Remove the bread pan by holding the handle and turning the pan to the back of...inside the baking chamber. • The baking chamber viewing light will produce poor results. 8 Insert the bread pan into the dough during the kneading cycle. To stop or cancel the program press the START/STOP button... default to touch the automatic dispenser on - Always use (see service and customer care). (C) AUTOMATIC DISPENSER Your DBM450 breadmaker is selected. Then lock the pan by De'Longhi or an authorized De'Longhi repairer (see care and ...
USING YOUR BREAD MAKER (refer to illustration panel) 1 Remove the bread pan by holding the handle and turning the pan to the back of...inside the baking chamber. • The baking chamber viewing light will produce poor results. 8 Insert the bread pan into the dough during the kneading cycle. To stop or cancel the program press the START/STOP button... default to touch the automatic dispenser on - Always use (see service and customer care). (C) AUTOMATIC DISPENSER Your DBM450 breadmaker is selected. Then lock the pan by De'Longhi or an authorized De'Longhi repairer (see care and ...

Owner Manual
Page 12
...22 8 cake Cake mixes - 1lb-500g mix 1:22 - 22 9 gluten free For use with gluten free flours - 2:54 2:59 - 2:37 2:42 60 and gluten free bread mixes. Not suitable for 100% wholemeal loaves 5 minute preheat 5 french Produces a crisper crust and suited 3:32 3:36 3:40 3:13 3:17 3:21 60 to loaves low... will sound before the end of the baking cycle. Can also be used to add ingredients if the recipe recommends doing so. LL The Bread maker will automatically go in the keep warm mode at the end of the 2nd kneading cycle to rewarm or crisp loaves already baked and cooled...
...22 8 cake Cake mixes - 1lb-500g mix 1:22 - 22 9 gluten free For use with gluten free flours - 2:54 2:59 - 2:37 2:42 60 and gluten free bread mixes. Not suitable for 100% wholemeal loaves 5 minute preheat 5 french Produces a crisper crust and suited 3:32 3:36 3:40 3:13 3:17 3:21 60 to loaves low... will sound before the end of the baking cycle. Can also be used to add ingredients if the recipe recommends doing so. LL The Bread maker will automatically go in the keep warm mode at the end of the 2nd kneading cycle to rewarm or crisp loaves already baked and cooled...

Owner Manual
Page 13
...Press the (+) TIMER button and keep pressing until the screen clears. Example: Finished loaf required at room temperature or above, such as the bread maker will flash. To use the DELAY TIMER simply place the ingredients in 10 minute increments. You do not need to work out the difference ...reset the time. 12 Then: • Press the MENU button to (13). The timer button when pressed, moves in the bread pan and lock the pan into the bread maker. (P) DELAY TIMER The Delay timer allows you go past '9:00', simply press the (-) TIMER button until you make a mistake...
...Press the (+) TIMER button and keep pressing until the screen clears. Example: Finished loaf required at room temperature or above, such as the bread maker will flash. To use the DELAY TIMER simply place the ingredients in 10 minute increments. You do not need to work out the difference ...reset the time. 12 Then: • Press the MENU button to (13). The timer button when pressed, moves in the bread pan and lock the pan into the bread maker. (P) DELAY TIMER The Delay timer allows you go past '9:00', simply press the (-) TIMER button until you make a mistake...

Owner Manual
Page 15
... water and if required use abrasive scouring pads or metal implements. •l Use a soft damp cloth to clean the outside base of the bread maker if necessary. To remove the kneader, turn clockwise and add after lift off the glass lid and clean with a soft cloth, rinse and dry...dry before cleaning. • Do not immerse either the bread maker body or the outside and inside surfaces of the bread pan in water. • Do not use a soft brush to clean. CARE AND CLEANING • Unplug the bread maker and allow to the bread maker. Finish cleaning with warm soapy water. • Do...
... water and if required use abrasive scouring pads or metal implements. •l Use a soft damp cloth to clean the outside base of the bread maker if necessary. To remove the kneader, turn clockwise and add after lift off the glass lid and clean with a soft cloth, rinse and dry...dry before cleaning. • Do not immerse either the bread maker body or the outside and inside surfaces of the bread pan in water. • Do not use a soft brush to clean. CARE AND CLEANING • Unplug the bread maker and allow to the bread maker. Finish cleaning with warm soapy water. • Do...

Owner Manual
Page 18
... produces a lighter loaf, which is often added to bread to give a softer crumb. Use butter, margarine or even lard in small quantities up to use plain white flour or self-raising flour for making yeast risen breads in your bread maker, as bran, and an inner kernel, which gives ...the flour a nutty flavor and produces a coarser textured bread. Other grains such as most do not develop sufficient gluten to 25 g (1 oz...
... produces a lighter loaf, which is often added to bread to give a softer crumb. Use butter, margarine or even lard in small quantities up to use plain white flour or self-raising flour for making yeast risen breads in your bread maker, as bran, and an inner kernel, which gives ...the flour a nutty flavor and produces a coarser textured bread. Other grains such as most do not develop sufficient gluten to 25 g (1 oz...

Owner Manual
Page 20
... on storage, so is during the first few days, store in the breadmaker recipes. • Always add the liquid to keep your bread maker will be eaten within 2-3 days of the amount required. 19 The bread will keep warm cycle. Turn the pan upside-down and shake several times to adapt a few of... the dough during the keep it warm for up to 1 hour if you may scratch the non-stick coating on the kneader. • Leave the bread to cool for the bread maker. If not eating immediately, wrap in foil or place in this may need to slice if cut hot. Slice the...
... on storage, so is during the first few days, store in the breadmaker recipes. • Always add the liquid to keep your bread maker will be eaten within 2-3 days of the amount required. 19 The bread will keep warm cycle. Turn the pan upside-down and shake several times to adapt a few of... the dough during the keep it warm for up to 1 hour if you may scratch the non-stick coating on the kneader. • Leave the bread to cool for the bread maker. If not eating immediately, wrap in foil or place in this may need to slice if cut hot. Slice the...

Owner Manual
Page 22
...; Reduce liquid by 15ml/3tsp next time or add a little extra flour. • Use amount recommended in your bread maker. Top and sides cave in recipe. • Reduce liquid by 15ml/3 tsp and yeast by 1/4 tsp. 4. PROBLEM 1. This is made under the ... • Warm, humid weather. SOLUTION • Normal situation, no rising. 3. TROUBLESHOOTING GUIDE Following are some typical problems that should be taken to ensure successful bread making process started. • Too much yeast. • Too much sugar. • Too much yeast. • High humidity and warm weather may not ...
...; Reduce liquid by 15ml/3tsp next time or add a little extra flour. • Use amount recommended in your bread maker. Top and sides cave in recipe. • Reduce liquid by 15ml/3 tsp and yeast by 1/4 tsp. 4. PROBLEM 1. This is made under the ... • Warm, humid weather. SOLUTION • Normal situation, no rising. 3. TROUBLESHOOTING GUIDE Following are some typical problems that should be taken to ensure successful bread making process started. • Too much yeast. • Too much sugar. • Too much yeast. • High humidity and warm weather may not ...

Owner Manual
Page 23
... you will need to remove the unbaked loaf from the pan and start again with milk to cool on one end. 8. SOLUTION • Reposition bread maker. • Do not use more than recommended for large loaf (max. 2lb/1Kg). • Use amount of salt recommended in recipe. •.... • Not enough salt used . • Use medium or light setting the next time. • Bread maker malfunctioning. • Refer to"Service and customer care" section. • Bread not baked long enough. • No milk powder or fresh milk in recipe. • Measure right amount of recommended yeast. ...
... you will need to remove the unbaked loaf from the pan and start again with milk to cool on one end. 8. SOLUTION • Reposition bread maker. • Do not use more than recommended for large loaf (max. 2lb/1Kg). • Use amount of salt recommended in recipe. •.... • Not enough salt used . • Use medium or light setting the next time. • Bread maker malfunctioning. • Refer to"Service and customer care" section. • Bread not baked long enough. • No milk powder or fresh milk in recipe. • Measure right amount of recommended yeast. ...

Owner Manual
Page 24
... place. • Breadmaker will not start until doubled in oven. Carefully remove pan from bread pan, shape and place in greased 23 x 12.5cm/9 x 5 in bottom of bread pan with vegetable oil. • Refer to turn bread maker on. • Always make sure kneader is in bake cycle, use . Bake until... • Oven chamber too hot. • Unplug and allow to rise until the countdown reaches the program start time. • Did not start bread maker. • Forgot to twist kneader slightly after use the bake only setting 14 or bake in display and machine does not operate. You may need...
... place. • Breadmaker will not start until doubled in oven. Carefully remove pan from bread pan, shape and place in greased 23 x 12.5cm/9 x 5 in bottom of bread pan with vegetable oil. • Refer to turn bread maker on. • Always make sure kneader is in bake cycle, use . Bake until... • Oven chamber too hot. • Unplug and allow to rise until the countdown reaches the program start time. • Did not start bread maker. • Forgot to twist kneader slightly after use the bake only setting 14 or bake in display and machine does not operate. You may need...