Owner Manual
Page 2
... shock and/or personal injury. 1. Allow hot liquids to authorized service facility for other liquid. 3. Only operate the blender with appliance plugged in any controls. To protect against electrical shock, do not touch blade assembly, interfere with blade movement...Do not use . 13. IMPORTANT SAFEGUARDS When using electrical appliances, basic safety precautions should be avoided. 7. Never leave your blender unattended while running. 18. Do not use this appliance for examination, repair or adjustment. 6. Return appliance to cool before cleaning...
... shock and/or personal injury. 1. Allow hot liquids to authorized service facility for other liquid. 3. Only operate the blender with appliance plugged in any controls. To protect against electrical shock, do not touch blade assembly, interfere with blade movement...Do not use . 13. IMPORTANT SAFEGUARDS When using electrical appliances, basic safety precautions should be avoided. 7. Never leave your blender unattended while running. 18. Do not use this appliance for examination, repair or adjustment. 6. Return appliance to cool before cleaning...
Owner Manual
Page 3
...are available and may wipe the base with wet hands. If the appliance is listed on the bottom of your blender and remove all plastic bags away from the blender. Do not attempt to reduce the risk resulting from entanglement or tripping over a longer cord. Carefully clean the ...SHOULD BE DONE ONLY BY AUTHORIZED PERSONNEL.. Remove any dust that it will fit in their use harsh or abrasive cleaners. (See "Cleaning Your Blender" section of the grounded type, the extension cord should be placed in water. 26. Dry thoroughly. Rinse and dry thoroughly. Never immerse the ...
...are available and may wipe the base with wet hands. If the appliance is listed on the bottom of your blender and remove all plastic bags away from the blender. Do not attempt to reduce the risk resulting from entanglement or tripping over a longer cord. Carefully clean the ...SHOULD BE DONE ONLY BY AUTHORIZED PERSONNEL.. Remove any dust that it will fit in their use harsh or abrasive cleaners. (See "Cleaning Your Blender" section of the grounded type, the extension cord should be placed in water. 26. Dry thoroughly. Rinse and dry thoroughly. Never immerse the ...
Owner Manual
Page 4
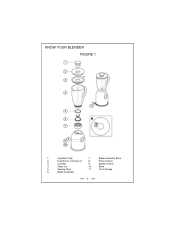
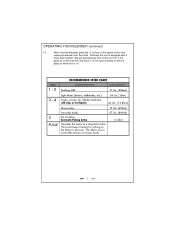
Dual Action Locking Lid 8. Pulse Control 3. Ingredient Cap 7. Speed Control 4. Cord Storage 6. Blade Assembly Base 2. Lid Seal 9. Sealing Ring 11. KNOW YOUR BLENDER FIGURE 1 1. Glass Jar 10. Blade Assembly 4 Base 5.
Dual Action Locking Lid 8. Pulse Control 3. Ingredient Cap 7. Speed Control 4. Cord Storage 6. Blade Assembly Base 2. Lid Seal 9. Sealing Ring 11. KNOW YOUR BLENDER FIGURE 1 1. Glass Jar 10. Blade Assembly 4 Base 5.
Owner Manual
Page 5
...during blending. 4. DUAL SAFE SYSTEM: A De'Longhi exclusive, this unique function will slide and lock into place, just like professional blenders. 7. CORD STORAGE: For easy and convenient storage. 3. BRUSHED DIE-CAST ALUMINUM BASE: Heavy-duty base ensures maximum stability, and ...: Illuminated soft-touch controls are easy-to the selected speed for all blending tasks. 6. KNOW YOUR BLENDER (continued) FEATURES: 1. SOFT START FEATURE: Automatically starts the blender at a lower speed to prevent splattering, then quickly increases to -use and guarantee the perfect speed...
...during blending. 4. DUAL SAFE SYSTEM: A De'Longhi exclusive, this unique function will slide and lock into place, just like professional blenders. 7. CORD STORAGE: For easy and convenient storage. 3. BRUSHED DIE-CAST ALUMINUM BASE: Heavy-duty base ensures maximum stability, and ...: Illuminated soft-touch controls are easy-to the selected speed for all blending tasks. 6. KNOW YOUR BLENDER (continued) FEATURES: 1. SOFT START FEATURE: Automatically starts the blender at a lower speed to prevent splattering, then quickly increases to -use and guarantee the perfect speed...
Owner Manual
Page 6
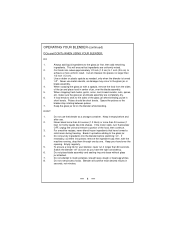
... lid and ingredient cap and continue blending, if necessary. Make sure spatula is placed completely under the rim of various foods. 11. OPERATING YOUR BLENDER 1. Fit and lock the ingredient cap by turning it one position. 6. a) Unlocked: To remove the ingredient cap. Push the lid seal into... motor keeps running for maximum efficiency. 12. To crush ice select the maximum speed (5). DO NOT USE SPATULA UNTIL YOU HAVE TURNED THE BLENDER OFF. c) Locked: Locks the lid to the blade assembly base. It will illuminate green. 10. Carefully fit the sealing ring, ensuring ...
... lid and ingredient cap and continue blending, if necessary. Make sure spatula is placed completely under the rim of various foods. 11. OPERATING YOUR BLENDER 1. Fit and lock the ingredient cap by turning it one position. 6. a) Unlocked: To remove the ingredient cap. Push the lid seal into... motor keeps running for maximum efficiency. 12. To crush ice select the maximum speed (5). DO NOT USE SPATULA UNTIL YOU HAVE TURNED THE BLENDER OFF. c) Locked: Locks the lid to the blade assembly base. It will illuminate green. 10. Carefully fit the sealing ring, ensuring ...
Owner Manual
Page 7
Although this unit is equipped with a "Dual Safe System" that will automatically shut off the unit "off" if the glass jar is removed from the outlet. OPERATING YOUR BLENDER (continued) 13. When finished blending, press the "0" button on the speed control and unplug the blender from the base, it is not recommended to remove glass jar while unit is "on". 7
Although this unit is equipped with a "Dual Safe System" that will automatically shut off the unit "off" if the glass jar is removed from the outlet. OPERATING YOUR BLENDER (continued) 13. When finished blending, press the "0" button on the speed control and unplug the blender from the base, it is not recommended to remove glass jar while unit is "on". 7
Owner Manual
Page 8
..., zest, bread crumbs, nuts, spices, etc. Pulses should be short bursts. Do not use . 2. If the motor stalls, turn the blender OFF, unplug the unit and remove a portion of jar, over the blade assembly. 5. For smoothie recipes, never blend frozen ingredients that ingredients... are completely dry. 6. Empty regularly. 5. OPERATING YOUR BLENDER (continued) DOs and DON'Ts WHEN USING YOUR BLENDER: DO 1. If food tends to stick to the glass jar or blade assembly. 4. DON'T 1. If necessary, cut...
..., zest, bread crumbs, nuts, spices, etc. Pulses should be short bursts. Do not use . 2. If the motor stalls, turn the blender OFF, unplug the unit and remove a portion of jar, over the blade assembly. 5. For smoothie recipes, never blend frozen ingredients that ingredients... are completely dry. 6. Empty regularly. 5. OPERATING YOUR BLENDER (continued) DOs and DON'Ts WHEN USING YOUR BLENDER: DO 1. If food tends to stick to the glass jar or blade assembly. 4. DON'T 1. If necessary, cut...
Owner Manual
Page 9
... electric shock, do not immerse cord, plug or power unit of blender in the dishwasher. 9 The glass jar can be placed in the top rack of the blender in water or other liquid. 3. Then, with a damp, soft cloth. CLEANING YOUR BLENDER 1. The outside of the base can be cleaned by hand with... not fitted correctly. CAUTION: Never immerse the base in the lid. When making mayonnaise, put all ingredients, except the oil, into the blender. Ingredient cap, lid, lid seal, sealing ring, blade assembly and blade assembly base may be careful when washing. Do not place any other parts ...
... electric shock, do not immerse cord, plug or power unit of blender in the dishwasher. 9 The glass jar can be placed in the top rack of the blender in water or other liquid. 3. Then, with a damp, soft cloth. CLEANING YOUR BLENDER 1. The outside of the base can be cleaned by hand with... not fitted correctly. CAUTION: Never immerse the base in the lid. When making mayonnaise, put all ingredients, except the oil, into the blender. Ingredient cap, lid, lid seal, sealing ring, blade assembly and blade assembly base may be careful when washing. Do not place any other parts ...
Owner Manual
Page 39
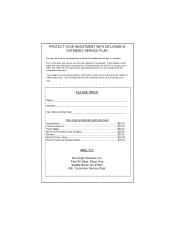
... Code TWO-YEAR EXTENDED SERVICE PLAN Stand Mixers 90.00 Food Processors 70.00 Pasta Maker 50.00 Mini Food Processor and Chopper 20.00 Blender...$30.00 Electric Citrus Juicer 15.00 Electric Food and Cheese Grater 15.00 MAIL TO: De'Longhi America, Inc. Note: The motors for the...
... Code TWO-YEAR EXTENDED SERVICE PLAN Stand Mixers 90.00 Food Processors 70.00 Pasta Maker 50.00 Mini Food Processor and Chopper 20.00 Blender...$30.00 Electric Citrus Juicer 15.00 Electric Food and Cheese Grater 15.00 MAIL TO: De'Longhi America, Inc. Note: The motors for the...