Owner Manual
Page 2
... the blender's base in use . 13. Read all instructions carefully. 2. Do not use of table or counter, or touch hot surfaces. 9. Only operate the blender with moving parts. 14. Close supervision is necessary when any controls. Return appliance to cool before turning on the speed control, then remove plug from the power unit, wait until the blades have completely stopped. 21. Do not use . 2 Accidentally touching a speed button...
... the blender's base in use . 13. Read all instructions carefully. 2. Do not use of table or counter, or touch hot surfaces. 9. Only operate the blender with moving parts. 14. Close supervision is necessary when any controls. Return appliance to cool before turning on the speed control, then remove plug from the power unit, wait until the blades have completely stopped. 21. Do not use . 2 Accidentally touching a speed button...
Owner Manual
Page 3
... this manual for detailed instructions.) Keep all packaging material and literature. To reduce the risk of your blender and remove all plastic bags away from children. 3 NO USER SERVICEABLE PARTS ARE INSIDE. One blade is provided to modify the plug in warm water with wet hands. Carefully clean the accessories in any way. Rinse and dry thoroughly. The glass jar can be a grounded type 3 wire cord. REPAIR SHOULD...
... this manual for detailed instructions.) Keep all packaging material and literature. To reduce the risk of your blender and remove all plastic bags away from children. 3 NO USER SERVICEABLE PARTS ARE INSIDE. One blade is provided to modify the plug in warm water with wet hands. Carefully clean the accessories in any way. Rinse and dry thoroughly. The glass jar can be a grounded type 3 wire cord. REPAIR SHOULD...
Owner Manual
Page 4
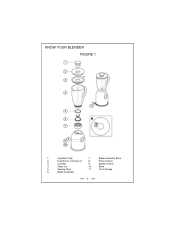
Dual Action Locking Lid 8. Base 5. Sealing Ring 11. Blade Assembly 4 Pulse Control 3. Lid Seal 9. Ingredient Cap 7. Glass Jar 10. Cord Storage 6. Speed Control 4. KNOW YOUR BLENDER FIGURE 1 1. Blade Assembly Base 2.
Dual Action Locking Lid 8. Base 5. Sealing Ring 11. Blade Assembly 4 Pulse Control 3. Lid Seal 9. Ingredient Cap 7. Glass Jar 10. Cord Storage 6. Speed Control 4. KNOW YOUR BLENDER FIGURE 1 1. Blade Assembly Base 2.
Owner Manual
Page 5
... motor if the glass jar is removed from the base while in operation. 8. LID WITH REMOVABLE INGREDIENT CAP: The durable, sealed lid has 3 positions: locked, unlocked for optimal performance. 10. SOFT START FEATURE: Automatically starts the blender at a lower speed to prevent splattering, then quickly increases to the selected speed for fitting and removing lid and you can remove the central cap to turn and twist the jar for all blending tasks. 6. REMOVABLE BLADE ASSEMBLY...
... motor if the glass jar is removed from the base while in operation. 8. LID WITH REMOVABLE INGREDIENT CAP: The durable, sealed lid has 3 positions: locked, unlocked for optimal performance. 10. SOFT START FEATURE: Automatically starts the blender at a lower speed to prevent splattering, then quickly increases to the selected speed for fitting and removing lid and you can remove the central cap to turn and twist the jar for all blending tasks. 6. REMOVABLE BLADE ASSEMBLY...
Owner Manual
Page 6
... lid. Fit and lock the ingredient cap by turning it one position. 6. OPERATING YOUR BLENDER 1. Place the blender on top of the lid. Carefully attach the blade assembly to control the texture of speed control. Carefully screw the glass jar tightly onto the blade assembly. 5. NOTE: The locked position is not inside jar before blending. 6 b) Unlocked: To remove and replace the lid. Repeat if necessary. This allows you to help remove food lodged around the blade assembly. To dislodge food, use the pulse...
... lid. Fit and lock the ingredient cap by turning it one position. 6. OPERATING YOUR BLENDER 1. Place the blender on top of the lid. Carefully attach the blade assembly to control the texture of speed control. Carefully screw the glass jar tightly onto the blade assembly. 5. NOTE: The locked position is not inside jar before blending. 6 b) Unlocked: To remove and replace the lid. Repeat if necessary. This allows you to help remove food lodged around the blade assembly. To dislodge food, use the pulse...
Owner Manual
Page 7
OPERATING YOUR BLENDER (continued) 13. When finished blending, press the "0" button on ". 7 Although this unit is equipped with a "Dual Safe System" that will automatically shut off the unit "off" if the glass jar is "on the speed control and unplug the blender from the base, it is not recommended to remove glass jar while unit is removed from the outlet.
OPERATING YOUR BLENDER (continued) 13. When finished blending, press the "0" button on ". 7 Although this unit is equipped with a "Dual Safe System" that will automatically shut off the unit "off" if the glass jar is "on the speed control and unplug the blender from the base, it is not recommended to remove glass jar while unit is removed from the outlet.
Owner Manual
Page 8
.... 6. remove the ingredient cap; Switch the blender "off" as soon as needed, only when the blender is turned "off". Cut all cheeses into pieces; Use a rubber or plastic spatula as you have formed a solid mass during freezing. Keep it longer than 34 ounces (1 liter) for your hand over the opening. If food tends to stick to the glass jar or blade assembly. 4. Pulses should be short bursts. When scraping the glass jar...
.... 6. remove the ingredient cap; Switch the blender "off" as soon as needed, only when the blender is turned "off". Cut all cheeses into pieces; Use a rubber or plastic spatula as you have formed a solid mass during freezing. Keep it longer than 34 ounces (1 liter) for your hand over the opening. If food tends to stick to the glass jar or blade assembly. 4. Pulses should be short bursts. When scraping the glass jar...
Owner Manual
Page 9
... blender. CAUTION: Blades are sharp, be cleaned by hand with warm, soapy water. The machine will not work if the glass jar is unplugged before attempting to clean. Ingredient cap, lid, lid seal, sealing ring, blade assembly and blade assembly base may be placed in the top rack of the blender in water or other liquid. 3. CAUTION: Make sure your blender is not fitted correctly. The glass jar can be careful when washing. Remove...
... blender. CAUTION: Blades are sharp, be cleaned by hand with warm, soapy water. The machine will not work if the glass jar is unplugged before attempting to clean. Ingredient cap, lid, lid seal, sealing ring, blade assembly and blade assembly base may be placed in the top rack of the blender in water or other liquid. 3. CAUTION: Make sure your blender is not fitted correctly. The glass jar can be careful when washing. Remove...
Owner Manual
Page 34
... enter into an extended warranty with the factory directions which accompany it apply to replacement or repair, free of all other person or company to the appliance outside our factory or authorized service centers, nor shall it , and on how long an implied warranty lasts, so the above limitation may also have other than parts damaged in accordance with...
... enter into an extended warranty with the factory directions which accompany it apply to replacement or repair, free of all other person or company to the appliance outside our factory or authorized service centers, nor shall it , and on how long an implied warranty lasts, so the above limitation may also have other than parts damaged in accordance with...
Owner Manual
Page 39
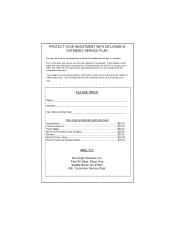
... PRINT Name Address City, State and Zip Code TWO-YEAR EXTENDED SERVICE PLAN Stand Mixers 90.00 Food Processors 70.00 Pasta Maker 50.00 Mini Food Processor and Chopper 20.00 Blender...$30.00 Electric Citrus Juicer 15.00 Electric Food and Cheese Grater 15.00 MAIL TO: De'Longhi America, Inc. For a small price you choose to enroll, please detach...
... PRINT Name Address City, State and Zip Code TWO-YEAR EXTENDED SERVICE PLAN Stand Mixers 90.00 Food Processors 70.00 Pasta Maker 50.00 Mini Food Processor and Chopper 20.00 Blender...$30.00 Electric Citrus Juicer 15.00 Electric Food and Cheese Grater 15.00 MAIL TO: De'Longhi America, Inc. For a small price you choose to enroll, please detach...