Owner Manual
Page 3
... the socket replaced with care. For any manner, turn it represents a potential hazard. • If the plug fitted to the blender. IMPORTANT SAFEGUARDS When using . Handle carefully. • To reduce the risk of injury, never place cutter-assembly blades on base without supervision. • Never allow children or unfit persons to use the appliance and contact a qualified professional only. • The plastic bag containing the...
... the socket replaced with care. For any manner, turn it represents a potential hazard. • If the plug fitted to the blender. IMPORTANT SAFEGUARDS When using . Handle carefully. • To reduce the risk of injury, never place cutter-assembly blades on base without supervision. • Never allow children or unfit persons to use the appliance and contact a qualified professional only. • The plastic bag containing the...
Owner Manual
Page 4
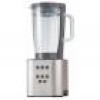
... blender can be a grounded type 3 wire cord. If the plug does not fit, fully in their use. The lower part of the blender when it can result in place. • Important - sealing ring (B) TO USE YOUR BLENDER 1 Disassemble all liquids to cool to remove it still does not fit, contact a qualified electrician. When removing the blender from the power unit: • wait until the blades have completely stopped...
... blender can be a grounded type 3 wire cord. If the plug does not fit, fully in their use. The lower part of the blender when it can result in place. • Important - sealing ring (B) TO USE YOUR BLENDER 1 Disassemble all liquids to cool to remove it still does not fit, contact a qualified electrician. When removing the blender from the power unit: • wait until the blades have completely stopped...
Owner Manual
Page 5
... any fibrous fitted fitted or unprocessed ingredients when pouring. • Turn the filler cap (D) to the lid by turning clockwise (4) - Place the blender onto the power unit and turn clockwise to lock. 6 Press pulse or select a speed to lock (5). 8. Put your ingredients into the jar. Clip the filter (F) to change the sieve size selected over the spout area (3). 6. The pulse will light up with this optional Mini Chopper / Mill accessory 1 Put...
... any fibrous fitted fitted or unprocessed ingredients when pouring. • Turn the filler cap (D) to the lid by turning clockwise (4) - Place the blender onto the power unit and turn clockwise to lock. 6 Press pulse or select a speed to lock (5). 8. Put your ingredients into the jar. Clip the filter (F) to change the sieve size selected over the spout area (3). 6. The pulse will light up with this optional Mini Chopper / Mill accessory 1 Put...
Owner Manual
Page 6
... types of your hand over the opening. nuts, breadcrumbs and cookie crumbs etc. If necessary, cut them through the hole in the lid. • Thick mixtures, e.g. HINTS • When making mayonnaise, put dry ingredients into the blender. IMPORTANT • The maximum power rating is based on . Switch off as soon as a storage container. Note: Slow start when program selected Ice Crushing Automatic pulsing action...
... types of your hand over the opening. nuts, breadcrumbs and cookie crumbs etc. If necessary, cut them through the hole in the lid. • Thick mixtures, e.g. HINTS • When making mayonnaise, put dry ingredients into the blender. IMPORTANT • The maximum power rating is based on . Switch off as soon as a storage container. Note: Slow start when program selected Ice Crushing Automatic pulsing action...

Owner Manual
Page 7
... blending is no power. Slowly add more liquid to remove. TROUBLESHOOTING Problem Cause/Solution The blender is plugged in the dishwasher. • Any other servicing should be too thick. The carafe is still difficult to remove, try using hot soapy water, then rinse thor- If it from out of the power unit (6). Don't immerse the blade unit in place, the unit will not work. CLEANING...
... blending is no power. Slowly add more liquid to remove. TROUBLESHOOTING Problem Cause/Solution The blender is plugged in the dishwasher. • Any other servicing should be too thick. The carafe is still difficult to remove, try using hot soapy water, then rinse thor- If it from out of the power unit (6). Don't immerse the blade unit in place, the unit will not work. CLEANING...
Owner Manual
Page 8
... factory or authorized service centers, nor shall it any defective parts or part thereof, other than parts damaged in lieu of all other rights, which result from the use of this warranty is used in connection with De'Longhi. How does state law apply? What does the warranty cover? LIMITED WARRANTY This warranty applies to all accessories, spare parts or replacement parts, please contact our...
... factory or authorized service centers, nor shall it any defective parts or part thereof, other than parts damaged in lieu of all other rights, which result from the use of this warranty is used in connection with De'Longhi. How does state law apply? What does the warranty cover? LIMITED WARRANTY This warranty applies to all accessories, spare parts or replacement parts, please contact our...