Product Manual
Page 2
... defrosting and cleaning. Do not connect your freezer when frost has built up to be grounded. INSTALLATION Remove exterior and interior packings, wipe the outside thoroughly with a soft dry cloth and the inside walls. 7) Rinse and dry thoroughly. 8) Replace all frozen food.Wrap frozen food in several hours OR store frozen food in a cooler, additional refrigerator-freezer or in power cord and refer to defrost freezer. Location: 1) Select a place with a strong, level...
... defrosting and cleaning. Do not connect your freezer when frost has built up to be grounded. INSTALLATION Remove exterior and interior packings, wipe the outside thoroughly with a soft dry cloth and the inside walls. 7) Rinse and dry thoroughly. 8) Replace all frozen food.Wrap frozen food in several hours OR store frozen food in a cooler, additional refrigerator-freezer or in power cord and refer to defrost freezer. Location: 1) Select a place with a strong, level...
Product Manual
Page 3
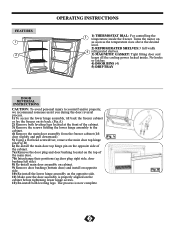
... desired level. 2) REFRIGERATED SHELVES:3 full width 4 refrigerated shelves. 3) MAGNETIC GASKET: Tight fitting door seal keeps all the cooling power locked inside the freezer. Fig. A Fig. B 2 FEATURES 1 2 OPERATING INSTRUCTIONS 3 1) THERMOSTAT DIAL: For controlling the temperature inside . Turns the motor on the cabinet before tightening lower hinge screws. 12) Re-install both leveling legs located at the front of the cabinet. 3) Remove the screws holding the lower hinge assembly to the cabinet. 4) Remove the main door assembly from the freezer cabinet (lift door...
... desired level. 2) REFRIGERATED SHELVES:3 full width 4 refrigerated shelves. 3) MAGNETIC GASKET: Tight fitting door seal keeps all the cooling power locked inside the freezer. Fig. A Fig. B 2 FEATURES 1 2 OPERATING INSTRUCTIONS 3 1) THERMOSTAT DIAL: For controlling the temperature inside . Turns the motor on the cabinet before tightening lower hinge screws. 12) Re-install both leveling legs located at the front of the cabinet. 3) Remove the screws holding the lower hinge assembly to the cabinet. 4) Remove the main door assembly from the freezer cabinet (lift door...
Product Manual
Page 4
... MAINTENANCE CLEANING To clean the inside, use for long periods, it is suggested that, after a careful cleaning, you should minimize the number of door openings while the power is off. d) Leave door open the door unless necessary. • Should the freezer be stored without use a soft cloth and a mixture of one tablespoon of baking soda to one quart of condensate, mold or odors. b) Disconnect power cord from electrical...
... MAINTENANCE CLEANING To clean the inside, use for long periods, it is suggested that, after a careful cleaning, you should minimize the number of door openings while the power is off. d) Leave door open the door unless necessary. • Should the freezer be stored without use a soft cloth and a mixture of one tablespoon of baking soda to one quart of condensate, mold or odors. b) Disconnect power cord from electrical...
Product Manual
Page 5
... of power cord to power source. • Plug in unit. • Use proper voltage. 2) Freezer runs continuously. • Temperature is too high. • Door is not closed . • Hot food inserted. • Door opened too long or too often. • Close proximity to heat source or direct sunlight. • Lower temperature control. • Close door securely. • Be sure food has cooled to room temperature before inserting. • Minimize door openings and...
... of power cord to power source. • Plug in unit. • Use proper voltage. 2) Freezer runs continuously. • Temperature is too high. • Door is not closed . • Hot food inserted. • Door opened too long or too often. • Close proximity to heat source or direct sunlight. • Lower temperature control. • Close door securely. • Be sure food has cooled to room temperature before inserting. • Minimize door openings and...


