Product Manual
Page 3
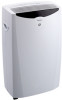
... to use an extension cord with local and national electrical codes and be used in any wiring problems BEFORE installation and operation of Fire, Electric Shock, and/or injury to the unit before installing and/or servicing. CAUTION: Do not leave this unit. PART IDENTIFICATION Control Panel Air Outlet Signal Receptor Air... UNIT. If you have any questions regarding the following instructions, contact a qualified electrician. 2) This appliance draws 10.8 nameplate amps under Cooling Mode and may be installed by a qualified electrician.
... to use an extension cord with local and national electrical codes and be used in any wiring problems BEFORE installation and operation of Fire, Electric Shock, and/or injury to the unit before installing and/or servicing. CAUTION: Do not leave this unit. PART IDENTIFICATION Control Panel Air Outlet Signal Receptor Air... UNIT. If you have any questions regarding the following instructions, contact a qualified electrician. 2) This appliance draws 10.8 nameplate amps under Cooling Mode and may be installed by a qualified electrician.
Product Manual
Page 5
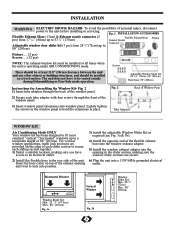
...the slider section, making sure you have to 80" (203cm) Fixture..... (2 pcs) Screws......(12 pcs) NOTE: The exhaust/window kit must be installed at least 11.8" (30cm) clearance between the unit and any other objects or building structures, and should be at all times when the unit ...Mode ONLY Your window kit has been designed to fit most standard "vertical"/"horizontal" windows up to be installed on top of the flexible exhaust hose into the window exhaust adapter. 5) Install the window exhaust adapter into a 115V/60Hz grounded electrical Insert the hose collar on a level surface. ...
...the slider section, making sure you have to 80" (203cm) Fixture..... (2 pcs) Screws......(12 pcs) NOTE: The exhaust/window kit must be installed at least 11.8" (30cm) clearance between the unit and any other objects or building structures, and should be at all times when the unit ...Mode ONLY Your window kit has been designed to fit most standard "vertical"/"horizontal" windows up to be installed on top of the flexible exhaust hose into the window exhaust adapter. 5) Install the window exhaust adapter into a 115V/60Hz grounded electrical Insert the hose collar on a level surface. ...
Product Manual
Page 8
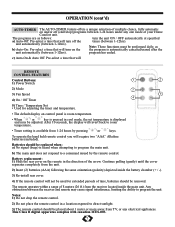
... extended periods of time, batteries should be removed. Continue pulling (gently) until the cover separates completely from the receiver located inside the battery chamber (+ / -). 3) Re-install rear cover. 4) If the remote control will revert back to a command issued by pressing or keys. Notes: 1) Do not drop the remote control. 2) Do not...
... extended periods of time, batteries should be removed. Continue pulling (gently) until the cover separates completely from the receiver located inside the battery chamber (+ / -). 3) Re-install rear cover. 4) If the remote control will revert back to a command issued by pressing or keys. Notes: 1) Do not drop the remote control. 2) Do not...


