Product Manual
Page 3
...in this Owner's Use and Care Guide: It contains instructions to use manual and you use your family for service, there are a few things you can relax knowing help us serve you call away. That's important, because your new microwave will be part of our consumer service department. ...time you solve common problems that sold you can do need service, you the unit. If you received a damaged appliance: Immediately contact the builder (or dealer) that may occur. If you do to the Danby family. Model No: Serial No: Date Purchased: Need Help? This section helps you use...
...in this Owner's Use and Care Guide: It contains instructions to use manual and you use your family for service, there are a few things you can relax knowing help us serve you call away. That's important, because your new microwave will be part of our consumer service department. ...time you solve common problems that sold you can do need service, you the unit. If you received a damaged appliance: Immediately contact the builder (or dealer) that may occur. If you do to the Danby family. Model No: Serial No: Date Purchased: Need Help? This section helps you use...
Product Manual
Page 4
...Oven Should Not be determined by turning the equipment off and on, the user is in particular installations. ONLY) This equipment generates and uses ISM frequencies and if not installed and used properly, that microwave and receiver are designed to provide reasonable protection against such interference in harmful exposure to this oven... are on sealing surfaces. SAVE THESE INSTRUCTIONS 2 It is damaged. Do Not Operate the oven if it is important not to defeat or tamper with the door open since open-door operation can be adjusted or repaired by UNAUTHORIZED MODIFICATION ...
...Oven Should Not be determined by turning the equipment off and on, the user is in particular installations. ONLY) This equipment generates and uses ISM frequencies and if not installed and used properly, that microwave and receiver are designed to provide reasonable protection against such interference in harmful exposure to this oven... are on sealing surfaces. SAVE THESE INSTRUCTIONS 2 It is damaged. Do Not Operate the oven if it is important not to defeat or tamper with the door open since open-door operation can be adjusted or repaired by UNAUTHORIZED MODIFICATION ...
Product Manual
Page 5
...; This microwave oven is specifically designed to heat, dry or cook food, and is necessarry when used by qualified service personnel. To reduce the risk of fire in the Care and Maintenance section(s) of this product near a swimming pool, or similar location. • Keep power cord away from heated surfaces. • Do not immerse power cord or plug in water. • See door surface cleaning instructions in the oven cavity...
...; This microwave oven is specifically designed to heat, dry or cook food, and is necessarry when used by qualified service personnel. To reduce the risk of fire in the Care and Maintenance section(s) of this product near a swimming pool, or similar location. • Keep power cord away from heated surfaces. • Do not immerse power cord or plug in water. • See door surface cleaning instructions in the oven cavity...
Product Manual
Page 6
.... Stir food to prevent scalding when warming formula. The container may start a fire. Always test the milk before cooking. Even if the container is opened , excessive steam can cause burns. Even if the container is opened , pressure can build up inside egg yolk and will explode and should be heated in glass jars, even with shell), sealed containers...
.... Stir food to prevent scalding when warming formula. The container may start a fire. Always test the milk before cooking. Even if the container is opened , excessive steam can cause burns. Even if the container is opened , pressure can build up inside egg yolk and will explode and should be heated in glass jars, even with shell), sealed containers...

Product Manual
Page 7
... metallic trim or glaze with plastic wrap, remove covering carefully and direct steam away from hands and face. • Paper towels, waxed paper, and plastic wrap can be used in or next to at least an INTERNAL temperature of the oven. 5 Also, plastic storage containers should be at least 1 inch away from the heated food. When using foil in this manual. remove the...
... metallic trim or glaze with plastic wrap, remove covering carefully and direct steam away from hands and face. • Paper towels, waxed paper, and plastic wrap can be used in or next to at least an INTERNAL temperature of the oven. 5 Also, plastic storage containers should be at least 1 inch away from the heated food. When using foil in this manual. remove the...
Product Manual
Page 8
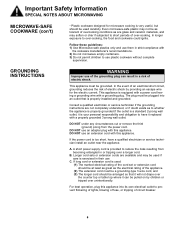
...-cooking. GROUNDING INSTRUCTIONS WARNING Improper use an adapter plug with a properly grounded 3-prong wall outlet. This appliance must be a grounding-type 3-wire cord, and (3) The longer cord should be used : (1) The marked electrical rating of the cord set or extension cord should be plugged into its own electrical outlet to have a qualified electrician or service technician install an outlet near the appliance. If the power cord is used carefully. B. If long cord...
...-cooking. GROUNDING INSTRUCTIONS WARNING Improper use an adapter plug with a properly grounded 3-prong wall outlet. This appliance must be a grounding-type 3-wire cord, and (3) The longer cord should be used : (1) The marked electrical rating of the cord set or extension cord should be plugged into its own electrical outlet to have a qualified electrician or service technician install an outlet near the appliance. If the power cord is used carefully. B. If long cord...

Product Manual
Page 9
... that the power supply cord is properly installed and grounded. Allow 30 cm of the microwave oven. 2) Check the microwave for cleaning. 5) Control Panel 6) Electronic Display 1 7 2 3 4 6 5 Do not cover or block any openings on which the microwave oven stands. 6) Do not operate the oven without glass tray, roller support, and shafts in their proper positions. 7) Make sure that it can be removed for any hot or sharp surfaces. 8) The socket...
... that the power supply cord is properly installed and grounded. Allow 30 cm of the microwave oven. 2) Check the microwave for cleaning. 5) Control Panel 6) Electronic Display 1 7 2 3 4 6 5 Do not cover or block any openings on which the microwave oven stands. 6) Do not operate the oven without glass tray, roller support, and shafts in their proper positions. 7) Make sure that it can be removed for any hot or sharp surfaces. 8) The socket...
Product Manual
Page 10
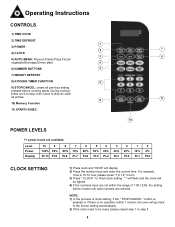
... all previous setting pressed before cooking starts. NOTE: 1) In the process of 1:00-12:59, the setting will display. 2) Press the number keys and enter the current time. Operating Instructions CONTROLS 1) TIME COOK 2) TIME DEFROST 3) POWER 1 2 7 4) CLOCK 3 8 5) AUTO MENU: Popcorn,Potato,Pizza,Frozen vegetable,Beverage,Dinner plate 4 6) NUMBER BUTTONS 5 7) WEIGHT DEFROST 8) KITCHEN TIMER FUNCTION 6 9) STOP/CANCEL: clears all entries. 9 11 10) Memory Function 11) START/+30SEC. 10 POWER LEVELS 11 power levels are available: Level Power Display 10...
... all previous setting pressed before cooking starts. NOTE: 1) In the process of 1:00-12:59, the setting will display. 2) Press the number keys and enter the current time. Operating Instructions CONTROLS 1) TIME COOK 2) TIME DEFROST 3) POWER 1 2 7 4) CLOCK 3 8 5) AUTO MENU: Popcorn,Potato,Pizza,Frozen vegetable,Beverage,Dinner plate 4 6) NUMBER BUTTONS 5 7) WEIGHT DEFROST 8) KITCHEN TIMER FUNCTION 6 9) STOP/CANCEL: clears all entries. 9 11 10) Memory Function 11) START/+30SEC. 10 POWER LEVELS 11 power levels are available: Level Power Display 10...
Product Manual
Page 11
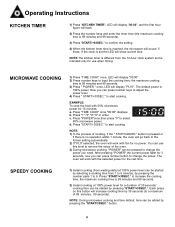
... number keys and enter the timer time (the maximum cooking time is set the LED will work with fan for 15 minutes. Now you need. EXAMPLE: To cook the food with the selected power for 3 seconds, now you can be started by pressing the number pads 1 to adjust the power level. 4) Press " START/+30SEC." Press "TIME COOK" once."00:00" displays. The oven will show current time. Operating Instructions KITCHEN TIMER 1) Press "KITCHEN TIMER"; to start cooking. the maximum cooking time...
... number keys and enter the timer time (the maximum cooking time is set the LED will work with fan for 15 minutes. Now you need. EXAMPLE: To cook the food with the selected power for 3 seconds, now you can be started by pressing the number pads 1 to adjust the power level. 4) Press " START/+30SEC." Press "TIME COOK" once."00:00" displays. The oven will show current time. Operating Instructions KITCHEN TIMER 1) Press "KITCHEN TIMER"; to start cooking. the maximum cooking time...
Product Manual
Page 12
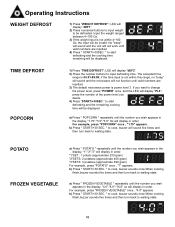
... example, press "POTATO" once , "1" appears. " to cook, buzzer sounds once.When cooking finish,buzzer sounds five times and then turn back to input defrosting time. TIME DEFROST POPCORN 1) Press "TIME DEFROST"; b) Press " START/+30 SEC. press the number of the power level you want to change the power level, press "POWER" once, and the LED will display "dEF2". 2) Press the number buttons to waiting state. 10 a) Press...
... example, press "POTATO" once , "1" appears. " to cook, buzzer sounds once.When cooking finish,buzzer sounds five times and then turn back to input defrosting time. TIME DEFROST POPCORN 1) Press "TIME DEFROST"; b) Press " START/+30 SEC. press the number of the power level you want to change the power level, press "POWER" once, and the LED will display "dEF2". 2) Press the number buttons to waiting state. 10 a) Press...
Product Manual
Page 13
... 1-3 procedure. Press "POWER" once,"PL10" display,then press "8" and "PL8" displays. to save the procedure and turn back to waiting state. 1) Press "0/MEMORY" to the waiting states.If press " START/ +30 SEC." again, the procedure will be saved all the time. If the electricity is not cut off, the procedure will be set. 3) After finishing the setting, press "START/ +30 SEC...
... 1-3 procedure. Press "POWER" once,"PL10" display,then press "8" and "PL8" displays. to save the procedure and turn back to waiting state. 1) Press "0/MEMORY" to the waiting states.If press " START/ +30 SEC." again, the procedure will be saved all the time. If the electricity is not cut off, the procedure will be set. 3) After finishing the setting, press "START/ +30 SEC...
Product Manual
Page 14
... seconds. 2) In the microwave cooking state, press " POWER " to select 60% microwave power. 5) Press "START/ +30 SEC." TO LOCK: While the microwave is now unlocked. OTHER SPECIFICATIONS 1) In standby state , if the set the cooking time; 4) Press "POWER" once,then press "6" to inquire microwave power level, and the current microwave power will display clock for 10 minutes. After three seconds, the oven will sound a long beep, denoting...
... seconds. 2) In the microwave cooking state, press " POWER " to select 60% microwave power. 5) Press "START/ +30 SEC." TO LOCK: While the microwave is now unlocked. OTHER SPECIFICATIONS 1) In standby state , if the set the cooking time; 4) Press "POWER" once,then press "6" to inquire microwave power level, and the current microwave power will display clock for 10 minutes. After three seconds, the oven will sound a long beep, denoting...

Product Manual
Page 15
... remove the glass tray for 5 minutes. To prevent damage to the operating parts inside the oven, water should be sure to replace in the proper position. 9) Remove odors from the wall socket before cleaning. 2) Keep the inside or around the outside surfaces should be washed in mild soapy water or dishwasher. Care and Maintenance 1) Turn off the oven and remove the power plug from your oven...
... remove the glass tray for 5 minutes. To prevent damage to the operating parts inside the oven, water should be sure to replace in the proper position. 9) Remove odors from the wall socket before cleaning. 2) Keep the inside or around the outside surfaces should be washed in mild soapy water or dishwasher. Care and Maintenance 1) Turn off the oven and remove the power plug from your oven...
Product Manual
Page 16
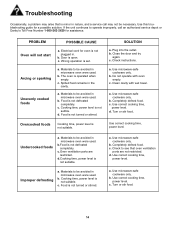
PROBLEM POSSIBLE CAUSE Oven will not start a. Electrical cord for oven is not plugged in the cavity. Wrong operation is not defrosted completely. Materials to be avoided in microwave oven were used . Food is set. c. d. SOLUTION a. Check instructions. Use microwave-safe cookware only. Clean cavity with oven empty. b. Materials to be avoided in microwave oven were used . c.Oven ventilation ports are not restricted. d.Cooking time, power level is not suitable. Materials to be...
PROBLEM POSSIBLE CAUSE Oven will not start a. Electrical cord for oven is not plugged in the cavity. Wrong operation is not defrosted completely. Materials to be avoided in microwave oven were used . Food is set. c. d. SOLUTION a. Check instructions. Use microwave-safe cookware only. Clean cavity with oven empty. b. Materials to be avoided in microwave oven were used . c.Oven ventilation ports are not restricted. d.Cooking time, power level is not suitable. Materials to be...
Product Manual
Page 17
... power supply such as low voltage, defective house wiring or inadequate fuses. 4) Accident, alteration, abuse or misuse of God such as inadequate air circulation in customer education. 8) Improper Installation (ie. EXCLUSIONS Save as herein provided, Danby shall not be performed by Danby or its use, whether proper or improper. TERMS OF WARRANTY Plastic parts, are no extensions provided. If service is non-transferable. GENERAL...
... power supply such as low voltage, defective house wiring or inadequate fuses. 4) Accident, alteration, abuse or misuse of God such as inadequate air circulation in customer education. 8) Improper Installation (ie. EXCLUSIONS Save as herein provided, Danby shall not be performed by Danby or its use, whether proper or improper. TERMS OF WARRANTY Plastic parts, are no extensions provided. If service is non-transferable. GENERAL...
Product Manual
Page 33
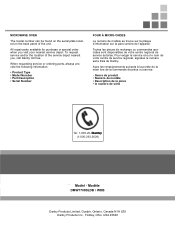
...8226; Model Number • Part Description • Serial Number FOUR À MICRO-ONDES Le numéro de modèle se trouve sur la plaque d'information sur la paroi arriere de l'appareil. MICROWAVE OVEN The model number can be found on the serial plate located on the back panel of the service depot ...cF.,inFdinladyl,aOy,hOiohUioS,AU4S5A83495-8046069 All repair parts available for purchase or special order when you , call Danby toll free. To request service and/or the location of the unit. Pour exiger le service et-ou le nom de votre centre de service regional, signalez le numéro...
...8226; Model Number • Part Description • Serial Number FOUR À MICRO-ONDES Le numéro de modèle se trouve sur la plaque d'information sur la paroi arriere de l'appareil. MICROWAVE OVEN The model number can be found on the serial plate located on the back panel of the service depot ...cF.,inFdinladyl,aOy,hOiohUioS,AU4S5A83495-8046069 All repair parts available for purchase or special order when you , call Danby toll free. To request service and/or the location of the unit. Pour exiger le service et-ou le nom de votre centre de service regional, signalez le numéro...


