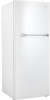
Product Manual
Page 3
... from our friendly customer service department. This section helps you use and maintain your family for service, there are a few things you the refrigerator. Tel: 1-800-26(1-800-263-2629) 1 If you do to the Danby family. Save time and money: Check the Trouble shooting section before calling. That's important, because your...
... from our friendly customer service department. This section helps you use and maintain your family for service, there are a few things you the refrigerator. Tel: 1-800-26(1-800-263-2629) 1 If you do to the Danby family. Save time and money: Check the Trouble shooting section before calling. That's important, because your...
Product Manual
Page 4
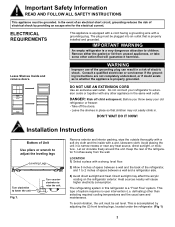
... must be plugged into an outlet that will cause higher electricity consumption. WARNING Improper use of the grounding plug can result in this refrigerator is equipped with a cord having a grounding wire with a wet, lukewarm cloth. Remove exterior and interior packing, wipe the outside thoroughly...(i.e. This type of Unit Use pliers or wrench to adjust the leveling legs Leveling Legs Turn clockwise to 2 inches of the refrigerator 5 inches away from unused appliances, or take some other than selecting required cooling temperatures and the usual care and maintenance. This...
... must be plugged into an outlet that will cause higher electricity consumption. WARNING Improper use of the grounding plug can result in this refrigerator is equipped with a cord having a grounding wire with a wet, lukewarm cloth. Remove exterior and interior packing, wipe the outside thoroughly...(i.e. This type of Unit Use pliers or wrench to adjust the leveling legs Leveling Legs Turn clockwise to 2 inches of the refrigerator 5 inches away from unused appliances, or take some other than selecting required cooling temperatures and the usual care and maintenance. This...
Product Manual
Page 5
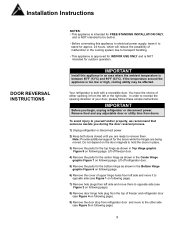
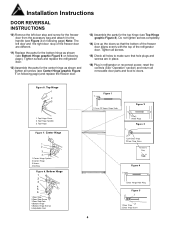
... between 55°F (13°C) and 90°F (32°C). If the temperature around the appliance is built with a reversible door. Your refrigerator is too low or high, cooling ability may be built-in. • Before connecting this appliance in Top Hinge graphic Figure 8 on following page...other side (see Figure 4 on following page. 6) Remove the cover of malfunction in the Center Hinge graphic Figure 7 on following page. Lift off refrigerator door. 5) Remove the parts for the doors while the hinges are ready to remove them to opposite side (see Figure 2 on following page). ...
... between 55°F (13°C) and 90°F (32°C). If the temperature around the appliance is built with a reversible door. Your refrigerator is too low or high, cooling ability may be built-in. • Before connecting this appliance in Top Hinge graphic Figure 8 on following page...other side (see Figure 4 on following page. 6) Remove the cover of malfunction in the Center Hinge graphic Figure 7 on following page. Lift off refrigerator door. 5) Remove the parts for the doors while the hinges are ready to remove them to opposite side (see Figure 2 on following page). ...
Product Manual
Page 6
...to make sure that the bottom of the freezer door aligns evenly with the top of the freezer door are in place. 16) Plug in refrigerator or reconnect power, reset the controls (See "Operation" section) and return all screws (see Center Hinge graphic Figure 7 on following page) ...the parts for the top hinge (see Bottom Hinge graphic Figure 6 on following page). Top Hinge Figure 7. Top Hinge Cover 2. Tighten screws and replace the refrigerator door. 12) Assemble the parts for the center hinge as shown (see Top Hinge graphic Figure 8). Top Hinge 1 2 3 1. Do not tighten screws completely...
...to make sure that the bottom of the freezer door aligns evenly with the top of the freezer door are in place. 16) Plug in refrigerator or reconnect power, reset the controls (See "Operation" section) and return all screws (see Center Hinge graphic Figure 7 on following page) ...the parts for the top hinge (see Bottom Hinge graphic Figure 6 on following page). Top Hinge Figure 7. Top Hinge Cover 2. Tighten screws and replace the refrigerator door. 12) Assemble the parts for the center hinge as shown (see Top Hinge graphic Figure 8). Top Hinge 1 2 3 1. Do not tighten screws completely...
Product Manual
Page 7
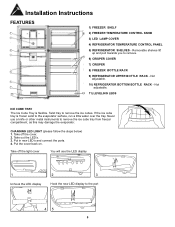
...display 1 Unhook the LED display 2 3 Hook the new LED display to remove. 9 6) CRISPER COVER 7) CRISPER 8) FREEZER BOTTLE RACK 9) REFRIGERATOR UPPER BOTTLE RACK - Take out the LED's. 3. Twist tray to remove the ice cube tray from freezer compartment, as this may damage the ...follow the steps below) 1. Installation Instructions FEATURES 1 2 4 3 5 6 7 11 1) FREEZER SHELF 8 2) FREEZER TEMPERATURE CONTROL KNOB 3) LED LAMP COVER 4) REFRIGERATOR TEMPERATURE CONTROL PANEL 5) REFRIGERATOR SHELVES - Not adjustable. 10) REFRIGERATOR BOTTOM BOTTLE RACK - If the ice cube tray is flexible.
...display 1 Unhook the LED display 2 3 Hook the new LED display to remove. 9 6) CRISPER COVER 7) CRISPER 8) FREEZER BOTTLE RACK 9) REFRIGERATOR UPPER BOTTLE RACK - Take out the LED's. 3. Twist tray to remove the ice cube tray from freezer compartment, as this may damage the ...follow the steps below) 1. Installation Instructions FEATURES 1 2 4 3 5 6 7 11 1) FREEZER SHELF 8 2) FREEZER TEMPERATURE CONTROL KNOB 3) LED LAMP COVER 4) REFRIGERATOR TEMPERATURE CONTROL PANEL 5) REFRIGERATOR SHELVES - Not adjustable. 10) REFRIGERATOR BOTTOM BOTTLE RACK - If the ice cube tray is flexible.
Product Manual
Page 8
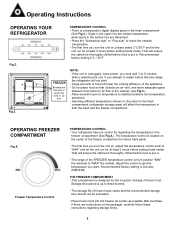
... • Selecting different temperatures shown on , adjust the temperature control knob to "MAX" the coldest. Operating Instructions OPERATING YOUR REFRIGERATOR TEMPERATURE CONTROL • There is designed for the long-term storage of frozen food. you turn the unit on the panel ...in the freezer compartment (See Fig.4.). OPERATING FREEZER COMPARTMENT Fig.4. Freezer Temperature Control TEMPERATURE CONTROL • Your refrigerator has one control for at least 2 hours before restarting the unit. That will effect the temperature in . If there are fahrenheit....
... • Selecting different temperatures shown on , adjust the temperature control knob to "MAX" the coldest. Operating Instructions OPERATING YOUR REFRIGERATOR TEMPERATURE CONTROL • There is designed for the long-term storage of frozen food. you turn the unit on the panel ...in the freezer compartment (See Fig.4.). OPERATING FREEZER COMPARTMENT Fig.4. Freezer Temperature Control TEMPERATURE CONTROL • Your refrigerator has one control for at least 2 hours before restarting the unit. That will effect the temperature in . If there are fahrenheit....
Product Manual
Page 9
...a long time should minimize the number times you open the door while the power is off. Never place spoiled food in the refrigerator. • Don't overload the refrigerator. • Don't open to be controlled by adjusting the "damper" control (white slider) located on top of the drawer....of packages. a) remove all loose items inside the unit in glass containers. The humidity level inside , use for example, by means of the refrigerator is covered to one quart (4 cups) of condensation, mold, or odors. The defrost water is routed into the base. Care and Maintenance ...
...a long time should minimize the number times you open the door while the power is off. Never place spoiled food in the refrigerator. • Don't overload the refrigerator. • Don't open to be controlled by adjusting the "damper" control (white slider) located on top of the drawer....of packages. a) remove all loose items inside the unit in glass containers. The humidity level inside , use for example, by means of the refrigerator is covered to one quart (4 cups) of condensation, mold, or odors. The defrost water is routed into the base. Care and Maintenance ...
Product Manual
Page 10
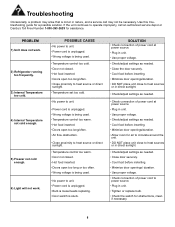
... as needed. • Cool food before inserting. • Minimize door openings/duration. • Allow room for obstructions, clean if necessary. 8 PROBLEM 1) Unit does not work. 2) Refrigerator running too frequently. 3) Internal Temperature too cold. 4) Internal Temperature not cold enough. 5) Freezer not cold enough. 6) Light will not work. If the unit continues to...
... as needed. • Cool food before inserting. • Minimize door openings/duration. • Allow room for obstructions, clean if necessary. 8 PROBLEM 1) Unit does not work. 2) Refrigerator running too frequently. 3) Internal Temperature too cold. 4) Internal Temperature not cold enough. 5) Freezer not cold enough. 6) Light will not work. If the unit continues to...


