Product Manual
Page 3
... dependable service; Model No: Serial No: Date Purchased: Need Help? If you received a damaged appliance: Immediately contact the builder (or dealer) that may occur. like you will experience these values each and every time you the refrigerator. This section helps you can do need this Owner's Use and Care Guide: It contains instructions to obtain service under warranty. If you do to the Danby...
... dependable service; Model No: Serial No: Date Purchased: Need Help? If you received a damaged appliance: Immediately contact the builder (or dealer) that may occur. like you will experience these values each and every time you the refrigerator. This section helps you can do need this Owner's Use and Care Guide: It contains instructions to obtain service under warranty. If you do to the Danby...
Product Manual
Page 4
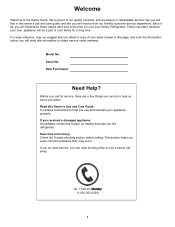
... plug. Leave Shelves Inside and remove doors. Avoid placing the unit in the same wall outlet. This is properly installed and grounded. The plug must be grounded. DON'T WAIT DO IT NOW! Turn counterclockwise to children. Keep the rear of Unit Use pliers or wrench to adjust the leveling legs Leveling Legs Turn clockwise to 2 inches of system requires no user intervention (i.e. This type of...
... plug. Leave Shelves Inside and remove doors. Avoid placing the unit in the same wall outlet. This is properly installed and grounded. The plug must be grounded. DON'T WAIT DO IT NOW! Turn counterclockwise to children. Keep the rear of Unit Use pliers or wrench to adjust the leveling legs Leveling Legs Turn clockwise to 2 inches of system requires no user intervention (i.e. This type of...
Product Manual
Page 5
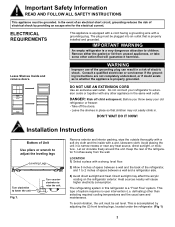
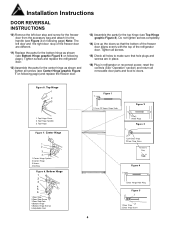
... during the door reversal process. 1) Unplug refrigerator or disconnect power. 2) Keep both doors closed until you begin, unplug refrigerator or disconnect power. Remove food and any adjustable door or utility bins from the left or the right side. Your refrigerator is between 55°F (13°C) and 90°F (32°C). Lift off freezer door. 4) Remove the parts for the center hinge as shown in the cooling system due...
... during the door reversal process. 1) Unplug refrigerator or disconnect power. 2) Keep both doors closed until you begin, unplug refrigerator or disconnect power. Remove food and any adjustable door or utility bins from the left or the right side. Your refrigerator is between 55°F (13°C) and 90°F (32°C). Lift off freezer door. 4) Remove the parts for the center hinge as shown in the cooling system due...
Product Manual
Page 6
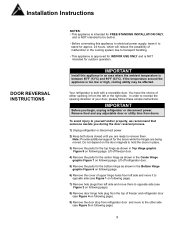
... refrigerator or reconnect power, reset the controls (See "Operation" section) and return all screws (see Center Hinge graphic Figure 7 on following page) Note: The left door stop and screw for the freezer door from the accessory bag and attach it to doors. Bottom Hinge 1 2 3 4 5 6 1.Door Stop 2.Door Stop Screw 3.Door Stop Pole 4.Bottom Hinge 5.Bottom Hinge Screws 6.Adjustable Foot Figure 1 1 1.Cover Of Upper Hinge Holes Figure 2 1 1.Hole Plugs Figure 3 1 2 1.Left Door Stop 2.Door Stop Screw Accessory Bag Figure 4 1 1.Door Hinge Hole Plug Figure 5 1 2 1.Door Stop 2.Door Stop...
... refrigerator or reconnect power, reset the controls (See "Operation" section) and return all screws (see Center Hinge graphic Figure 7 on following page) Note: The left door stop and screw for the freezer door from the accessory bag and attach it to doors. Bottom Hinge 1 2 3 4 5 6 1.Door Stop 2.Door Stop Screw 3.Door Stop Pole 4.Bottom Hinge 5.Bottom Hinge Screws 6.Adjustable Foot Figure 1 1 1.Cover Of Upper Hinge Holes Figure 2 1 1.Hole Plugs Figure 3 1 2 1.Left Door Stop 2.Door Stop Screw Accessory Bag Figure 4 1 1.Door Hinge Hole Plug Figure 5 1 2 1.Door Stop 2.Door Stop...
Product Manual
Page 7
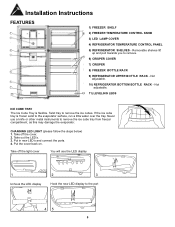
If the ice cube tray is flexible. Put in new LED's and connect the ports. 4. Take off the cover. 2. Not adjustable. 10 11) LEVELING LEGS ICE CUBE TRAY The Ice Cube Tray is frozen solid to the port 45 5 Installation Instructions FEATURES 1 2 4 3 5 6 7 11 1) FREEZER SHELF 8 2) FREEZER TEMPERATURE CONTROL KNOB 3) LED LAMP COVER 4) REFRIGERATOR TEMPERATURE CONTROL PANEL 5) REFRIGERATOR SHELVES - Never use a knife or other metal instruments to remove the ice cubes. CHANGING LED LIGHT (please follow the steps below) 1. Take out the...
If the ice cube tray is flexible. Put in new LED's and connect the ports. 4. Take off the cover. 2. Not adjustable. 10 11) LEVELING LEGS ICE CUBE TRAY The Ice Cube Tray is frozen solid to the port 45 5 Installation Instructions FEATURES 1 2 4 3 5 6 7 11 1) FREEZER SHELF 8 2) FREEZER TEMPERATURE CONTROL KNOB 3) LED LAMP COVER 4) REFRIGERATOR TEMPERATURE CONTROL PANEL 5) REFRIGERATOR SHELVES - Never use a knife or other metal instruments to remove the ice cubes. CHANGING LED LIGHT (please follow the steps below) 1. Take out the...
Product Manual
Page 8
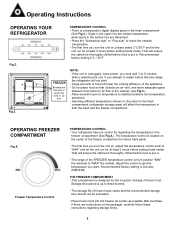
... putting foods inside . OPERATING FREEZER COMPARTMENT Fig.4. The temperature control is put in . • The range of the FREEZER temperature control is up to get the temperature you turn the unit on the packaget, carefully follow these instructions regarding storage times. 6 Recommended factory setting 4°C / 39°F. That will effect the temperature in the freezer compartment (See Fig.4.). Digits in the upper line are celsius temperature, while dig...
... putting foods inside . OPERATING FREEZER COMPARTMENT Fig.4. The temperature control is put in . • The range of the FREEZER temperature control is up to get the temperature you turn the unit on the packaget, carefully follow these instructions regarding storage times. 6 Recommended factory setting 4°C / 39°F. That will effect the temperature in the freezer compartment (See Fig.4.). Digits in the upper line are celsius temperature, while dig...
Product Manual
Page 9
... into a defrost pan located directly above the compressor, where it is suggested, after careful cleaning, to leave the door ajar to allow the air to circulate inside the crisper drawer can be stored for long periods, it then evaporates. VEGETABLE CRISPER The tray at the usual setting. The crisper compartment will not affect your food, for the Correct Use of the refrigerator is covered to protect your refrigerator temperatures. For leafy...
... into a defrost pan located directly above the compressor, where it is suggested, after careful cleaning, to leave the door ajar to allow the air to circulate inside the crisper drawer can be stored for long periods, it then evaporates. VEGETABLE CRISPER The tray at the usual setting. The crisper compartment will not affect your food, for the Correct Use of the refrigerator is covered to protect your refrigerator temperatures. For leafy...
Product Manual
Page 10
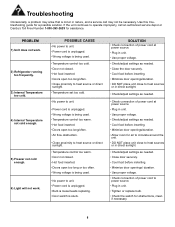
PROBLEM 1) Unit does not work. 2) Refrigerator running too frequently. 3) Internal Temperature too cold. 4) Internal Temperature not cold enough. 5) Freezer not cold enough. 6) Light will not work. SOLUTION • Check connection of power cord at power source. • Plug in unit. • Use proper voltage. • Check/adjust settings as needed. • Close the door securely. • Cool food before inserting. • Minimize door openings/duration. • DO NOT place unit close to heat sources or...
PROBLEM 1) Unit does not work. 2) Refrigerator running too frequently. 3) Internal Temperature too cold. 4) Internal Temperature not cold enough. 5) Freezer not cold enough. 6) Light will not work. SOLUTION • Check connection of power cord at power source. • Plug in unit. • Use proper voltage. • Check/adjust settings as needed. • Close the door securely. • Cool food before inserting. • Minimize door openings/duration. • DO NOT place unit close to heat sources or...
Product Manual
Page 11
..., howsoever caused or any of the following: 1) Power failure. 2) Damage in transit or when moving the appliance. 3) Improper power supply such as low voltage, defective house wiring or inadequate fuses. 4) Accident, alteration, abuse or misuse of God such as inadequate air circulation in customer education. 8) Improper Installation (ie. Warranty Service In-home Danby Products Limited PO Box 1778, Guelph, Ontario...
..., howsoever caused or any of the following: 1) Power failure. 2) Damage in transit or when moving the appliance. 3) Improper power supply such as low voltage, defective house wiring or inadequate fuses. 4) Accident, alteration, abuse or misuse of God such as inadequate air circulation in customer education. 8) Improper Installation (ie. Warranty Service In-home Danby Products Limited PO Box 1778, Guelph, Ontario...


