
Product Manual
Page 2
... properly grounded. INSTALLATION INSTRUCTIONS Remove exterior and interior packings, wipe the outside thoroughly with a soft dry cloth and the inside with a strong, level floor. 2) Allow 5 inches of space between the back of electrical shock by adjusting the front leveling leg, located under the refrigerator. To avoid vibration, the unit must be grounded. IMPORTANT SAFETY INFORMATION ELECTRICAL This appliance must be set level. In the...
... properly grounded. INSTALLATION INSTRUCTIONS Remove exterior and interior packings, wipe the outside thoroughly with a soft dry cloth and the inside with a strong, level floor. 2) Allow 5 inches of space between the back of electrical shock by adjusting the front leveling leg, located under the refrigerator. To avoid vibration, the unit must be grounded. IMPORTANT SAFETY INFORMATION ELECTRICAL This appliance must be set level. In the...
Product Manual
Page 3
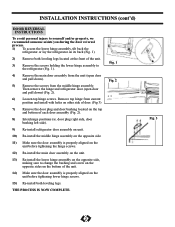
... located on its back (Fig. 1). 2) Remove both leveling legs. Fig. 1 Fig. 2 Fig. 3 2 THE PROCESS IS NOW COMPLETE. Then remove the hinge and refrigerator door (open door and pull down ) (Fig. 2). 6) Loosen top hinge screws. INSTALLATION INSTRUCTIONS (cont'd) DOOR REVERSAL INSTRUCTIONS To avoid personal injury to the refrigerator (Fig. 1). 4) Remove the main door assembly from the unit (open door and pull down ). 5) Remove the screws from the middle hinge assembly. door plug right side, door bushing left side). 9) Re-install refrigerator door assembly...
... located on its back (Fig. 1). 2) Remove both leveling legs. Fig. 1 Fig. 2 Fig. 3 2 THE PROCESS IS NOW COMPLETE. Then remove the hinge and refrigerator door (open door and pull down ) (Fig. 2). 6) Loosen top hinge screws. INSTALLATION INSTRUCTIONS (cont'd) DOOR REVERSAL INSTRUCTIONS To avoid personal injury to the refrigerator (Fig. 1). 4) Remove the main door assembly from the unit (open door and pull down ). 5) Remove the screws from the middle hinge assembly. door plug right side, door bushing left side). 9) Re-install refrigerator door assembly...
Product Manual
Page 4
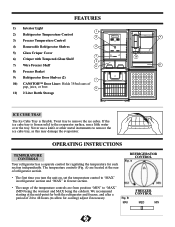
...Never use a knife or other metal instruments to remove the ice cubes. B MAX FREEZER CONTROL MED MIN 3 FEATURES 1) Interior Light 1 2) Refrigerator Temperature Control 2 3) Freezer Temperature Control 4) Removable Refrigerator Shelves 4 5) Glass Crisper Cover 3 6) Crisper with Tempered-Glass Shelf 5 7) Wire Freezer Shelf 6 8) Freezer Basket 9) Refrigerator Door Shelves (2) 7 10) CANSTORTM Door Liner: Holds 355ml cans of pop, juice, or beer. 8 11) 2 Liter Bottle Storage 9 10 11 ICE CUBE TRAY The Ice Cube Tray is frozen solid to the evaporator surface, run a little water over...
...Never use a knife or other metal instruments to remove the ice cubes. B MAX FREEZER CONTROL MED MIN 3 FEATURES 1) Interior Light 1 2) Refrigerator Temperature Control 2 3) Freezer Temperature Control 4) Removable Refrigerator Shelves 4 5) Glass Crisper Cover 3 6) Crisper with Tempered-Glass Shelf 5 7) Wire Freezer Shelf 6 8) Freezer Basket 9) Refrigerator Door Shelves (2) 7 10) CANSTORTM Door Liner: Holds 355ml cans of pop, juice, or beer. 8 11) 2 Liter Bottle Storage 9 10 11 ICE CUBE TRAY The Ice Cube Tray is frozen solid to the evaporator surface, run a little water over...
Product Manual
Page 5
.... We recommend setting the thermostat at the usual setting. However, if you never have to retain moisture. Defrosting is covered to defrost the freezer compartment. During longer absences; c) clean the refrigerator thoroughly, including defrost pan. • Always remove porous store wrapping paper from the power supply. Vegetable Crisper The tray at the bottom of the refrigerator is done automatically by "•". CARE AND MAINTENANCE Cooling System This refrigerator is routed...
.... We recommend setting the thermostat at the usual setting. However, if you never have to retain moisture. Defrosting is covered to defrost the freezer compartment. During longer absences; c) clean the refrigerator thoroughly, including defrost pan. • Always remove porous store wrapping paper from the power supply. Vegetable Crisper The tray at the bottom of the refrigerator is done automatically by "•". CARE AND MAINTENANCE Cooling System This refrigerator is routed...
Product Manual
Page 6
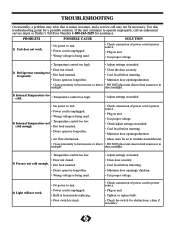
.... • Adjust settings as needed . • Door not closed . 5) Freezer not cold enough. • Hot food inserted. • Doors open too long/often. • Close the door securely. • Cool food before inserting. • Minimize door openings/duration. • Air flow obstruction. • Allow room for obstructions, clean if necessary. 5 TROUBLESHOOTING Occasionally, a problem may not be necessary. direct sunlight. • Temperature control too low. • Door not closed . 2) Refrigerator running too...
.... • Adjust settings as needed . • Door not closed . 5) Freezer not cold enough. • Hot food inserted. • Doors open too long/often. • Close the door securely. • Cool food before inserting. • Minimize door openings/duration. • Air flow obstruction. • Allow room for obstructions, clean if necessary. 5 TROUBLESHOOTING Occasionally, a problem may not be necessary. direct sunlight. • Temperature control too low. • Door not closed . 2) Refrigerator running too...
Product Manual
Page 7
...-in of the unit and by Danby. Save as inadequate air circulation in the room or abnormal operating conditions (extremely high or low room temperature). 5) Use for warranty service by the purchase of Danby under the normal operating conditions intended by the unit. LIMITED IN-HOME APPLIANCE WARRANTY This quality product is warranted to be free from manufacturer's defects in material...
...-in of the unit and by Danby. Save as inadequate air circulation in the room or abnormal operating conditions (extremely high or low room temperature). 5) Use for warranty service by the purchase of Danby under the normal operating conditions intended by the unit. LIMITED IN-HOME APPLIANCE WARRANTY This quality product is warranted to be free from manufacturer's defects in material...


