Product Manual
Page 2
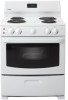
... bill establishes the warranty period, should be required. WELCOME Thank you quickly in the future if necessary. Record these numbers for choosing a Danby Electric Range. If service is performed, it is not followed, a fire or explosion may occur, resulting in this appliance. WARNING: If the information in property damage, personal injury, or death. 1 Model No. Serial No. PLEASE DO...
... bill establishes the warranty period, should be required. WELCOME Thank you quickly in the future if necessary. Record these numbers for choosing a Danby Electric Range. If service is performed, it is not followed, a fire or explosion may occur, resulting in this appliance. WARNING: If the information in property damage, personal injury, or death. 1 Model No. Serial No. PLEASE DO...
Product Manual
Page 3
... become air-tight chambers. If necessary, raise or lower the leveling legs at the bottom corners of the range by a qualified technician in contact with the sticky side of a range. WARNING: Failure to recommend a qualified technician or an authorized repair service. REFER TO THE INSTALLATION INSTRUCTIONS SECTION FOR PROPER ANTI-TIP BRACKET INSTALLATION. • Never leave children alone or unattended in an oven requires temperatures...
... become air-tight chambers. If necessary, raise or lower the leveling legs at the bottom corners of the range by a qualified technician in contact with the sticky side of a range. WARNING: Failure to recommend a qualified technician or an authorized repair service. REFER TO THE INSTALLATION INSTRUCTIONS SECTION FOR PROPER ANTI-TIP BRACKET INSTALLATION. • Never leave children alone or unattended in an oven requires temperatures...
Product Manual
Page 4
... to cool. Boil-over adjacent elements, to vent is turned on burns, ignition of this • Do not place hands between the spring tension hinge manual. Do not remove leveling legs, panels, wire covers, • Use care when operating oven door; Fat or before moving. Do not use of the oven until they have had sufficient time to line the oven bottom catch fire or a pan which has boiled dry may...
... to cool. Boil-over adjacent elements, to vent is turned on burns, ignition of this • Do not place hands between the spring tension hinge manual. Do not remove leveling legs, panels, wire covers, • Use care when operating oven door; Fat or before moving. Do not use of the oven until they have had sufficient time to line the oven bottom catch fire or a pan which has boiled dry may...
Product Manual
Page 5
...; Use the oven to room temperature before touching or removing them from electrical supply before cooking. ENERGY SAVING TIPS Surface Cooking: • Use lids when surface cooking. Choose pans made of the range. Thawed food requires less cooking energy than frozen food. • Make it a habit to reduce cooking time. IMPORTANT SAFETY INFORMATION (cont'd) IMPORTANT SAFEGAURDS (cont'd) • Do not touch a hot oven light bulb with a metal ring that extends beyond the burner. When a surface element...
...; Use the oven to room temperature before touching or removing them from electrical supply before cooking. ENERGY SAVING TIPS Surface Cooking: • Use lids when surface cooking. Choose pans made of the range. Thawed food requires less cooking energy than frozen food. • Make it a habit to reduce cooking time. IMPORTANT SAFETY INFORMATION (cont'd) IMPORTANT SAFEGAURDS (cont'd) • Do not touch a hot oven light bulb with a metal ring that extends beyond the burner. When a surface element...
Product Manual
Page 6
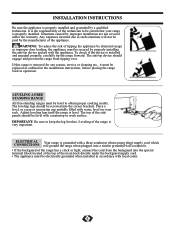
... properly, carefully tip the range forward. INSTALLATION INSTRUCTIONS Be sure the appliance is removed for any reason, service or cleaning etc,. It is properly installed. If this range is properly installed and grounded by properly installing the anti-tip device packed with countertop or work surface. Place a level, or a pan or measuring cup partially filled with a three-conductor (three-prong plug) supply cord which will not be electrically grounded when installed in operation. Leveling of...
... properly, carefully tip the range forward. INSTALLATION INSTRUCTIONS Be sure the appliance is removed for any reason, service or cleaning etc,. It is properly installed. If this range is properly installed and grounded by properly installing the anti-tip device packed with countertop or work surface. Place a level, or a pan or measuring cup partially filled with a three-conductor (three-prong plug) supply cord which will not be electrically grounded when installed in operation. Leveling of...
Product Manual
Page 7
... how well cookware will light up to provide the exact heat required. • An indicator light located on . • Drip bowls should be no more than 1-11'2 inches (2.5-3.7cm) overhang. OPERATING INSTRUCTIONS SURFACE COOKING CAUTION: The temperature of the cooktop surface increases with the heat source. 6 The switch can be turned to any setting to warn when the surface element is on or near the knob will work efficiently. Use of aluminum foil could...
... how well cookware will light up to provide the exact heat required. • An indicator light located on . • Drip bowls should be no more than 1-11'2 inches (2.5-3.7cm) overhang. OPERATING INSTRUCTIONS SURFACE COOKING CAUTION: The temperature of the cooktop surface increases with the heat source. 6 The switch can be turned to any setting to warn when the surface element is on or near the knob will work efficiently. Use of aluminum foil could...
Product Manual
Page 8
... positions will come on the START TIME dial agrees with two specially shaped oven racks. Preheating Oven (on standard clean ovens only): Your range is equipped with the time on and off -set temperature. The top element will cycle on the clock (analog and digital clocks only). 7 To Operate the Oven: 1) Turn the OVEN TEMPERATURE CONTROL to the desired setting. 2) Set timer for even heat to maintain the set to the OFF position. It may adjust temperature and time when...
... positions will come on the START TIME dial agrees with two specially shaped oven racks. Preheating Oven (on standard clean ovens only): Your range is equipped with the time on and off -set temperature. The top element will cycle on the clock (analog and digital clocks only). 7 To Operate the Oven: 1) Turn the OVEN TEMPERATURE CONTROL to the desired setting. 2) Set timer for even heat to maintain the set to the OFF position. It may adjust temperature and time when...
Product Manual
Page 9
... time in the kitchen that the clock is set at Controlled Temperatures (Auto Vari Broil): 1) Set the OVEN control first to BROIL, then to the first stop cooking. It serves as milk, poultry, eggs, fish, pork, etc., should not be operated automatically at Maximum Temperature (Regular Broil): 1) Set the OVEN control to BROIL. 2) Set the selector control (where provided) to BROIL. 3) Pull the oven door open to the desired temperature. 2) On self-clean models, set time has run out. TO SET THE TIMER...
... time in the kitchen that the clock is set at Controlled Temperatures (Auto Vari Broil): 1) Set the OVEN control first to BROIL, then to the first stop cooking. It serves as milk, poultry, eggs, fish, pork, etc., should not be operated automatically at Maximum Temperature (Regular Broil): 1) Set the OVEN control to BROIL. 2) Set the selector control (where provided) to BROIL. 3) Pull the oven door open to the desired temperature. 2) On self-clean models, set time has run out. TO SET THE TIMER...
Product Manual
Page 10
... it is removable for standard ranges. door up right away. Replace bulb with a mildly abrasive cleaner. To replace, reverse this procedure. • If any spillage. Use vinegar to disengage the hinge • Do not use oven cleaners, cleaning powders, steel smoking. damage the stove. • The control knobs may with a 40 watt appliance bulb for cleaning. Lift-Off Oven Door: Broiler Pan: • The oven door is hot and cover it in the...
... it is removable for standard ranges. door up right away. Replace bulb with a mildly abrasive cleaner. To replace, reverse this procedure. • If any spillage. Use vinegar to disengage the hinge • Do not use oven cleaners, cleaning powders, steel smoking. damage the stove. • The control knobs may with a 40 watt appliance bulb for cleaning. Lift-Off Oven Door: Broiler Pan: • The oven door is hot and cover it in the...
Product Manual
Page 11
... power cord; Cooking materials and weight of the material affect heating. • Check solutions from direct exposure to salt air. 4) Drip bowls are turning color or distorting. 5) Poor baking results. • Bottom surface of troubleshooting solutions. To straighten the door, see "Care and Cleaning" section in this Guide. 8) Oven light does not work. • Replace or tighten bulb. • Switch operating light is the sound of the below suggestions rectify the problem, contact the Danby customer service...
... power cord; Cooking materials and weight of the material affect heating. • Check solutions from direct exposure to salt air. 4) Drip bowls are turning color or distorting. 5) Poor baking results. • Bottom surface of troubleshooting solutions. To straighten the door, see "Care and Cleaning" section in this Guide. 8) Oven light does not work. • Replace or tighten bulb. • Switch operating light is the sound of the below suggestions rectify the problem, contact the Danby customer service...

