Product Manual
Page 4
... plug. For plastic items not marked, check the manufacturer's recommendations. • Use only detergent and rinse additives designed for an automatic dishwasher. • Never use of the appliance by a person responsible for their points down or placed in order to avoid a hazard. ... from the open door of least resistant electric current. Important Safety Information READ AND FOLLOW ALL SAFETY INSTRUCTIONS When using your dishwasher, follow the precautions listed below: GROUNDING INSTRUCTIONS SAFETY PRECAUTIONS This appliance must be extremely dangerous if swallowed. The plug must ...
... plug. For plastic items not marked, check the manufacturer's recommendations. • Use only detergent and rinse additives designed for an automatic dishwasher. • Never use of the appliance by a person responsible for their points down or placed in order to avoid a hazard. ... from the open door of least resistant electric current. Important Safety Information READ AND FOLLOW ALL SAFETY INSTRUCTIONS When using your dishwasher, follow the precautions listed below: GROUNDING INSTRUCTIONS SAFETY PRECAUTIONS This appliance must be extremely dangerous if swallowed. The plug must ...
Product Manual
Page 5
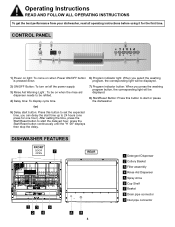
... the washing program button, the corresponding light will be displayed. 8) Start/Reset Button: Press this button to start or pause the dishwasher. (or) 5) Delay start button: Press this button to 24 hours (one hour). After setting the time, press the Start/Reset...indicator light: When you can delay the start the delayed hour, press the Start/Reset button continuously until the "H :00" displays then stop the delay. DISHWASHER FEATURES FRONT 6 DOOR FroOnPt vEieNw 7 REAR 13 5 24 89 4 1 Detergent Dispenser 2 Cutlery Basket 3 Filter assembly 4 Rinse Aid Dispenser 5 Spray ...
... the washing program button, the corresponding light will be displayed. 8) Start/Reset Button: Press this button to start or pause the dishwasher. (or) 5) Delay start button: Press this button to 24 hours (one hour). After setting the time, press the Start/Reset...indicator light: When you can delay the start the delayed hour, press the Start/Reset button continuously until the "H :00" displays then stop the delay. DISHWASHER FEATURES FRONT 6 DOOR FroOnPt vEieNw 7 REAR 13 5 24 89 4 1 Detergent Dispenser 2 Cutlery Basket 3 Filter assembly 4 Rinse Aid Dispenser 5 Spray ...
Product Manual
Page 6
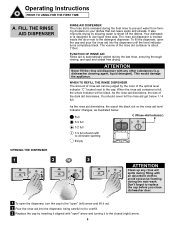
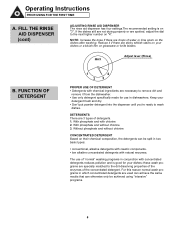
...will be judged by allowing water to the cap. The volume of the optical level indicator "C" located next to sheet off the dishes. dishwasher cleaning agent, liquid detergent). When the rinse aid container is about 110ml. ATTENTION Never fill the rinse aid dispenser with "open" arrow ... indicator turns completely black. Full C (Rinse-Aid Indicator) 3/4 full 1/2 full 1/4 full should never let the rinse aid get below . Your dishwasher is released during the next wash. FILL THE RINSE AID DISPENSER OPENING THE DISPENSER RINSE AID DISPENSER The rinse aid is designed to prevent water...
...will be judged by allowing water to the cap. The volume of the optical level indicator "C" located next to sheet off the dishes. dishwasher cleaning agent, liquid detergent). When the rinse aid container is about 110ml. ATTENTION Never fill the rinse aid dispenser with "open" arrow ... indicator turns completely black. Full C (Rinse-Aid Indicator) 3/4 full 1/2 full 1/4 full should never let the rinse aid get below . Your dishwasher is released during the next wash. FILL THE RINSE AID DISPENSER OPENING THE DISPENSER RINSE AID DISPENSER The rinse aid is designed to prevent water...
Product Manual
Page 7
...are sticky whitish stains on your dishes or a bluish film on their chemical composition, the detergents can otherwise only be split in dishwashers. The use in two basic types: • conventional, alkaline detergents with caustic components. • low alkaline concentrated detergents with ...ingredients are specially matched to wash dishes. For this reason normal wash programs in conjunction with natural enzymes. Reduce it from the dishwasher. • Use only detergent specifically made for your detergent fresh and dry. • Don't put powder detergent into the ...
...are sticky whitish stains on your dishes or a bluish film on their chemical composition, the detergents can otherwise only be split in dishwashers. The use in two basic types: • conventional, alkaline detergents with caustic components. • low alkaline concentrated detergents with ...ingredients are specially matched to wash dishes. For this reason normal wash programs in conjunction with natural enzymes. Reduce it from the dishwasher. • Use only detergent specifically made for your detergent fresh and dry. • Don't put powder detergent into the ...
Product Manual
Page 8
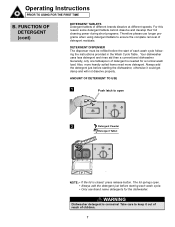
... wash load. AMOUNT OF DETERGENT TO USE 1 Push latch to open . • Always add the detergent just before starting the dishwasher, otherwise it out of reach of detergent residuals. Take care to ensure the complete removal of children. 7 DETERGENT DISPENSER The dispenser... each wash cycle following the instructions provided in the Wash Cycle Table . WARNING Dishwasher detergent is needed for the dishwasher. Your dishwasher uses less detergent and rinse aid than a conventional dishwasher. Also, more heavily soiled items need more detergent. Always add the detergent just...
... wash load. AMOUNT OF DETERGENT TO USE 1 Push latch to open . • Always add the detergent just before starting the dishwasher, otherwise it out of reach of detergent residuals. Take care to ensure the complete removal of children. 7 DETERGENT DISPENSER The dispenser... each wash cycle following the instructions provided in the Wash Cycle Table . WARNING Dishwasher detergent is needed for the dishwasher. Your dishwasher uses less detergent and rinse aid than a conventional dishwasher. Also, more heavily soiled items need more detergent. Always add the detergent just...
Product Manual
Page 10
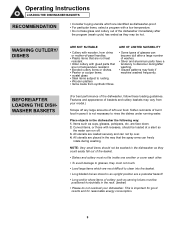
...not necessary to rinse the dishes under running water. All utensils are a potential hazard! • Long and/or sharp items of cutlery such as dishwasher-proof. • For particular items, select a program with glued parts that are face down. 2. NOTE: Very small items should be loaded ... spray arms can freely rotate during /after the program (wash cycle) has ended as cups, glasses, pots/pans, etc. BEFORE/AFTER LOADING THE DISHWASHER BASKETS (For best performance of left over . 4. WASHING CUTLERY/ DISHES ARE NOT SUITABLE • Cutlery with wooden, horn china or mother-of ...
...not necessary to rinse the dishes under running water. All utensils are a potential hazard! • Long and/or sharp items of cutlery such as dishwasher-proof. • For particular items, select a program with glued parts that are face down. 2. NOTE: Very small items should be loaded ... spray arms can freely rotate during /after the program (wash cycle) has ended as cups, glasses, pots/pans, etc. BEFORE/AFTER LOADING THE DISHWASHER BASKETS (For best performance of left over . 4. WASHING CUTLERY/ DISHES ARE NOT SUITABLE • Cutlery with wooden, horn china or mother-of ...
Product Manual
Page 11
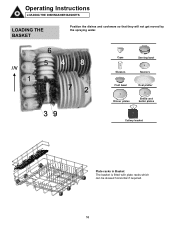
Operating Instructions LOADING THE DISHWASHER BASKETS LOADING THE BASKET Position the dishes and cookware so that they will not get moved by the spraying water. 6 5 1 1 Cups 2 Serving bowl 3 4 Glasses Saucers 1 5 6 Fruit bowl Oval platter 7 Dinner plates 8 Bread and butter plates 9 Cutlery basket Plate racks in Basket The basket is fitted with plate racks which can be stowed horizontal if required. 10
Operating Instructions LOADING THE DISHWASHER BASKETS LOADING THE BASKET Position the dishes and cookware so that they will not get moved by the spraying water. 6 5 1 1 Cups 2 Serving bowl 3 4 Glasses Saucers 1 5 6 Fruit bowl Oval platter 7 Dinner plates 8 Bread and butter plates 9 Cutlery basket Plate racks in Basket The basket is fitted with plate racks which can be stowed horizontal if required. 10
Product Manual
Page 12
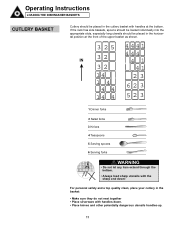
... clean, place your cutlery in the basket: • Make sure they do not nest together • Place silverware with handles-down ! Operating Instructions LOADING THE DISHWASHER BASKETS CUTLERY BASKET Cutlery should be placed in the cutlery basket with handles at the front of the upper basket as shown. 3 2 5 4441 IN 32...
... clean, place your cutlery in the basket: • Make sure they do not nest together • Place silverware with handles-down ! Operating Instructions LOADING THE DISHWASHER BASKETS CUTLERY BASKET Cutlery should be placed in the cutlery basket with handles at the front of the upper basket as shown. 3 2 5 4441 IN 32...
Product Manual
Page 13
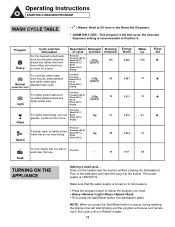
... Wash (55°C) 3/15g 85 and lightly soiled pans. Rinse (or3in1) Normal standard daily cycle. Draw out the basket (see the section entitled Loading the Dishwasher). Program Heavy Cycle selection Information For the heaviest soiled loads, such as plates,glasses,bowls and lightly soiled pans. Rinse (65°C) AHAM DW-1-2005... pots,pans,casserole dishes and dishes that do not need . • Heavy->Normal->Light->Glass->Speed->Soak • Then press the Start/Reset button, the dishwasher starts.
... Wash (55°C) 3/15g 85 and lightly soiled pans. Rinse (or3in1) Normal standard daily cycle. Draw out the basket (see the section entitled Loading the Dishwasher). Program Heavy Cycle selection Information For the heaviest soiled loads, such as plates,glasses,bowls and lightly soiled pans. Rinse (65°C) AHAM DW-1-2005... pots,pans,casserole dishes and dishes that do not need . • Heavy->Normal->Light->Glass->Speed->Soak • Then press the Start/Reset button, the dishwasher starts.
Product Manual
Page 14
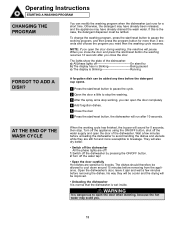
... WASHING PROGRAM CHANGING THE PROGRAM You can open the door completely 4 Add forgotten dishes. 5 Close the door 6 Press the start/reset button, the dishwasher will sound for 8 seconds, then stop working, you need then the washing cycle resumes. If this is dangerous to knocks. The lights show the... state of the dishwasher. Open the dishwasher's door, leave it ajar and wait a few minutes before removing from the appliance. AT THE END OF THE WASH CYCLE When the ...
... WASHING PROGRAM CHANGING THE PROGRAM You can open the door completely 4 Add forgotten dishes. 5 Close the door 6 Press the start/reset button, the dishwasher will sound for 8 seconds, then stop working, you need then the washing cycle resumes. If this is dangerous to knocks. The lights show the... state of the dishwasher. Open the dishwasher's door, leave it ajar and wait a few minutes before removing from the appliance. AT THE END OF THE WASH CYCLE When the ...
Product Manual
Page 15
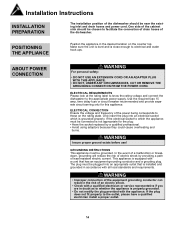
... GROUNDING CONNECTION FROM THE POWER CORD. ELECTRICAL REQUIREMENTS Please look at the rating label to know the rating voltage and connect the dishwasher to the outlet, please have a qualified electrician install a proper outlet. 14 Use the required fuse 15 amp, time delay... is not appropriate for this appliance. Installation Instructions INSTALLATION PREPARATION The installation position of the dishwasher should be chosen to facilitate the connection of drain hoses of the dishwasher. POSITIONING THE APPLIANCE Position the appliance in accordance with a cord that has an equipment-...
... GROUNDING CONNECTION FROM THE POWER CORD. ELECTRICAL REQUIREMENTS Please look at the rating label to know the rating voltage and connect the dishwasher to the outlet, please have a qualified electrician install a proper outlet. 14 Use the required fuse 15 amp, time delay... is not appropriate for this appliance. Installation Instructions INSTALLATION PREPARATION The installation position of the dishwasher should be chosen to facilitate the connection of drain hoses of the dishwasher. POSITIONING THE APPLIANCE Position the appliance in accordance with a cord that has an equipment-...
Product Manual
Page 16
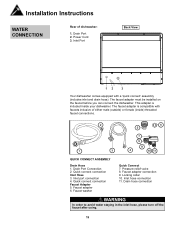
... after using. 15 Installation Instructions WATER CONNECTION Rear of either male (outside) or female (inside your dishwasher. QUICK CONNECT ASSEMBLY Drain Hose 1. The faucet adapter must be installed on the faucet before you can connect the... Adapter 5. Faucet adapter 6. Pressure relief valve 8. Drain Port Connection 2. Drain Port 2. Inlet Port Back View 12 3 Your dishwasher comes equipped with faucets inclusive of dishwasher: 1. Inlet hose connection 11. The faucet adapter is included inside ) threaded faucet connections. This adapter is compatible with a '...
... after using. 15 Installation Instructions WATER CONNECTION Rear of either male (outside) or female (inside your dishwasher. QUICK CONNECT ASSEMBLY Drain Hose 1. The faucet adapter must be installed on the faucet before you can connect the... Adapter 5. Faucet adapter 6. Pressure relief valve 8. Drain Port Connection 2. Drain Port 2. Inlet Port Back View 12 3 Your dishwasher comes equipped with faucets inclusive of dishwasher: 1. Inlet hose connection 11. The faucet adapter is included inside ) threaded faucet connections. This adapter is compatible with a '...
Product Manual
Page 17
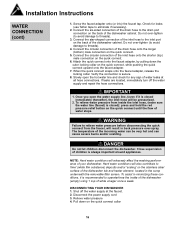
... pushing the quick connect upward onto the faucet adapter. 7. WARNING Failure to relieve water pressure before disconnecting the quick connect from inside of the dishwasher (empty) using 1 cup of the incoming water can be pressurized. 2. NOTE: Hard water conditions will result in minimizing these conditions, it ...is closed ): press and hold the red pressure relief button on the stainless steel surface of the dishwasher tub and heater element, located in the sump underneath the removable filter screen. Pull down the outer locking collar on the back...
... pushing the quick connect upward onto the faucet adapter. 7. WARNING Failure to relieve water pressure before disconnecting the quick connect from inside of the dishwasher (empty) using 1 cup of the incoming water can be pressurized. 2. NOTE: Hard water conditions will result in minimizing these conditions, it ...is closed ): press and hold the red pressure relief button on the stainless steel surface of the dishwasher tub and heater element, located in the sump underneath the removable filter screen. Pull down the outer locking collar on the back...
Product Manual
Page 18
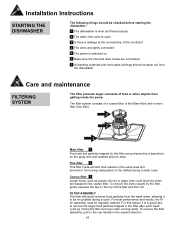
... sure the inlet and drain hoses are not twisted 7 All packing materials and removable printings should be taken out from the dishwasher Care and maintenance FILTERING SYSTEM The filter prevents larger remnants of food or other objects from the wash water, allowing it out... FILTER ASSEMBLY The filter efficiently removes food particles from getting inside the pump. Installation Instructions STARTING THE DISHWASHER The following things should be checked before starting the dishwasher: 1 The dishwasher is level and fixed properly 2 The water inlet valve is open 3 Is there a leakage at ...
... sure the inlet and drain hoses are not twisted 7 All packing materials and removable printings should be taken out from the dishwasher Care and maintenance FILTERING SYSTEM The filter prevents larger remnants of food or other objects from the wash water, allowing it out... FILTER ASSEMBLY The filter efficiently removes food particles from getting inside the pump. Installation Instructions STARTING THE DISHWASHER The following things should be checked before starting the dishwasher: 1 The dishwasher is level and fixed properly 2 The water inlet valve is open 3 Is there a leakage at ...
Product Manual
Page 19
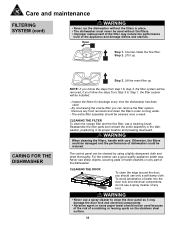
.... Remove any kind. WARNING When cleaning the filters, handle with care. Otherwise, the filters could be damaged and the performance of dishwasher could be cleaned once a week. To avoid penetration of water into the door lock and electrical components, do not use sharp objects...harsh cleaners on the stainless steel surface. 18 Step 2. Reassemble the filter parts and reinsert the entire assembly in the dishwasher, positioning in place. • The dishwasher must never be used without the filters in its proper location and pressing downward. NOTE: If you can be used ...
.... Remove any kind. WARNING When cleaning the filters, handle with care. Otherwise, the filters could be damaged and the performance of dishwasher could be cleaned once a week. To avoid penetration of water into the door lock and electrical components, do not use sharp objects...harsh cleaners on the stainless steel surface. 18 Step 2. Reassemble the filter parts and reinsert the entire assembly in the dishwasher, positioning in place. • The dishwasher must never be used without the filters in its proper location and pressing downward. NOTE: If you can be used ...
Product Manual
Page 20
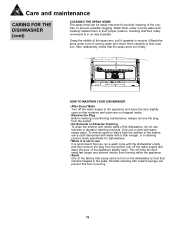
... • Seals One of running water andcarefully replace them carefully to the appliance and leave the door slightly open . HOW TO MAINTAIN YOUR DISHWASHER • After Every Wash Turn off the water supply and leave the door of the appliance slightly open so that moisture and odors are ...the surface of the interior, use a cloth dampened with water with a little vinegar, or a cleaning product made specifically for periodic cleaning of the dishwasher, do not use It is recommend that you run a wash cycle with warm soapy water. After reassembly, check that remains trapped in no way ...
... • Seals One of running water andcarefully replace them carefully to the appliance and leave the door slightly open . HOW TO MAINTAIN YOUR DISHWASHER • After Every Wash Turn off the water supply and leave the door of the appliance slightly open so that moisture and odors are ...the surface of the interior, use a cloth dampened with water with a little vinegar, or a cleaning product made specifically for periodic cleaning of the dishwasher, do not use It is recommend that you run a wash cycle with warm soapy water. After reassembly, check that remains trapped in no way ...
Product Manual
Page 21
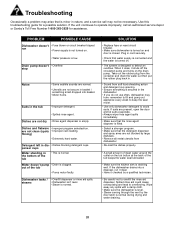
...out appliance every week to keep the seal moist. • Use only dishwasher detergent to overflowing. Troubleshooting Occasionally a problem may arise that is minor in nature, and a service call an authorized service depot or Danby's Toll Free Number 1-800-263-2629 for a possible solution. Detergent ...left in cord securely. • Check that water supply is connected and the water is turned on and door is normal. Dishwasher leaks / • Overfill dispenser or rinse...
...out appliance every week to keep the seal moist. • Use only dishwasher detergent to overflowing. Troubleshooting Occasionally a problem may arise that is minor in nature, and a service call an authorized service depot or Danby's Toll Free Number 1-800-263-2629 for a possible solution. Detergent ...left in cord securely. • Check that water supply is connected and the water is turned on and door is normal. Dishwasher leaks / • Overfill dispenser or rinse...
Product Manual
Page 43
... pièce Tel: 1-800-26(1-800-263-2629) ModeMlo• dMeold•èMleo•dMèoledelo DDW611WLED DaDnbaynbPyroPdruocdtuscLtsimLiitmedit,eGdu, eOlpnhtaOrion,taCraionaCdaanaNd1aHN61ZH96Z9 DDanabnybyPrPordoudcutcstsInIcn.,cF.,inFdinladyla, Oy,hOiohUioS, AU4S5A843598-046069 DISHWASHER The model number of your appliance is found on the serial plate located on the back panel of the service...
... pièce Tel: 1-800-26(1-800-263-2629) ModeMlo• dMeold•èMleo•dMèoledelo DDW611WLED DaDnbaynbPyroPdruocdtuscLtsimLiitmedit,eGdu, eOlpnhtaOrion,taCraionaCdaanaNd1aHN61ZH96Z9 DDanabnybyPrPordoudcutcstsInIcn.,cF.,inFdinladyla, Oy,hOiohUioS, AU4S5A843598-046069 DISHWASHER The model number of your appliance is found on the serial plate located on the back panel of the service...


