Product Manual
Page 3
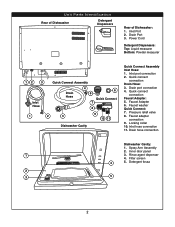
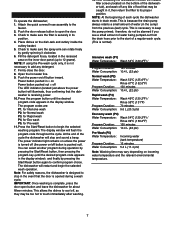
Power Cord Detergent Dispensers: Top: Liquid measurer Bottom: Powder measurer 12 3 Inlet Hose 1 Quick Connect Assembly Drain Hose 4 6 5 Quick Connect 7 8 2 3 9 10 11 Dishwasher Cavity Quick Connect Assembly Inlet Hose: 1. Drain port connection 4. Pressure relief valve 8. Spray Arm Assembly 2. ...Rear of Dishwasher: 1. Faucet Adapter 6. Inlet Port 2. Quick connect connection Faucet Adapter: 5. Inlet hose connection 11. Inner door panel 1 3. Faucet adapter connection 9. Inlet port connection 2. Locking collar 10. Detergent fossa 2 3 5 2...
Power Cord Detergent Dispensers: Top: Liquid measurer Bottom: Powder measurer 12 3 Inlet Hose 1 Quick Connect Assembly Drain Hose 4 6 5 Quick Connect 7 8 2 3 9 10 11 Dishwasher Cavity Quick Connect Assembly Inlet Hose: 1. Drain port connection 4. Pressure relief valve 8. Spray Arm Assembly 2. ...Rear of Dishwasher: 1. Faucet Adapter 6. Inlet Port 2. Quick connect connection Faucet Adapter: 5. Inlet hose connection 11. Inner door panel 1 3. Faucet adapter connection 9. Inlet port connection 2. Locking collar 10. Detergent fossa 2 3 5 2...
Product Manual
Page 5
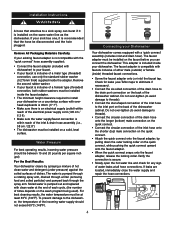
... To prevent damage to the dishwasher, the temperature of the incoming water supply should be installed on the back of the inlet & drain hose assembly (i.e., 58 cm / 22.8"). • The dishwasher must be disconnected and the hole plugged. If your faucet is within reach of ...adapter is recommended that attaches to a sink spray can connect the dishwasher. If your existing faucet adapter is not compatible with the "quick connect" hose assembly supplied; • Connect the faucet adapter (included with dishwasher) to your faucet. • If your sink has one, it is pumped...
... To prevent damage to the dishwasher, the temperature of the incoming water supply should be installed on the back of the inlet & drain hose assembly (i.e., 58 cm / 22.8"). • The dishwasher must be disconnected and the hole plugged. If your faucet is within reach of ...adapter is recommended that attaches to a sink spray can connect the dishwasher. If your existing faucet adapter is not compatible with the "quick connect" hose assembly supplied; • Connect the faucet adapter (included with dishwasher) to your faucet. • If your sink has one, it is pumped...
Product Manual
Page 6
... BURNS AND/OR SCALDING. NOTE: Hard water conditions will adversely affect the washing performance of water stops. • Disconnect the quick-connect hose assembly by pulling down on the outer locking collar, (thus releasing the quick-connect from the faucet adapter). Press and hold the red ...• Close the hot water supply at least once a week. Loading your detergent is recommended to release the water pressure inside the inlet hose. DANGER DO NOT LET CHILDREN DISCONNECT THE DISHWASHER; To assist in a normal wash cycle. When loading/unloading is designed to its washing power...
... BURNS AND/OR SCALDING. NOTE: Hard water conditions will adversely affect the washing performance of water stops. • Disconnect the quick-connect hose assembly by pulling down on the outer locking collar, (thus releasing the quick-connect from the faucet adapter). Press and hold the red ...• Close the hot water supply at least once a week. Loading your detergent is recommended to release the water pressure inside the inlet hose. DANGER DO NOT LET CHILDREN DISCONNECT THE DISHWASHER; To assist in a normal wash cycle. When loading/unloading is designed to its washing power...
Product Manual
Page 8
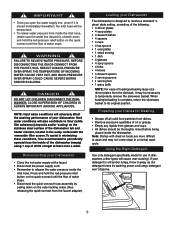
.... 4. Check to keep the pump primed; This allows the dishes to cool off any detergent. 7. This is securely in the sump) from the drain hose prior to touch immediately after washing. 12. Fill the detergent fossa, located in the display window. NOTE: If using the Pre-wash cycle only, it... light remains on unless the power is turned off (the power on /off button is not necessary to 12 grams). Attach the quick connect hose assembly to confirm program choice. You can rotate freely by pressing the Start/Reset button, then pressing the program key (until the desired program ...
.... 4. Check to keep the pump primed; This allows the dishes to cool off any detergent. 7. This is securely in the sump) from the drain hose prior to touch immediately after washing. 12. Fill the detergent fossa, located in the display window. NOTE: If using the Pre-wash cycle only, it... light remains on unless the power is turned off (the power on /off button is not necessary to 12 grams). Attach the quick connect hose assembly to confirm program choice. You can rotate freely by pressing the Start/Reset button, then pressing the program key (until the desired program ...
Product Manual
Page 9
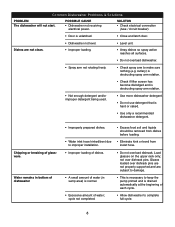
...Dishwasher Problems & Solutions PROBLEM The dishwasher will not start. Water remains in bottom of dishwasher • Improperly prepared dishes. • Water inlet hose kinked/bent due to keep the pump primed and is unlatched. • Close and latch door. • Dishwasher not level. •... improper installation. • Excess food soil and liquids should be removed from dishes before loading. • Eliminate kink or bend from inelet hose. • Improper loading of dishes. • A small amount of water; cutlery) is obstructing spray arm rotation. • Check if...
...Dishwasher Problems & Solutions PROBLEM The dishwasher will not start. Water remains in bottom of dishwasher • Improperly prepared dishes. • Water inlet hose kinked/bent due to keep the pump primed and is unlatched. • Close and latch door. • Dishwasher not level. •... improper installation. • Excess food soil and liquids should be removed from dishes before loading. • Eliminate kink or bend from inelet hose. • Improper loading of dishes. • A small amount of water; cutlery) is obstructing spray arm rotation. • Check if...
