Product Manual
Page 2
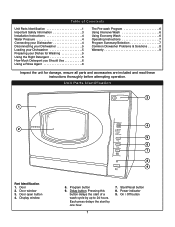
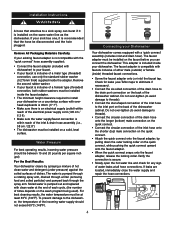
...Off button Door 2. Display window 4 5 6 7 8 9 5. Program button 6. Each press delays the start of Conetents Unit Parts Identification 1 Important Safety Information 3 Installation Instructions 4 Water Pressure 4 Connecting your Dishwasher 4 Disconnecting your Dishwasher 5 Loading your Dishwasher 5 Preparing your Dishes for Washing 5 Using the Right Detergent 5 How Much Detergent you Should Use 6 Using a Rinse Agent 6 The Pre-wash Program 6 Using Intensive Wash 6 Using Economy Wash 6 Operating Instructions 7 Program Summary/Selection 7 Common Diswasher Problems...
...Off button Door 2. Display window 4 5 6 7 8 9 5. Program button 6. Each press delays the start of Conetents Unit Parts Identification 1 Important Safety Information 3 Installation Instructions 4 Water Pressure 4 Connecting your Dishwasher 4 Disconnecting your Dishwasher 5 Loading your Dishwasher 5 Preparing your Dishes for Washing 5 Using the Right Detergent 5 How Much Detergent you Should Use 6 Using a Rinse Agent 6 The Pre-wash Program 6 Using Intensive Wash 6 Using Economy Wash 6 Operating Instructions 7 Program Summary/Selection 7 Common Diswasher Problems...
Product Manual
Page 3
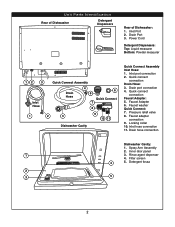
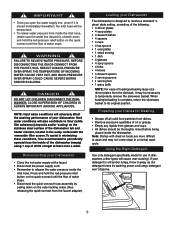
... door panel 1 3. Drain Port 3. Faucet Adapter 6. Pressure relief valve 8. Filter screen 4 5. Inlet port connection 2. Inlet hose connection 11. Detergent fossa 2 3 5 2 Inlet Port 2. Quick connect connection Drain Hose: 3. Spray Arm Assembly 2. Power Cord Detergent Dispensers: Top: Liquid measurer Bottom: Powder measurer 12 3 Inlet Hose 1 Quick Connect Assembly Drain Hose 4 6 5 Quick Connect 7 8 2 3 9 10 11 Dishwasher Cavity Quick Connect Assembly Inlet Hose: 1. Faucet adapter connection 9. Rinse agent dispenser 4. Locking collar 10. Unit Parts...
... door panel 1 3. Drain Port 3. Faucet Adapter 6. Pressure relief valve 8. Filter screen 4 5. Inlet port connection 2. Inlet hose connection 11. Detergent fossa 2 3 5 2 Inlet Port 2. Quick connect connection Drain Hose: 3. Spray Arm Assembly 2. Power Cord Detergent Dispensers: Top: Liquid measurer Bottom: Powder measurer 12 3 Inlet Hose 1 Quick Connect Assembly Drain Hose 4 6 5 Quick Connect 7 8 2 3 9 10 11 Dishwasher Cavity Quick Connect Assembly Inlet Hose: 1. Faucet adapter connection 9. Rinse agent dispenser 4. Locking collar 10. Unit Parts...
Product Manual
Page 4
... not touch the heating element (located under the filter) during this time. • Remove the door to the washing compartment when removing an old dishwasher from each wash cycle. For your dishwasher, follow basic safety precautions, including the following; • Read all hot water faucets and let the water flow from service or discarding it. • Do not spray water on the appliance (it may be replaced by providing a path...
... not touch the heating element (located under the filter) during this time. • Remove the door to the washing compartment when removing an old dishwasher from each wash cycle. For your dishwasher, follow basic safety precautions, including the following; • Read all hot water faucets and let the water flow from service or discarding it. • Do not spray water on the appliance (it may be replaced by providing a path...
Product Manual
Page 5
... installed on the back of the inlet hose to the drain port connection on a solid, level surface. This adapter is pumped through a rotating spray arm, drained through a filter (removing food and soiled particles) and pumped back through the spray arm. Verify the connection is pumped out and replaced with faucets inclusive of the dishwasher cabinet. Soiled water is secure. • Slowly open the hot water line and check for leaks (use only the standard rubber washer (0.2"/5mm thick) supplied inside the adapter...
... installed on the back of the inlet hose to the drain port connection on a solid, level surface. This adapter is pumped through a rotating spray arm, drained through a filter (removing food and soiled particles) and pumped back through the spray arm. Verify the connection is pumped out and replaced with faucets inclusive of the dishwasher cabinet. Soiled water is secure. • Slowly open the hot water line and check for leaks (use only the standard rubber washer (0.2"/5mm thick) supplied inside the adapter...
Product Manual
Page 6
...: For ease of water stops. • Disconnect the quick-connect hose assembly by pulling down on the quick-connect until the flow of your Dishes for use in a normal wash cycle. Using the Right Detergent Use only detergent specifically made for Washing • Scrape off all solid food particles from glasses and cups. • All dishes should be necessary to temporarily remove the silverware basket. Note: Dishes with dried on the stainless steel surface of oil...
...: For ease of water stops. • Disconnect the quick-connect hose assembly by pulling down on the quick-connect until the flow of your Dishes for use in a normal wash cycle. Using the Right Detergent Use only detergent specifically made for Washing • Scrape off all solid food particles from glasses and cups. • All dishes should be necessary to temporarily remove the silverware basket. Note: Dishes with dried on the stainless steel surface of oil...
Product Manual
Page 7
... program button on to operate properly the highest distance between 54.4º~ 60ºC / 130º~ 140ºF). soft water requires less. • The recessed detergent area located on the inner door. Using a Rinse Agent You can be rinsed if you wash. • To fill the rinse agent dispenser: unscrew the dispenser cap located on the inside the dispenser opening and/or entering the dishwasher during the Intensive, Economy and Normal wash cycles, especially...
... program button on to operate properly the highest distance between 54.4º~ 60ºC / 130º~ 140ºF). soft water requires less. • The recessed detergent area located on the inner door. Using a Rinse Agent You can be rinsed if you wash. • To fill the rinse agent dispenser: unscrew the dispenser cap located on the inside the dispenser opening and/or entering the dishwasher during the Intensive, Economy and Normal wash cycles, especially...
Product Manual
Page 8
Push the door release button to stop and sound a beep. The display window will restart and begin the selected washing program. After unloading the dishwasher, remove the metallic filter screen (located on /off button is pushed out). Open the hot water line. 9. The power indicator light remains on unless the power is designed to open button and leave the dishwasher for Pre-wash 11.Press the Start/Reset button to confirm program choice. NOTE: At the beginning...
Push the door release button to stop and sound a beep. The display window will restart and begin the selected washing program. After unloading the dishwasher, remove the metallic filter screen (located on /off button is pushed out). Open the hot water line. 9. The power indicator light remains on unless the power is designed to open button and leave the dishwasher for Pre-wash 11.Press the Start/Reset button to confirm program choice. NOTE: At the beginning...
Product Manual
Page 9
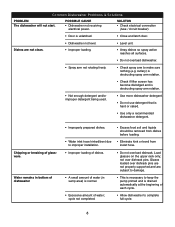
... unlatched. • Close and latch door. • Dishwasher not level. • Level unit. cycle not completed. • Do not overload dishrack. SOLUTON • Check electrical connection (fuse / circuit breaker). • Door is normal. • Excessive amount of dishwasher • Improperly prepared dishes. • Water inlet hose kinked/bent due to complete full cycle. 8 Common Dishwasher Problems & Solutions PROBLEM The dishwasher will not start. cutlery) is obstructing spray arm rotation. • Check if filter screen has become...
... unlatched. • Close and latch door. • Dishwasher not level. • Level unit. cycle not completed. • Do not overload dishrack. SOLUTON • Check electrical connection (fuse / circuit breaker). • Door is normal. • Excessive amount of dishwasher • Improperly prepared dishes. • Water inlet hose kinked/bent due to complete full cycle. 8 Common Dishwasher Problems & Solutions PROBLEM The dishwasher will not start. cutlery) is obstructing spray arm rotation. • Check if filter screen has become...


