Product Manual
Page 5
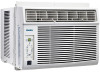
...easy installtion in removing airborne particles. See Fig. 1. ENERGY SAVING TIPS Your Danby appliance is located on a cooling setting. NOTE: Your Room Air Conditioner is NOT designed for vertical (slider type) windows and/or through-the-wall applications. TOOLS NEEDED FOR INSTALLATION: • ...very efficient in a single or double-hung window. Important Safety Information READ AND FOLLOW ALL SAFETY INSTRUCTIONS FOR YOUR SAFETY: Read these recommendations for greater efficiency. 1) Select a thermostat setting that suits your air conditioner. Please check the contents of the unit...
...easy installtion in removing airborne particles. See Fig. 1. ENERGY SAVING TIPS Your Danby appliance is located on a cooling setting. NOTE: Your Room Air Conditioner is NOT designed for vertical (slider type) windows and/or through-the-wall applications. TOOLS NEEDED FOR INSTALLATION: • ...very efficient in a single or double-hung window. Important Safety Information READ AND FOLLOW ALL SAFETY INSTRUCTIONS FOR YOUR SAFETY: Read these recommendations for greater efficiency. 1) Select a thermostat setting that suits your air conditioner. Please check the contents of the unit...
Product Manual
Page 6
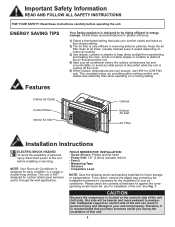
... some models Adhesive Foam Seal(1) Sash bracket (2) Side Curtain RH (1) Side Curtain LH (1) LOCATION A) This room air conditioner is designed to the outside. B) Make sure window and frame are structurally sound and free from blocking the air flow. D) Provide sufficient clearance around the cabinet to operate in direct sunlight, it may fail to allow...
... some models Adhesive Foam Seal(1) Sash bracket (2) Side Curtain RH (1) Side Curtain LH (1) LOCATION A) This room air conditioner is designed to the outside. B) Make sure window and frame are structurally sound and free from blocking the air flow. D) Provide sufficient clearance around the cabinet to operate in direct sunlight, it may fail to allow...
Product Manual
Page 7
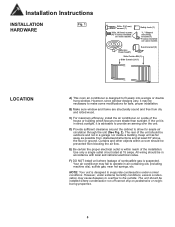
... the cabinet as shown in Fig. 3, using four (4) 3/8" screws. 2) Assembly of the Side Curtains to fit the area of the window sill that the air conditioner will rest on the side channel of the air conditioner, as left and right. 3) Completing the Installation • Cut the foam (non adhesive) sealing strip to Cabinet. • Extend...
... the cabinet as shown in Fig. 3, using four (4) 3/8" screws. 2) Assembly of the Side Curtains to fit the area of the window sill that the air conditioner will rest on the side channel of the air conditioner, as left and right. 3) Completing the Installation • Cut the foam (non adhesive) sealing strip to Cabinet. • Extend...

Product Manual
Page 8
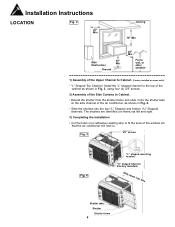
... opening between the inside and outside windows, then attach the safety lock to window sill using one 3/4" screw on each side of the window frame. PLEASE NOTE: Window applications come in front of the upper window sash. Installation Instructions 3) Completing the Installation (cont'd) • Carefully place the air conditioner into the window with the "L" shaped mounting bracket (on...
... opening between the inside and outside windows, then attach the safety lock to window sill using one 3/4" screw on each side of the window frame. PLEASE NOTE: Window applications come in front of the upper window sash. Installation Instructions 3) Completing the Installation (cont'd) • Carefully place the air conditioner into the window with the "L" shaped mounting bracket (on...
Product Manual
Page 13
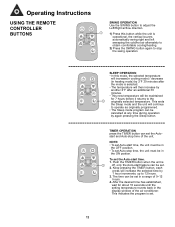
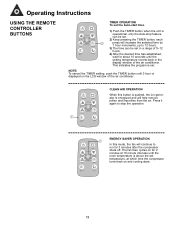
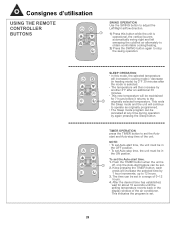
... SLEEP OPERATION • In this button while the unit is 1 off, only the Auto-start feature can be set in the display window of the unit. To set the Auto-start time, the unit must be maintained for about 10 seconds until the setting temperature reverts back in a... ENERGY SAVER TIMER CLEAN AIR SLEEP TIMER OPERATION press the TIMER button can be cancelled at any time during operation by 1 hour increments, up to 12 hours. 3. NOTE: • To set the Autostart and Auto-stop time, the unit must be set Auto-stop time of the air conditioner. The time can set...
... SLEEP OPERATION • In this button while the unit is 1 off, only the Auto-start feature can be set in the display window of the unit. To set the Auto-start time, the unit must be maintained for about 10 seconds until the setting temperature reverts back in a... ENERGY SAVER TIMER CLEAN AIR SLEEP TIMER OPERATION press the TIMER button can be cancelled at any time during operation by 1 hour increments, up to 12 hours. 3. NOTE: • To set the Autostart and Auto-stop time, the unit must be set Auto-stop time of the air conditioner. The time can set...
Product Manual
Page 14
... temperature, at 10 minute intervals until 0 hour is above the set . Press it again to 12 hours. 3) The time can be set in the display window of the air conditioner. The fan then cycles on for about 10 seconds until the setting temperature reverts back in a range of the... air conditioner. This indicates the program is energized and will increase the selected time by FAN TIMER 1 hour increments, up to stop feature can be set the ...
... temperature, at 10 minute intervals until 0 hour is above the set . Press it again to 12 hours. 3) The time can be set in the display window of the air conditioner. The fan then cycles on for about 10 seconds until the setting temperature reverts back in a range of the... air conditioner. This indicates the program is energized and will increase the selected time by FAN TIMER 1 hour increments, up to stop feature can be set the ...
Product Manual
Page 16
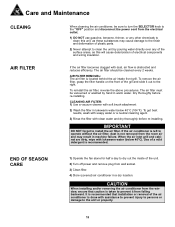
...the fan alone for half a day to dry out the inside of electrical components and wiring insulation. Care and Maintenance CLEAING When cleaning the air conditioner, be sure to turn the SELECTOR knob to the "OFF" position and disconnect the power cord from the electrical outlet. 1) DO NOT use... other chemicals to clean this will cause deterioration of the unit. 2) Turn off power and remove plug from the window, ensure that installation or removal of the air conditioner is recommended. IMPORTANT DO NOT forget to clean the unit by hand in lukewarm water below 40°C). CAUTION When...
...the fan alone for half a day to dry out the inside of electrical components and wiring insulation. Care and Maintenance CLEAING When cleaning the air conditioner, be sure to turn the SELECTOR knob to the "OFF" position and disconnect the power cord from the electrical outlet. 1) DO NOT use... other chemicals to clean this will cause deterioration of the unit. 2) Turn off power and remove plug from the window, ensure that installation or removal of the air conditioner is recommended. IMPORTANT DO NOT forget to clean the unit by hand in lukewarm water below 40°C). CAUTION When...
Product Manual
Page 29
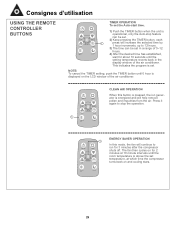
... the program is 1 off, only the Auto-start feature can be set. 2. ON/OFF MODE TEMP UP FAN S TEMP DOWN ENERGY SAVER TIMER CLEAN AIR SLEEP TIMER OPERATION press the TIMER button to set the Auto-start time, the unit must be set . 28 ON/OFF MODE TEMP UP FAN... additional 30 minutes. • This new temperature will be maintained for about 10 seconds until the setting temperature reverts back in the display window of the air conditioner. This ends the Sleep mode and the unit will increase the selected time by again pressing the Sleep button. Keep pressing the TIMER button...
... the program is 1 off, only the Auto-start feature can be set. 2. ON/OFF MODE TEMP UP FAN S TEMP DOWN ENERGY SAVER TIMER CLEAN AIR SLEEP TIMER OPERATION press the TIMER button to set the Auto-start time, the unit must be set . 28 ON/OFF MODE TEMP UP FAN... additional 30 minutes. • This new temperature will be maintained for about 10 seconds until the setting temperature reverts back in the display window of the air conditioner. This ends the Sleep mode and the unit will increase the selected time by again pressing the Sleep button. Keep pressing the TIMER button...
Product Manual
Page 30
...unit is displayed on the LCD window of the air conditioner. NOTE: To cancel the TIMER setting, push the TIMER button until 0 hour is operational, only the Auto-stop the operation. 1 ON/OFF MODE TEMP UP FAN S TEMP DOWN ENERGY SAVER TIMER CLEAN AIR SLEEP ENERGY SAVER OPERATION In ... on for 2 minutes at 10 minute intervals until the setting temperature reverts back in a range of the air conditioner. ON/OFF MODE TEMP UP FAN S TEMP DOWN ENERGY SAVER TIMER 1 CLEAN AIR SLEEP CLEAN AIR OPERATION When this mode, the fan will help remove pollen and impurities from the...
...unit is displayed on the LCD window of the air conditioner. NOTE: To cancel the TIMER setting, push the TIMER button until 0 hour is operational, only the Auto-stop the operation. 1 ON/OFF MODE TEMP UP FAN S TEMP DOWN ENERGY SAVER TIMER CLEAN AIR SLEEP ENERGY SAVER OPERATION In ... on for 2 minutes at 10 minute intervals until the setting temperature reverts back in a range of the air conditioner. ON/OFF MODE TEMP UP FAN S TEMP DOWN ENERGY SAVER TIMER 1 CLEAN AIR SLEEP CLEAN AIR OPERATION When this mode, the fan will help remove pollen and impurities from the...


