Product Manual
Page 10
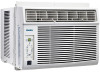
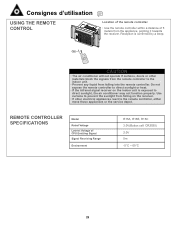
... from the appliance, pointing it towards the receiver. Reception is exposed to the indoor unit. • Prevent any liquid from falling into the remote controller. Use curtains to prevent the sunlight from falling on the indoor unit is confirmed by a beep. 5m O N /O FF TUEMPP MO...if curtains, doors or other electrical appliances react to the remote controller, either move these appliances or call the service depot. REMOTE CONTROLLER SPECIFICATIONS Model Rated Voltage Lowest Voltage of 5 meters from the remote controller to direct sunlight, the air conditioner may not function...
... from the appliance, pointing it towards the receiver. Reception is exposed to the indoor unit. • Prevent any liquid from falling into the remote controller. Use curtains to prevent the sunlight from falling on the indoor unit is confirmed by a beep. 5m O N /O FF TUEMPP MO...if curtains, doors or other electrical appliances react to the remote controller, either move these appliances or call the service depot. REMOTE CONTROLLER SPECIFICATIONS Model Rated Voltage Lowest Voltage of 5 meters from the remote controller to direct sunlight, the air conditioner may not function...

Product Manual
Page 11
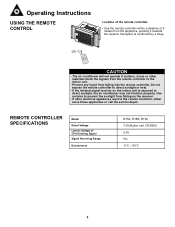
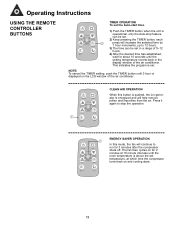
... button Each time you press this button is pressed and stops when the button is selected in a sequence that goes from the air. Operating Instructions REMOTE CONTROLLER BUTTONS NOTE: Modle R15B does not have CLEAN AIR feature. ON/OFF button Operation starts when this button to stop the funtion. This function...
... button Each time you press this button is pressed and stops when the button is selected in a sequence that goes from the air. Operating Instructions REMOTE CONTROLLER BUTTONS NOTE: Modle R15B does not have CLEAN AIR feature. ON/OFF button Operation starts when this button to stop the funtion. This function...
Product Manual
Page 12
...In the Auto mode, the air conditioner can be performed. NOTE: In the Fan mode, the setting temperature is not displayed in the remote controller and you , the desired mode can logically choose the mode of Cooling, Fan, Heating and Dehumidifying by sensing the difference between the...the TEMP UP / DOWN button to CLEAN AIR SLEEP set the desired temperature. It has already been automatically controlled. 11 Operating Instructions USING THE REMOTE CONTROLLER BUTTONS 1 ON/OFF MODE 3 TEMP UP FAN S TEMP DOWN ENERGY SAVER TIMER CLEAN AIR SLEEP AUTO OPERATION Ensure the unit is plugged...
...In the Auto mode, the air conditioner can be performed. NOTE: In the Fan mode, the setting temperature is not displayed in the remote controller and you , the desired mode can logically choose the mode of Cooling, Fan, Heating and Dehumidifying by sensing the difference between the...the TEMP UP / DOWN button to CLEAN AIR SLEEP set the desired temperature. It has already been automatically controlled. 11 Operating Instructions USING THE REMOTE CONTROLLER BUTTONS 1 ON/OFF MODE 3 TEMP UP FAN S TEMP DOWN ENERGY SAVER TIMER CLEAN AIR SLEEP AUTO OPERATION Ensure the unit is plugged...
Product Manual
Page 13
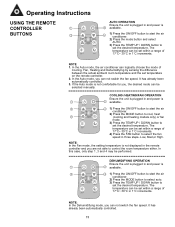
Operating Instructions USING THE REMOTE CONTROLLER BUTTONS ON/OFF MODE 1 TEMP UP FAN TEMP DOWN SWING TIMER SLEEP SWING OPERATION Use the SWING button to adjust the Left/Right airflow ...
Operating Instructions USING THE REMOTE CONTROLLER BUTTONS ON/OFF MODE 1 TEMP UP FAN TEMP DOWN SWING TIMER SLEEP SWING OPERATION Use the SWING button to adjust the Left/Right airflow ...
Product Manual
Page 14
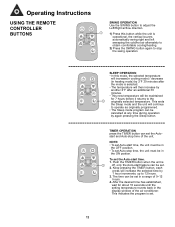
Operating Instructions USING THE REMOTE CONTROLLER BUTTONS TIMER OPERATION To set . The fan then cycles on for 2 minutes at which time the compressor turns back on the LCD window of 0~...
Operating Instructions USING THE REMOTE CONTROLLER BUTTONS TIMER OPERATION To set . The fan then cycles on for 2 minutes at which time the compressor turns back on the LCD window of 0~...

Product Manual
Page 15
The above step 1 and 2 should be done simultaneously to the number 1 arrow direction by your thumb. 2 1 +2 1 1 + 2 3. A CR 2025 B 14 Slightly press "A" position according to slide the button cell out. Remove the button cell according to the number 2 arrow direction by a cover. Press "B" position and pull it according to the arrow marked at the back of the remote controller. 1 1. Operating Instructions CHANGING THE BATTERIES ON THE REMOTE The remote controller is powered by one button cell housed in the rear part and protected by your CR2025 forefinger. 2 2.
The above step 1 and 2 should be done simultaneously to the number 1 arrow direction by your thumb. 2 1 +2 1 1 + 2 3. A CR 2025 B 14 Slightly press "A" position according to slide the button cell out. Remove the button cell according to the number 2 arrow direction by a cover. Press "B" position and pull it according to the arrow marked at the back of the remote controller. 1 1. Operating Instructions CHANGING THE BATTERIES ON THE REMOTE The remote controller is powered by one button cell housed in the rear part and protected by your CR2025 forefinger. 2 2.
Product Manual
Page 26
... cell: CR2025) 2.0V 5m -5°C ~ 60°C 25 Reception is exposed to direct sunlight, the air conditioner may not function properly. REMOTE CONTROLLER SPECIFICATIONS Model Rated Voltage Lowest Voltage of 5 meters from the appliance, pointing it towards the receiver. Do not expose the... to direct sunlight or heat. • If the infrared signal receiver on the receiver. • If other materials block the signals from falling into the remote controller. Use curtains to prevent the sunlight from falling on the indoor unit is confirmed by a beep. 5m O N /O FF TUEMPP MO D E ...
... cell: CR2025) 2.0V 5m -5°C ~ 60°C 25 Reception is exposed to direct sunlight, the air conditioner may not function properly. REMOTE CONTROLLER SPECIFICATIONS Model Rated Voltage Lowest Voltage of 5 meters from the appliance, pointing it towards the receiver. Do not expose the... to direct sunlight or heat. • If the infrared signal receiver on the receiver. • If other materials block the signals from falling into the remote controller. Use curtains to prevent the sunlight from falling on the indoor unit is confirmed by a beep. 5m O N /O FF TUEMPP MO D E ...

Product Manual
Page 27
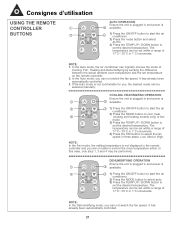
... AUTO. FAN button Used to select the fan speed in a sequence that goes from side to stop the funtion. Press again to side. Consignes d'utilisation REMOTE CONTROLLER BUTTONS NOTE: Modle R15B does not have the CLEAN AIR feature. ON/OFF button Operation starts when this button to decrease the indoor temperature...
... AUTO. FAN button Used to select the fan speed in a sequence that goes from side to stop the funtion. Press again to side. Consignes d'utilisation REMOTE CONTROLLER BUTTONS NOTE: Modle R15B does not have the CLEAN AIR feature. ON/OFF button Operation starts when this button to decrease the indoor temperature...
Product Manual
Page 28
...176;C increments. NOTE: In the Fan mode, the setting temperature is 1 2 available. Low, Med,or High. Consignes d'utilisation USING THE REMOTE CONTROLLER BUTTONS 1 ON/OFF MODE 3 TEMP UP S TEMP DOWN ENERGY SAVER FAN TIMER CLEAN AIR SLEEP AUTO OPERATION Ensure the unit is plugged... be selected manually. The temperature can be performed. In this case, only step 1, 3 and 4 may be set temperature on the remote controller. 2. The temperature can be set within a range of Cooling, Fan, Heating and Dehumidifying by sensing the difference between the actual ...
...176;C increments. NOTE: In the Fan mode, the setting temperature is 1 2 available. Low, Med,or High. Consignes d'utilisation USING THE REMOTE CONTROLLER BUTTONS 1 ON/OFF MODE 3 TEMP UP S TEMP DOWN ENERGY SAVER FAN TIMER CLEAN AIR SLEEP AUTO OPERATION Ensure the unit is plugged... be selected manually. The temperature can be performed. In this case, only step 1, 3 and 4 may be set temperature on the remote controller. 2. The temperature can be set within a range of Cooling, Fan, Heating and Dehumidifying by sensing the difference between the actual ...
Product Manual
Page 29
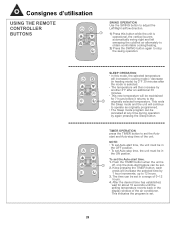
.... • This new temperature will be maintained for about 10 seconds until the setting temperature reverts back in the ON postion. Consignes d'utilisation USING THE REMOTE CONTROLLER BUTTONS ON/OFF MODE 1 TEMP UP FAN TEMP DOWN SWING TIMER SLEEP SWING OPERATION Use the SWING button to adjust the Left/Right airflow...
.... • This new temperature will be maintained for about 10 seconds until the setting temperature reverts back in the ON postion. Consignes d'utilisation USING THE REMOTE CONTROLLER BUTTONS ON/OFF MODE 1 TEMP UP FAN TEMP DOWN SWING TIMER SLEEP SWING OPERATION Use the SWING button to adjust the Left/Right airflow...
Product Manual
Page 30
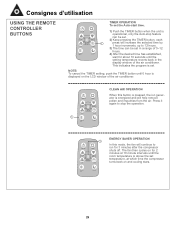
Consignes d'utilisation USING THE REMOTE CONTROLLER BUTTONS TIMER OPERATION To set in the display window of 0~12 hours. Press it again to stop feature can be set . TEMP UP S TEMP ...
Consignes d'utilisation USING THE REMOTE CONTROLLER BUTTONS TIMER OPERATION To set in the display window of 0~12 hours. Press it again to stop feature can be set . TEMP UP S TEMP ...

Product Manual
Page 31
Remove the button cell according to slide the button cell out. Consignes d'utilisation CHANGING THE BATTERIES ON THE REMOTE The remote controller is powered by one button cell housed in the rear part and protected by your CR2025 forefinger. 2 2. Press "B" position and pull it according to the number 1 arrow direction by your thumb. 2 1 +2 1 1 + 2 3. The above step 1 and 2 should be done simultaneously to the arrow marked at the back of the remote controller. 1 1. A CR 2025 B 30 Slightly press "A" position according to the number 2 arrow direction by a cover.
Remove the button cell according to slide the button cell out. Consignes d'utilisation CHANGING THE BATTERIES ON THE REMOTE The remote controller is powered by one button cell housed in the rear part and protected by your CR2025 forefinger. 2 2. Press "B" position and pull it according to the number 1 arrow direction by your thumb. 2 1 +2 1 1 + 2 3. The above step 1 and 2 should be done simultaneously to the arrow marked at the back of the remote controller. 1 1. A CR 2025 B 30 Slightly press "A" position according to the number 2 arrow direction by a cover.


