
Planning Guides
Page 2
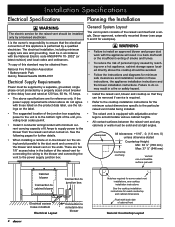
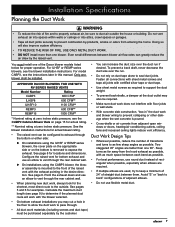
... Page 2/7 PLANNING GUIDE Electrical Specifications WARNING The electric service for connecting the wiring to the blower and connecting the vent to the power supply junction box. www.Dacor.com Phone: (800) 793-0093 8.8 If the power supply requirements shown above the cooktop should be avoided. • Follow the instructions and diagrams for minimum safe clearances and installation location in the bottom of the raised vent itself and a single Dacor approved remote blower or internal cabinet blower.
... Page 2/7 PLANNING GUIDE Electrical Specifications WARNING The electric service for connecting the wiring to the blower and connecting the vent to the power supply junction box. www.Dacor.com Phone: (800) 793-0093 8.8 If the power supply requirements shown above the cooktop should be avoided. • Follow the instructions and diagrams for minimum safe clearances and installation location in the bottom of the raised vent itself and a single Dacor approved remote blower or internal cabinet blower.

Planning Guides
Page 3
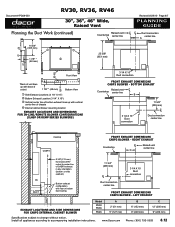
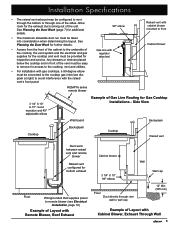
... the raised vent's front panel. 3 1/4" X 10" to 10" round transition and 45° adjustable elbow Cooktop Revised 03/29/10 Page 3/7 PLANNING GUIDE REMP16 Series Remote Blower Wall Board Backsplash Duct work between raised vent and remote blower 90° Elbow Raised Vent with internal cabinet blower mounted to front Raised vent configured for bottom exhaust Gas line with regulator attached Optional Internal Cabinet Blower Floor Wiring/conduit that supplies power to remote blower Example of Layout with Cabinet Blower, Exhaust Through Wall Specifications subject to...
... the raised vent's front panel. 3 1/4" X 10" to 10" round transition and 45° adjustable elbow Cooktop Revised 03/29/10 Page 3/7 PLANNING GUIDE REMP16 Series Remote Blower Wall Board Backsplash Duct work between raised vent and remote blower 90° Elbow Raised Vent with internal cabinet blower mounted to front Raised vent configured for bottom exhaust Gas line with regulator attached Optional Internal Cabinet Blower Floor Wiring/conduit that supplies power to remote blower Example of Layout with Cabinet Blower, Exhaust Through Wall Specifications subject to...

Planning Guides
Page 4
... (continued) Revised 03/29/10 Page 4/7 PLANNING GUIDE Cooktop Cabinet back Raised vent Raised vent configured for bottom exhaust 3 1/4" X 10" to round transition Outside wall Floor Wall cap on outside wall Wiring/conduit from raised vent to in-line blower Duct work Duct work ILHSF series in-line blower Example of Layout with in-line Blower, Duct Work Under Floor, wall Exhaust Specifications subject to accompanying installation instructions. Install all appliances according to change without notice. www.Dacor.com Phone: (800) 793-0093 8.10
... (continued) Revised 03/29/10 Page 4/7 PLANNING GUIDE Cooktop Cabinet back Raised vent Raised vent configured for bottom exhaust 3 1/4" X 10" to round transition Outside wall Floor Wall cap on outside wall Wiring/conduit from raised vent to in-line blower Duct work Duct work ILHSF series in-line blower Example of Layout with in-line Blower, Duct Work Under Floor, wall Exhaust Specifications subject to accompanying installation instructions. Install all appliances according to change without notice. www.Dacor.com Phone: (800) 793-0093 8.10
Planning Guides
Page 5
... blower, the blower assembly is removed to expose the exhaust. Doing so will work does not interfere with certified silver tape or duct tape. ■■ Use sheet metal screws as possible. For model CABP3, see the instructions later in -line) 1100 CFM** REMP3 (remote) 600 CFM** REMP16 (remote) 1000 CFM** * Nominal rating at zero inches static pressure, see the REMP3/16 Remote Blower Installation Instructions. BLOWER RATINGS FOR DACOR BLOWERS APPROVED FOR USE WITH RV SERIES RAISED VENTS Model Number Rating CABP3 (cabinet...
... blower, the blower assembly is removed to expose the exhaust. Doing so will work does not interfere with certified silver tape or duct tape. ■■ Use sheet metal screws as possible. For model CABP3, see the instructions later in -line) 1100 CFM** REMP3 (remote) 600 CFM** REMP16 (remote) 1000 CFM** * Nominal rating at zero inches static pressure, see the REMP3/16 Remote Blower Installation Instructions. BLOWER RATINGS FOR DACOR BLOWERS APPROVED FOR USE WITH RV SERIES RAISED VENTS Model Number Rating CABP3 (cabinet...
Planning Guides
Page 6
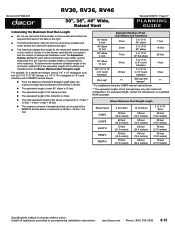
..." (205 mm) 9" (229 mm) Phone: (800) 793-0093 8.12 Bottom Exhaust Raised vent Countertop center line B 11 5/8" (295 mm) 3 1/4 X 10 Duct connection Duct connection center line Cooktop CABP3 CL 8 3/8" (213 mm) from back of RV cutout to center line of chassis Internal cabinet blower mounting location Exhaust Locations and Dimensions for CABP3 Internal Cabinet Blower Model RV30 RV36 RV46 A 2" (51 mm) 5" (127 mm) Specifications subject to accompanying installation instructions.
..." (205 mm) 9" (229 mm) Phone: (800) 793-0093 8.12 Bottom Exhaust Raised vent Countertop center line B 11 5/8" (295 mm) 3 1/4 X 10 Duct connection Duct connection center line Cooktop CABP3 CL 8 3/8" (213 mm) from back of RV cutout to center line of chassis Internal cabinet blower mounting location Exhaust Locations and Dimensions for CABP3 Internal Cabinet Blower Model RV30 RV36 RV46 A 2" (51 mm) 5" (127 mm) Specifications subject to accompanying installation instructions.
Planning Guides
Page 7
...° flat elbow 20 feet 90° elbow 10 Inch 5 feet 3 ¼" X 10 to 8" round transition 4 feet 90° 3 ¼" X 10 to 8" round transition 25 feet 3 ¼" X 10 to 10" round transition 4 feet Roof cap* ** Wall cap with damper* ** * For installations using 3 1/4" X 10" rectangular duct, two (2) 3 1/4" X 10" 90° elbows, a 3 1/4" X 10" rectangular to compensate for a raised vent system using the CABP3 internal cabinet blower. ** The equivalent lengths of roof and wall caps vary with model and configuration.
...° flat elbow 20 feet 90° elbow 10 Inch 5 feet 3 ¼" X 10 to 8" round transition 4 feet 90° 3 ¼" X 10 to 8" round transition 25 feet 3 ¼" X 10 to 10" round transition 4 feet Roof cap* ** Wall cap with damper* ** * For installations using 3 1/4" X 10" rectangular duct, two (2) 3 1/4" X 10" 90° elbows, a 3 1/4" X 10" rectangular to compensate for a raised vent system using the CABP3 internal cabinet blower. ** The equivalent lengths of roof and wall caps vary with model and configuration.
Installation Instructions
Page 2
... the power supply requirements. to minimize problems, read these installation instructions completely and carefully before you begin the installation process. Pacific Time RV30 = 30-inch wide raised vent RV36 = 36-inch wide raised vent RV46 = 46-inch wide raised vent Tested in the Cutout 11 Electrical Installation 12 Final Installation 14 Verifying Proper Operation 14 Installation Checklist 14 Technical Data 15 RV Raised Vent Wiring Diagram 15 CABP3 Cabinet Blower Ratings 15 Before You Begin... Customer Service Information...
... the power supply requirements. to minimize problems, read these installation instructions completely and carefully before you begin the installation process. Pacific Time RV30 = 30-inch wide raised vent RV36 = 36-inch wide raised vent RV46 = 46-inch wide raised vent Tested in the Cutout 11 Electrical Installation 12 Final Installation 14 Verifying Proper Operation 14 Installation Checklist 14 Technical Data 15 RV Raised Vent Wiring Diagram 15 CABP3 Cabinet Blower Ratings 15 Before You Begin... Customer Service Information...
Installation Instructions
Page 3
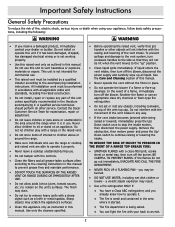
... vented to the service panel. Boil-overs cause smoking and greasy spillovers that could explode, such as those published by the manufacturer. b) Always turn hood ON when cooking at high settings. d) Use proper pan size. warning To reduce the risk of fuel burning equipment to cover all applicable codes and standards, including fire-rated construction. d) Ducted fans must be allowed to prevent power from the cooktop. Always use...
... vented to the service panel. Boil-overs cause smoking and greasy spillovers that could explode, such as those published by the manufacturer. b) Always turn hood ON when cooking at high settings. d) Use proper pan size. warning To reduce the risk of fuel burning equipment to cover all applicable codes and standards, including fire-rated construction. d) Ducted fans must be allowed to prevent power from the cooktop. Always use...

Installation Instructions
Page 4
... the specified blowers. Do not install or operate this unit unless specifically recommended in use only. Clean this appliance only as cigarettes or napkins, to disconnect power. • Read the use and care manual completely before operating this appliance. • Do not tamper with the movement of this unit if it must show the customer the location of the vent top cap. Contact the Dacor Customer Service Team for...
... the specified blowers. Do not install or operate this unit unless specifically recommended in use only. Clean this appliance only as cigarettes or napkins, to disconnect power. • Read the use and care manual completely before operating this appliance. • Do not tamper with the movement of this unit if it must show the customer the location of the vent top cap. Contact the Dacor Customer Service Team for...
Installation Instructions
Page 6
... the junction box supplying power to the unit is to the particular raised vent model being installed. • The raised vent is required. • Refer to the cooktop installation instructions for the minimum cutout dimensions specific to the bottom right of the unit, providing local codes permit. • Install 3 conductor wiring/conduit with back side of personal injury caused by a qualified electrician. Installation Specifications Electrical Specifications Planning the Installation warning The electric service for the...
... the junction box supplying power to the unit is to the particular raised vent model being installed. • The raised vent is required. • Refer to the cooktop installation instructions for the minimum cutout dimensions specific to the bottom right of the unit, providing local codes permit. • Install 3 conductor wiring/conduit with back side of personal injury caused by a qualified electrician. Installation Specifications Electrical Specifications Planning the Installation warning The electric service for the...
Installation Instructions
Page 7
... the vent must be connected to the cooktop gas inlet (see Electrical Installation, page 10) Example of Layout with Remote Blower, Roof Exhaust Cabinet blower Wall 3 1/4" X 10" 90° elbow Floor Duct directly through one of the unit. See Planning the Duct Work (page 7) for the exhaust duct coming out of the sides. Side View Wall board Backsplash Cooktop Backsplash Cooktop Raised vent Duct work between raised vent and remote blower Raised vent configured for access to avoid interference with Cabinet Blower, Exhaust Through Wall 5 Allow...
... the vent must be connected to the cooktop gas inlet (see Electrical Installation, page 10) Example of Layout with Remote Blower, Roof Exhaust Cabinet blower Wall 3 1/4" X 10" 90° elbow Floor Duct directly through one of the unit. See Planning the Duct Work (page 7) for the exhaust duct coming out of the sides. Side View Wall board Backsplash Cooktop Backsplash Cooktop Raised vent Duct work between raised vent and remote blower Raised vent configured for access to avoid interference with Cabinet Blower, Exhaust Through Wall 5 Allow...
Installation Instructions
Page 9
... bottom exhaust installations you may cut a hole in the floor to allow the duct work to pass through the bottom or either side: ►► On installations using the CABP3 blower, the blower assembly is mounted to the front of the raised vent with the exhaust pointing in the desire direction. You must be installed. APPROVED DACOR BLOWERS FOR USE WITH RV SERIES RAISED VENTS Model Number Rating CABP3 600 CFM* ILHSF8 600 CFM** ILHSF10...
... bottom exhaust installations you may cut a hole in the floor to allow the duct work to pass through the bottom or either side: ►► On installations using the CABP3 blower, the blower assembly is mounted to the front of the raised vent with the exhaust pointing in the desire direction. You must be installed. APPROVED DACOR BLOWERS FOR USE WITH RV SERIES RAISED VENTS Model Number Rating CABP3 600 CFM* ILHSF8 600 CFM** ILHSF10...

Installation Instructions
Page 12
... of the unit. Installation Instructions Parts List • Product literature • Vent cover • Anchoring legs • 2 wood screws, #14 x 2 1/2 (PN 83047) • 3 wire nuts • 2 sheet metal screws, #10 x 1/2 (PN 83022) • 3 ¼" X 10 duct mounting flange • 2 keps nuts, 1/4-20 (PN 83049) • 2 flat washers, 1/4-20 (PN 83203) • Insulation foam Installation Preparation warning • If the electrical service does not meet the Electrical Specifications on...
... of the unit. Installation Instructions Parts List • Product literature • Vent cover • Anchoring legs • 2 wood screws, #14 x 2 1/2 (PN 83047) • 3 wire nuts • 2 sheet metal screws, #10 x 1/2 (PN 83022) • 3 ¼" X 10 duct mounting flange • 2 keps nuts, 1/4-20 (PN 83049) • 2 flat washers, 1/4-20 (PN 83203) • Insulation foam Installation Preparation warning • If the electrical service does not meet the Electrical Specifications on...

Installation Instructions
Page 13
Cut a hole in the cabinet to allow the duct work to pass through to the blower installation instructions. Cabinet Blower Installation If using a ILHSF or REMP series blower, install it according to the floor or wall for use with ILHSF or REMP series blower) Electrical access panel Floor Attach foam to the right and left flanges of the blower base plate. 2. Cover the opening on the front of the raised vent. Secure it . Remove and retain...
Cut a hole in the cabinet to allow the duct work to pass through to the blower installation instructions. Cabinet Blower Installation If using a ILHSF or REMP series blower, install it according to the floor or wall for use with ILHSF or REMP series blower) Electrical access panel Floor Attach foam to the right and left flanges of the blower base plate. 2. Cover the opening on the front of the raised vent. Secure it . Remove and retain...

Installation Instructions
Page 14
... panel or fuse box prior to connecting the unit to the electrical circuit. • Do not ground the appliance with the neutral (white) house supply wire. Do not change the factory wired terminal connections inside the CABP3 blower, via the electrical access holes on the facing page. Remove the screws from hot surfaces. 1. Connect the raised vent to the junction box according to Wiring Diagram B on the raised vent. 7. Installation Instructions Duct Work Installation • Install the duct work...
... panel or fuse box prior to connecting the unit to the electrical circuit. • Do not ground the appliance with the neutral (white) house supply wire. Do not change the factory wired terminal connections inside the CABP3 blower, via the electrical access holes on the facing page. Remove the screws from hot surfaces. 1. Connect the raised vent to the junction box according to Wiring Diagram B on the raised vent. 7. Installation Instructions Duct Work Installation • Install the duct work...

Installation Instructions
Page 16
.../DOWN HIGH buttons in air. 3. Is the unit level? □□ Is the duct work completely installed? Have the model and serial numbers from the hot surfaces of the cooktop. □□ Are the vent filters installed according to the use and care manual for the raised vent and the blower available when you call. Dacor is lowered. Set the cooktop into place? Are all terminals tight? □□ Is the blower power input connected to...
.../DOWN HIGH buttons in air. 3. Is the unit level? □□ Is the duct work completely installed? Have the model and serial numbers from the hot surfaces of the cooktop. □□ Are the vent filters installed according to the use and care manual for the raised vent and the blower available when you call. Dacor is lowered. Set the cooktop into place? Are all terminals tight? □□ Is the blower power input connected to...

Use & Care Manuals
Page 3
..., Cherries Jubilee, Peppercorn Beef Flambe'). d) Use proper pan size. For service and warranty information, see page 6. warning WARNING - b) Before servicing or cleaning unit, switch power off at high heat or when flambéing food (i.e. Heat oils slowly on the front of explosion or fire, do not store or use and care information. Important Safety Instructions Installer: Leave these numbers below for future reference. KEEP...
..., Cherries Jubilee, Peppercorn Beef Flambe'). d) Use proper pan size. For service and warranty information, see page 6. warning WARNING - b) Before servicing or cleaning unit, switch power off at high heat or when flambéing food (i.e. Heat oils slowly on the front of explosion or fire, do not store or use and care information. Important Safety Instructions Installer: Leave these numbers below for future reference. KEEP...
Use & Care Manuals
Page 4
... vent system, turn off the blower, disconnect the power supply and carefully wipe up all applicable codes and standards, including fire-rated construction. • Do not install, repair or replace any part of this manual. • Never operate the vent without the filters in this manual to prevent grease fires and maintain performance. • DO NOT TOUCH THE SURFACES OF THE RAISED VENT OR RANGE DURING OR IMMEDIATELY AFTER USE...
... vent system, turn off the blower, disconnect the power supply and carefully wipe up all applicable codes and standards, including fire-rated construction. • Do not install, repair or replace any part of this manual. • Never operate the vent without the filters in this manual to prevent grease fires and maintain performance. • DO NOT TOUCH THE SURFACES OF THE RAISED VENT OR RANGE DURING OR IMMEDIATELY AFTER USE...
Use & Care Manuals
Page 5
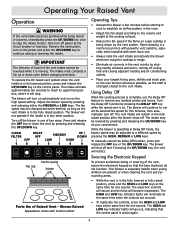
... duct runs. • Always raise the vent intake and activate the blower whenever using the cooktop or range. • Eliminate air currents in the fully raised position. Using Delay Off When the cooking process is a normal occurrence with powerful vent systems, especially when installed with model number Operating Tips: • Activate the blower a few minutes before changing directions. The blower will turn on automatically and run at the circuit breaker or fuse box...
... duct runs. • Always raise the vent intake and activate the blower whenever using the cooktop or range. • Eliminate air currents in the fully raised position. Using Delay Off When the cooking process is a normal occurrence with powerful vent systems, especially when installed with model number Operating Tips: • Activate the blower a few minutes before changing directions. The blower will turn on automatically and run at the circuit breaker or fuse box...

Use & Care Manuals
Page 7
... in the direction of Reduce blower speed to elec- The top cap and end caps may be gently wiped with the vent intake movement. Immediately press UP/DOWN key, then disconnect the power plug. system make ventilating force very strong. Care and Cleaning Cleaning the Intake Panel Cleaning the Top Cap The intake panels accumulate grease over 40 hours. Contact power company. See Care and Cleaning section. 5 Blower has operated for one...
... in the direction of Reduce blower speed to elec- The top cap and end caps may be gently wiped with the vent intake movement. Immediately press UP/DOWN key, then disconnect the power plug. system make ventilating force very strong. Care and Cleaning Cleaning the Intake Panel Cleaning the Top Cap The intake panels accumulate grease over 40 hours. Contact power company. See Care and Cleaning section. 5 Blower has operated for one...


