
Planning Guides
Page 2
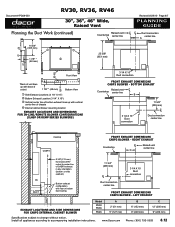
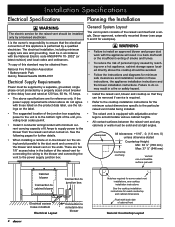
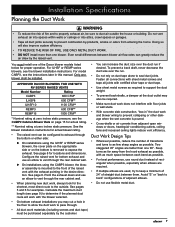
... duct work and connect it to the remote blower and raised vent on the ends. Install all appliances according to change without notice. Cabinet blower Connection to cabinet blower Connection to junction box Electrical access holes in bottom Electrical Layout Connection to remote/in a fire or safety hazard. ■■ Install the raised vent, blower and cooktop so that they can be removed if service is required. ■■ Refer to the cooktop planning guide for the minimum cutout dimensions specific...
... duct work and connect it to the remote blower and raised vent on the ends. Install all appliances according to change without notice. Cabinet blower Connection to cabinet blower Connection to junction box Electrical access holes in bottom Electrical Layout Connection to remote/in a fire or safety hazard. ■■ Install the raised vent, blower and cooktop so that they can be removed if service is required. ■■ Refer to the cooktop planning guide for the minimum cutout dimensions specific...

Planning Guides
Page 3
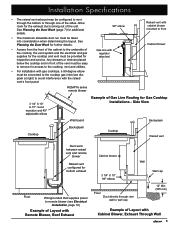
... raised vent's front panel. 3 1/4" X 10" to 10" round transition and 45° adjustable elbow Cooktop Revised 03/29/10 Page 3/7 PLANNING GUIDE REMP16 Series Remote Blower Wall Board Backsplash Duct work between raised vent and remote blower 90° Elbow Raised Vent with internal cabinet blower mounted to front Raised vent configured for bottom exhaust Gas line with regulator attached Optional Internal Cabinet Blower Floor Wiring/conduit that supplies power to remote blower Example of Layout with Cabinet Blower, Exhaust Through Wall Specifications subject to change without...
... raised vent's front panel. 3 1/4" X 10" to 10" round transition and 45° adjustable elbow Cooktop Revised 03/29/10 Page 3/7 PLANNING GUIDE REMP16 Series Remote Blower Wall Board Backsplash Duct work between raised vent and remote blower 90° Elbow Raised Vent with internal cabinet blower mounted to front Raised vent configured for bottom exhaust Gas line with regulator attached Optional Internal Cabinet Blower Floor Wiring/conduit that supplies power to remote blower Example of Layout with Cabinet Blower, Exhaust Through Wall Specifications subject to change without...

Planning Guides
Page 4
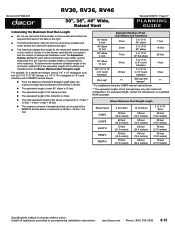
... System Layout (continued) Revised 03/29/10 Page 4/7 PLANNING GUIDE Cooktop Cabinet back Raised vent Raised vent configured for bottom exhaust 3 1/4" X 10" to round transition Outside wall Floor Wall cap on outside wall Wiring/conduit from raised vent to in-line blower Duct work Duct work ILHSF series in-line blower Example of Layout with in-line Blower, Duct Work Under Floor, wall Exhaust Specifications subject to accompanying installation instructions. www.Dacor.com Phone: (800) 793-0093 8.10 Install all appliances according to...
... System Layout (continued) Revised 03/29/10 Page 4/7 PLANNING GUIDE Cooktop Cabinet back Raised vent Raised vent configured for bottom exhaust 3 1/4" X 10" to round transition Outside wall Floor Wall cap on outside wall Wiring/conduit from raised vent to in-line blower Duct work Duct work ILHSF series in-line blower Example of Layout with in-line Blower, Duct Work Under Floor, wall Exhaust Specifications subject to accompanying installation instructions. www.Dacor.com Phone: (800) 793-0093 8.10 Install all appliances according to...
Planning Guides
Page 5
... instructions later in -line) 1100 CFM** REMP3 (remote) 600 CFM** REMP16 (remote) 1000 CFM** * Nominal rating at zero inches static pressure. Keep turns as possible. ■■ For best performance, use an elbow to vent through the bottom or either side: ►► On installations using the CABP3 blower, the blower assembly is poured. Install all joints with certified silver tape or duct tape. ■■ Use sheet metal screws as require to support the duct weights...
... instructions later in -line) 1100 CFM** REMP3 (remote) 600 CFM** REMP16 (remote) 1000 CFM** * Nominal rating at zero inches static pressure. Keep turns as possible. ■■ For best performance, use an elbow to vent through the bottom or either side: ►► On installations using the CABP3 blower, the blower assembly is poured. Install all joints with certified silver tape or duct tape. ■■ Use sheet metal screws as require to support the duct weights...
Planning Guides
Page 6
... CABP3 exhaust in -line/Remote Blower Configurations (ILHSF or REMP series blowers) 3 1/4 X 10 Duct connection Front Exhaust Dimensions CABP3 Blower - Bottom Exhaust Raised vent Countertop center line B 11 5/8" (295 mm) 3 1/4 X 10 Duct connection Duct connection center line Cooktop CABP3 CL 8 3/8" (213 mm) from back of RV cutout to accompanying installation instructions. www.Dacor.com B 6" (152 mm) 9" (229 mm) C 12" (205 mm) 9" (229 mm) Phone: (800) 793-0093 8.12 Document # PG08-003 RV30...
... CABP3 exhaust in -line/Remote Blower Configurations (ILHSF or REMP series blowers) 3 1/4 X 10 Duct connection Front Exhaust Dimensions CABP3 Blower - Bottom Exhaust Raised vent Countertop center line B 11 5/8" (295 mm) 3 1/4 X 10 Duct connection Duct connection center line Cooktop CABP3 CL 8 3/8" (213 mm) from back of RV cutout to accompanying installation instructions. www.Dacor.com B 6" (152 mm) 9" (229 mm) C 12" (205 mm) 9" (229 mm) Phone: (800) 793-0093 8.12 Document # PG08-003 RV30...
Planning Guides
Page 7
... to 8" round transition 4 feet 90° 3 ¼" X 10 to 8" round transition 25 feet 3 ¼" X 10 to 10" round transition 4 feet Roof cap* ** Wall cap with damper* ** * For installations using 3 1/4" X 10" rectangular duct, two (2) 3 1/4" X 10" 90° elbows, a 3 1/4" X 10" rectangular to 10" round transition with a REMP16 remote blower: ►► From the Maximum Equivalent Straight Length table, the maximum length without notice. To determine the maximum allowable length of elbows and transitions used with model and configuration...
... to 8" round transition 4 feet 90° 3 ¼" X 10 to 8" round transition 25 feet 3 ¼" X 10 to 10" round transition 4 feet Roof cap* ** Wall cap with damper* ** * For installations using 3 1/4" X 10" rectangular duct, two (2) 3 1/4" X 10" 90° elbows, a 3 1/4" X 10" rectangular to 10" round transition with a REMP16 remote blower: ►► From the Maximum Equivalent Straight Length table, the maximum length without notice. To determine the maximum allowable length of elbows and transitions used with model and configuration...
Installation Instructions
Page 2
... customer. • Customer: Keep these installation instructions completely and carefully before you have the model and serial number of safety and to Dacor appliances under warranty only) Phone: (877) 337-3226 (U.S.A. Whenever you call the Dacor Distinctive Service line. Friday 6:00 a.m. and Canada) Monday - All specifications subject to 5:00 p.m. For repairs to minimize problems, read these installation instructions for Household Electric Cooking and Liquid Heating Appliances, and UL 507 electric fans. to change...
... customer. • Customer: Keep these installation instructions completely and carefully before you have the model and serial number of safety and to Dacor appliances under warranty only) Phone: (877) 337-3226 (U.S.A. Whenever you call the Dacor Distinctive Service line. Friday 6:00 a.m. and Canada) Monday - All specifications subject to 5:00 p.m. For repairs to minimize problems, read these installation instructions for Household Electric Cooking and Liquid Heating Appliances, and UL 507 electric fans. to change...
Installation Instructions
Page 3
... flammable or explosive materials in severe personal injury or death. b) Sufficient air is needed for proper combustion and exhausting of gases through the flue(chimney) of a range top grease fire: a) Never leave surface units unattended at high settings. c) When cutting or drilling into wall or ceiling, do not damage electrical wiring and other appliance. d) Ducted fans must be locked, securely fasten a prominent warning device, such as those...
... flammable or explosive materials in severe personal injury or death. b) Sufficient air is needed for proper combustion and exhausting of gases through the flue(chimney) of a range top grease fire: a) Never leave surface units unattended at high settings. c) When cutting or drilling into wall or ceiling, do not damage electrical wiring and other appliance. d) Ducted fans must be locked, securely fasten a prominent warning device, such as those...

Installation Instructions
Page 4
... fire connect only one of the models specified. Contact the Dacor Customer Service Team for commercial use and care manual completely before operating this unit if it must show the customer the location of the electrical outlet so that the customer knows where and how to exhaust hazardous or explosive materials and vapors. • This appliance is not equipped with these installation instructions the Dacor cooktop installation instructions and the remote...
... fire connect only one of the models specified. Contact the Dacor Customer Service Team for commercial use and care manual completely before operating this unit if it must show the customer the location of the electrical outlet so that the customer knows where and how to exhaust hazardous or explosive materials and vapors. • This appliance is not equipped with these installation instructions the Dacor cooktop installation instructions and the remote...
Installation Instructions
Page 6
... box Electrical access holes in bottom Electrical Layout Connection to ensure that the electrical connection of this standard may result in a fire or safety hazard. • Install the raised vent, blower and cooktop so that they can be removed if service is required. • Refer to the cooktop installation instructions for the minimum cutout dimensions specific to the particular raised vent model being installed. • The raised vent is equipped with the National Electric code...
... box Electrical access holes in bottom Electrical Layout Connection to ensure that the electrical connection of this standard may result in a fire or safety hazard. • Install the raised vent, blower and cooktop so that they can be removed if service is required. • Refer to the cooktop installation instructions for the minimum cutout dimensions specific to the particular raised vent model being installed. • The raised vent is equipped with the National Electric code...
Installation Instructions
Page 7
... through rear wall to 10" round transition and 45° adjustable elbow Example of the unit. See Planning the Duct Work for further details. • Access from the front of the cabinet to the underside of the cooktop, the vent system and the electrical and gas supplies for inspection and service. REMP16 series remote blower 90° elbow Gas line with regulator attached Raised vent with Remote Blower, Roof Exhaust Cabinet blower Wall 3 1/4" X 10" 90° elbow Floor Duct directly...
... through rear wall to 10" round transition and 45° adjustable elbow Example of the unit. See Planning the Duct Work for further details. • Access from the front of the cabinet to the underside of the cooktop, the vent system and the electrical and gas supplies for inspection and service. REMP16 series remote blower 90° elbow Gas line with regulator attached Raised vent with Remote Blower, Roof Exhaust Cabinet blower Wall 3 1/4" X 10" 90° elbow Floor Duct directly...
Installation Instructions
Page 9
... the Dacor blower models listed below for the shortest, most direct route to the outside the house or building. APPROVED DACOR BLOWERS FOR USE WITH RV SERIES RAISED VENTS Model Number Rating CABP3 600 CFM* ILHSF8 600 CFM** ILHSF10 REMP3 1100 CFM** 600 CFM** REMP16 1000 CFM** * Nominal rating at zero inches static pressure, see the blower installation instructions. Avoid "S" or "back to back" configurations of adjacent elbows. • Do not use an elbow to vent through the rear cabinet wall...
... the Dacor blower models listed below for the shortest, most direct route to the outside the house or building. APPROVED DACOR BLOWERS FOR USE WITH RV SERIES RAISED VENTS Model Number Rating CABP3 600 CFM* ILHSF8 600 CFM** ILHSF10 REMP3 1100 CFM** 600 CFM** REMP16 1000 CFM** * Nominal rating at zero inches static pressure, see the blower installation instructions. Avoid "S" or "back to back" configurations of adjacent elbows. • Do not use an elbow to vent through the rear cabinet wall...

Installation Instructions
Page 12
Installation Instructions Parts List • Product literature • Vent cover • Anchoring legs • 2 wood screws, #14 x 2 1/2 (PN 83047) • 3 wire nuts • 2 sheet metal screws, #10 x 1/2 (PN 83022) • 3 ¼" X 10 duct mounting flange • 2 keps nuts, 1/4-20 (PN 83049) • 2 flat washers, 1/4-20 (PN 83203) • Insulation foam Installation Preparation warning • If the electrical service does not meet the Electrical Specifications on page 4, do not...
Installation Instructions Parts List • Product literature • Vent cover • Anchoring legs • 2 wood screws, #14 x 2 1/2 (PN 83047) • 3 wire nuts • 2 sheet metal screws, #10 x 1/2 (PN 83022) • 3 ¼" X 10 duct mounting flange • 2 keps nuts, 1/4-20 (PN 83049) • 2 flat washers, 1/4-20 (PN 83203) • Insulation foam Installation Preparation warning • If the electrical service does not meet the Electrical Specifications on page 4, do not...

Installation Instructions
Page 13
... moving parts, make sure the blower assembly is installed prior to final installation of the raised vent. Installing the Raised Vent 1. Locate the foam tape supplied with ILHSF or REMP series blower) Electrical access panel Floor Attach foam to the blower installation instructions. Rear corner of cutout (back of the unit. Remove and retain the three (3) wing nuts from the cooktop. Possible Duct Hole Locations 2. Gently slide the vent into bottom retainer bracket Cabinet Blower Installation 11...
... moving parts, make sure the blower assembly is installed prior to final installation of the raised vent. Installing the Raised Vent 1. Locate the foam tape supplied with ILHSF or REMP series blower) Electrical access panel Floor Attach foam to the blower installation instructions. Rear corner of cutout (back of the unit. Remove and retain the three (3) wing nuts from the cooktop. Possible Duct Hole Locations 2. Gently slide the vent into bottom retainer bracket Cabinet Blower Installation 11...

Installation Instructions
Page 14
... on both units. Replace the electrical access panel on the blower orientation. 5. Replace the blower electrical access cover. Connect the wiring/conduit that will supply power to the raised vent is turned off power at the circuit breaker or fuse box. 2. Connect it exits the building according to the Installation Specifications. Installation Instructions Duct Work Installation • Install the duct work from the raised vent to the blower: • On installations using a ILHSF or REMP series blower, connect the wiring according to the blower installation instructions...
... on both units. Replace the electrical access panel on the blower orientation. 5. Replace the blower electrical access cover. Connect the wiring/conduit that will supply power to the raised vent is turned off power at the circuit breaker or fuse box. 2. Connect it exits the building according to the Installation Specifications. Installation Instructions Duct Work Installation • Install the duct work from the raised vent to the blower: • On installations using a ILHSF or REMP series blower, connect the wiring according to the blower installation instructions...

Installation Instructions
Page 16
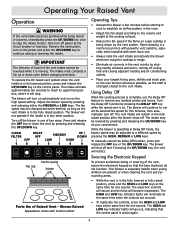
... vent use and care manual for the cost of the cooktop when the intake is not responsible for filter installation instructions. 1. Contact Dacor Distinctive Service at the circuit breaker panel or fuse box. 2. Push the OFF, LOW, MEDIUM and UP/DOWN HIGH buttons in turn to operating the raised vent. OFF LOW MED HIGH 4. If interference occurs, adjust the position of the raised vent. Refer to the use and care manual completely before operation. • Make...
... vent use and care manual for the cost of the cooktop when the intake is not responsible for filter installation instructions. 1. Contact Dacor Distinctive Service at the circuit breaker panel or fuse box. 2. Push the OFF, LOW, MEDIUM and UP/DOWN HIGH buttons in turn to operating the raised vent. OFF LOW MED HIGH 4. If interference occurs, adjust the position of the raised vent. Refer to the use and care manual completely before operation. • Make...

Use & Care Manuals
Page 3
... turn hood ON when cooking at high settings. c) Clean ventilating fans frequently. Always use and care information. warning Never allow foreign objects, such as aerosol cans away from being switched on low or medium settings. Pacific Time Web site: www.Dacor.com Have the complete model and serial number for warranty service. Model Number Serial Number Date of Purchase Since Dacor continuously improves the quality and performance of the unit. b) Before servicing or cleaning unit, switch power off at service panel...
... turn hood ON when cooking at high settings. c) Clean ventilating fans frequently. Always use and care information. warning Never allow foreign objects, such as aerosol cans away from being switched on low or medium settings. Pacific Time Web site: www.Dacor.com Have the complete model and serial number for warranty service. Model Number Serial Number Date of Purchase Since Dacor continuously improves the quality and performance of the unit. b) Before servicing or cleaning unit, switch power off at service panel...
Use & Care Manuals
Page 4
... the vent system, turn off the blower, disconnect the power supply and carefully wipe up all other objects will not be performed in accordance with the controls. • Clean the filters and all applicable codes and standards, including fire-rated construction. • Do not install, repair or replace any objects, including cookware, on top of interest to sit or stand on the unit's surfaces...
... the vent system, turn off the blower, disconnect the power supply and carefully wipe up all other objects will not be performed in accordance with the controls. • Clean the filters and all applicable codes and standards, including fire-rated construction. • Do not install, repair or replace any objects, including cookware, on top of interest to sit or stand on the unit's surfaces...
Use & Care Manuals
Page 5
... so that the control panel is in the fully raised position after the blower shuts off power at the circuit breaker or fuse box. To operate the RV raised vent system when the vent intake is in its uppermost position, where it is a normal occurrence with powerful vent systems, especially when installed with model number Operating Tips: • Activate the blower a few minutes before changing directions. The fan speed may be...
... so that the control panel is in the fully raised position after the blower shuts off power at the circuit breaker or fuse box. To operate the RV raised vent system when the vent intake is in its uppermost position, where it is a normal occurrence with powerful vent systems, especially when installed with model number Operating Tips: • Activate the blower a few minutes before changing directions. The fan speed may be...

Use & Care Manuals
Page 7
... edge of a cloth. Remove the obstruction. See Care and Cleaning section. 5 Care and Cleaning Cleaning the Intake Panel Cleaning the Top Cap The intake panels accumulate grease over 40 hours. Do not use any abrasive substances on power at the same time. The top cap and end caps may be removed by what to DO Raised vent not connected to operating the vent system. Turn on the intake panels, as this may...
... edge of a cloth. Remove the obstruction. See Care and Cleaning section. 5 Care and Cleaning Cleaning the Intake Panel Cleaning the Top Cap The intake panels accumulate grease over 40 hours. Do not use any abrasive substances on power at the same time. The top cap and end caps may be removed by what to DO Raised vent not connected to operating the vent system. Turn on the intake panels, as this may...


