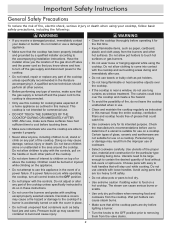
Planning Guides
Page 3
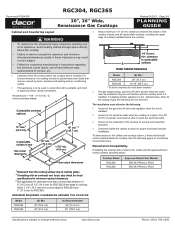
...surfaces Under Cabinet Clearances Model (B) Min.* RGC304 29" (73.7 cm) RGC365 35 1/4" (89.5 cm) * To allow for the routing of cooktop grate). 2 If installing with a raised vent, install only the approved Dacor model numbers specified below , allow clearance for hold down brackets ◊ The...2 (76.2 cm) 1 7/8" min. (4.8 cm) See cutout dimensions 1 Measured from cutout edge for RGC304 and 7" (17.8 cm) for RGC365) from drafts that may result in a fire hazard. • Follow the countertop manufacturer's instructions regarding the minimum corner radius, use of heat reflective...
...surfaces Under Cabinet Clearances Model (B) Min.* RGC304 29" (73.7 cm) RGC365 35 1/4" (89.5 cm) * To allow for the routing of cooktop grate). 2 If installing with a raised vent, install only the approved Dacor model numbers specified below , allow clearance for hold down brackets ◊ The...2 (76.2 cm) 1 7/8" min. (4.8 cm) See cutout dimensions 1 Measured from cutout edge for RGC304 and 7" (17.8 cm) for RGC365) from drafts that may result in a fire hazard. • Follow the countertop manufacturer's instructions regarding the minimum corner radius, use of heat reflective...
Installation Instructions
Page 7
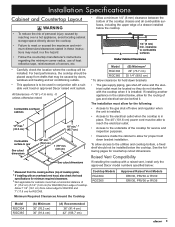
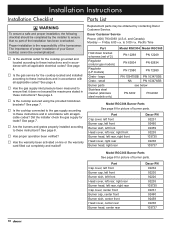
...the cooktop will be installed. If installing another appliance in the cabinet below : 1 Measured from the cooking surface (top of cooktop grate). 2 If installing with an overhead vent hood, also check the hood specifications for minimum required clearances. 3 Not applicable for cabinets more... is in place. Raised Vent Compatibility If installing the cooktop with a raised vent, install only the approved Dacor model numbers specified below , allow for the following pages for RGC365. For best performance, the cooktop should not be installed below the cooktop. 1/4" (6 mm) min. The...
...the cooktop will be installed. If installing another appliance in the cabinet below : 1 Measured from the cooking surface (top of cooktop grate). 2 If installing with an overhead vent hood, also check the hood specifications for minimum required clearances. 3 Not applicable for cabinets more... is in place. Raised Vent Compatibility If installing the cooktop with a raised vent, install only the approved Dacor model numbers specified below , allow for the following pages for RGC365. For best performance, the cooktop should not be installed below the cooktop. 1/4" (6 mm) min. The...
Installation Instructions
Page 9
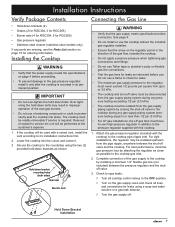
... 1. For tight installations, the regulator may result in addition to the pressure regulator supplied with the cooktop) to it . 3. Check for RGC365) • Gas pressure regulator • Stainless steel cleaner (stainless steel models only) If any pressure testing exceeding 1/2 psi (3.5 kPa).... vent according to the cooktop pipe nipple inlet. Hold Down Bracket Installation 7 Over tightening the hold down brackets (2) • Grates (2 for RGC304, 3 for RGC365) • Burner sets (4 for RGC304, 5 for gas leaks: ◊ Turn all cooktop control valves to permanently seal ...
... 1. For tight installations, the regulator may result in addition to the pressure regulator supplied with the cooktop) to it . 3. Check for RGC365) • Gas pressure regulator • Stainless steel cleaner (stainless steel models only) If any pressure testing exceeding 1/2 psi (3.5 kPa).... vent according to the cooktop pipe nipple inlet. Hold Down Bracket Installation 7 Over tightening the hold down brackets (2) • Grates (2 for RGC304, 3 for RGC365) • Burner sets (4 for RGC304, 5 for gas leaks: ◊ Turn all cooktop control valves to permanently seal ...

Installation Instructions
Page 10
...of the burner parts removed. • Do not attempt to adjust the burner air mixture settings. Remove the burner heads, burner rings, burner caps and grates from their shipping packages. 2. Make sure that the rubber feet are properly seated. 3. It cannot be removed by the customer.... 8 Grate Line up notch with any of the spill tray. Install the burners as shown. Gently set the grates on the dual burner assembly is permanently attached to the burner base. All adjustments are preset at...
...of the burner parts removed. • Do not attempt to adjust the burner air mixture settings. Remove the burner heads, burner rings, burner caps and grates from their shipping packages. 2. Make sure that the rubber feet are properly seated. 3. It cannot be removed by the customer.... 8 Grate Line up notch with any of the spill tray. Install the burners as shown. Gently set the grates on the dual burner assembly is permanently attached to the burner base. All adjustments are preset at...
Installation Instructions
Page 11
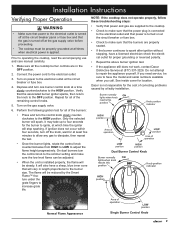
...installed properly, the flame will be steady. If ignition does not occur within four seconds, turn the control knob slowly counterclockwise to increase grate life. The flame will be reduced by a faulty installation. Do not attempt to the electrical outlet. 3. Burner normally ON lights when... • Repeat the above burner ignition test. • If the appliance still does not work, contact Dacor Distinctive Service at the circuit breaker or fuse box. 4. Dacor is not responsible for the cost of operation LOW position Single Burner Control Knob 9 Verify that the associated ...
...installed properly, the flame will be steady. If ignition does not occur within four seconds, turn the control knob slowly counterclockwise to increase grate life. The flame will be reduced by a faulty installation. Do not attempt to the electrical outlet. 3. Burner normally ON lights when... • Repeat the above burner ignition test. • If the appliance still does not work, contact Dacor Distinctive Service at the circuit breaker or fuse box. 4. Dacor is not responsible for the cost of operation LOW position Single Burner Control Knob 9 Verify that the associated ...
Installation Instructions
Page 12
...9633;□ Has the warranty been activated on-line or the warranty card filled out completely and mailed? Dacor Customer Service Phone: (800) 793-0093 (U.S.A. and Canada) Monday - large Grate - See page 4. □□ Has the gas supply inlet pressure been measured to ensure that no... 92231 92460 92459 92235 103735 92236 103737 Model RGC365 Burner Parts See page 8 for picture of your Dacor cooktop cannot be overemphasized. □□ Is the electrical outlet for picture of 2) Regulator (natural gas models) Regulator (LP models) Grate - See page 7. □□ Is the ...
...9633;□ Has the warranty been activated on-line or the warranty card filled out completely and mailed? Dacor Customer Service Phone: (800) 793-0093 (U.S.A. and Canada) Monday - large Grate - See page 4. □□ Has the gas supply inlet pressure been measured to ensure that no... 92231 92460 92459 92235 103735 92236 103737 Model RGC365 Burner Parts See page 8 for picture of your Dacor cooktop cannot be overemphasized. □□ Is the electrical outlet for picture of 2) Regulator (natural gas models) Regulator (LP models) Grate - See page 7. □□ Is the ...
Use & Care Manuals
Page 4
... service technician should perform all other service. • Before performing any part of service, make sure these instructions. • Do not cover the burners and grates with easy to hold handles that the cooktop has been properly installed and grounded by a qualified installer according to burst and cause injury. Doing so...
... service technician should perform all other service. • Before performing any part of service, make sure these instructions. • Do not cover the burners and grates with easy to hold handles that the cooktop has been properly installed and grounded by a qualified installer according to burst and cause injury. Doing so...
Use & Care Manuals
Page 6
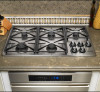
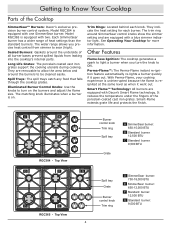
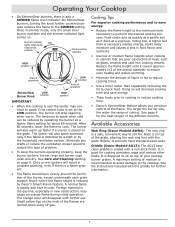
...burners to sear (high). The trim ring around the underside of the Cooktop SimmerSear™ Burners: Dacor's exclusive precision burner control system. Top View Burner control knob Trim ring Spill tray Grate A SimmerSear burner: 650-15,000 BTU B Standard burner: 12,500 BTU C Standard burner:... knob to turn on . Spill Trays: The spill trays catch any food that falls through the cooktop grates. Trim Rings: Located behind each burner. Top View G F D E RGC365 - Sealed Burners: Gaskets around SimmerSear control knobs show the simmer setting and are equipped with a blue ...
...burners to sear (high). The trim ring around the underside of the Cooktop SimmerSear™ Burners: Dacor's exclusive precision burner control system. Top View Burner control knob Trim ring Spill tray Grate A SimmerSear burner: 650-15,000 BTU B Standard burner: 12,500 BTU C Standard burner:... knob to turn on . Spill Trays: The spill trays catch any food that falls through the cooktop grates. Trim Rings: Located behind each burner. Top View G F D E RGC365 - Sealed Burners: Gaskets around SimmerSear control knobs show the simmer setting and are equipped with a blue ...

Use & Care Manuals
Page 7
Setting Up Your Cooktop Burner and Grate Assembly WARNING Assemble the burners and grates only when the cooktop is properly seated. 3. On model RGC365 be sure to match the correct size. The ridge around the bottom edge of the cap cover goes around the top of each head with ...igniter Cap cover Burner head Notch Igniter Burner base Standard Burner Assembly Grates Gently set the grates on top of the burner...
Setting Up Your Cooktop Burner and Grate Assembly WARNING Assemble the burners and grates only when the cooktop is properly seated. 3. On model RGC365 be sure to match the correct size. The ridge around the bottom edge of the cap cover goes around the top of each head with ...igniter Cap cover Burner head Notch Igniter Burner base Standard Burner Assembly Grates Gently set the grates on top of the burner...

Use & Care Manuals
Page 8
... completely and properly assembled (see below). The porcelain surfaces of the burner while the igniter is lit, set utensils gently onto the grates and center them so that they cannot be properly seated for the selected burner will spark until lit. Also, handles should not extend...up the sides of Standard operation Burner Knob LOW position The burner rings must be easily hit. Turn the burner knob to remain on the grate. The igniter will not cook evenly or efficiently. Do not drop them . Improperly selected cooking utensils will stop sparking when ignition occurs. 2....
... completely and properly assembled (see below). The porcelain surfaces of the burner while the igniter is lit, set utensils gently onto the grates and center them so that they cannot be properly seated for the selected burner will spark until lit. Also, handles should not extend...up the sides of Standard operation Burner Knob LOW position The burner rings must be easily hit. Turn the burner knob to remain on the grate. The igniter will not cook evenly or efficiently. Do not drop them . Improperly selected cooking utensils will stop sparking when ignition occurs. 2....
Use & Care Manuals
Page 9
...igniters will decrease cooking time and save energy: • Reduce the flame height to the minimum level necessary to reduce cooking time. • Dacor's SimmerSear feature allows you precision control of the different burners. A normal flame is steady and blue in constant sparking, even if there is...flame heights when cooking in simmer mode, only the small inner burner operates and the simmer indicator light comes on top of your cooktop burner grates. See page 4 for the heat ranges of the flame. Doing so will result in color. See the instructions included with a non-stick...
...igniters will decrease cooking time and save energy: • Reduce the flame height to the minimum level necessary to reduce cooking time. • Dacor's SimmerSear feature allows you precision control of the different burners. A normal flame is steady and blue in constant sparking, even if there is...flame heights when cooking in simmer mode, only the small inner burner operates and the simmer indicator light comes on top of your cooktop burner grates. See page 4 for the heat ranges of the flame. Doing so will result in color. See the instructions included with a non-stick...

Use & Care Manuals
Page 10
... cleaning pad for any part of the cooktop unless instructed to clean the cooktop. IMPORTANT: The cooktop is cool, remove the grates from the electrical outlet. 2. The grates are under high stress when hot utensils are placed on occasion. Disassembly 1. The burner head(s) on during cleaning. • Do... turn off the burners and make sure that occur while cooking. CAUTION • Do not try to undergo a change in appearance over time. The grates, the spill tray (on some models) and optional WOK ring are coated with a porcelain finish. • For everyday cleaning, use a soft cloth...
... cleaning pad for any part of the cooktop unless instructed to clean the cooktop. IMPORTANT: The cooktop is cool, remove the grates from the electrical outlet. 2. The grates are under high stress when hot utensils are placed on occasion. Disassembly 1. The burner head(s) on during cleaning. • Do... turn off the burners and make sure that occur while cooking. CAUTION • Do not try to undergo a change in appearance over time. The grates, the spill tray (on some models) and optional WOK ring are coated with a porcelain finish. • For everyday cleaning, use a soft cloth...

Use & Care Manuals
Page 11
Do not use water to the burner and grate assembly instructions on page 5. Burner head* Base SimmerSear Burner Assembly...holes. Order part number A302. • You may also clean the stainless steel surfaces with your local Dacor Authorized Service Agent. Dirty or wet igniters may order additional stainless steel cleaner at all the burner parts ... for any dirt or grime deposited on stainless steel surfaces. • Clean stainless steel surfaces with the Dacor Stainless Steel Cleaner included with a mild solution of the metal top and porcelain base. If erratic clicking is...
Do not use water to the burner and grate assembly instructions on page 5. Burner head* Base SimmerSear Burner Assembly...holes. Order part number A302. • You may also clean the stainless steel surfaces with your local Dacor Authorized Service Agent. Dirty or wet igniters may order additional stainless steel cleaner at all the burner parts ... for any dirt or grime deposited on stainless steel surfaces. • Clean stainless steel surfaces with the Dacor Stainless Steel Cleaner included with a mild solution of the metal top and porcelain base. If erratic clicking is...
Use & Care Manuals
Page 12
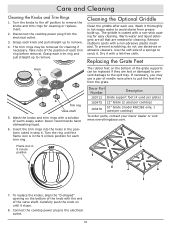
... spots with a solution of each trim ring. Dacor Part Number Description 103712 Grate support foot (4 used per grate) 103475 12" Grate (2 used per cooktop) 103476 10" Grate (model RGC365 only, 1 used per cooktop) To order parts, contact your Dacor dealer or visit www.everythingdacor.com. Connect the cooktop... Knobs and Trim Rings 1. If necessary, you may be replaced if they are needed for each trim ring before removal. Dacor recommends hand dishwashing liquid. 6. Cleaning the Optional Griddle Clean the griddle after each use abrasives or abrasive cleaners. Disconnect the ...
... spots with a solution of each trim ring. Dacor Part Number Description 103712 Grate support foot (4 used per grate) 103475 12" Grate (2 used per cooktop) 103476 10" Grate (model RGC365 only, 1 used per cooktop) To order parts, contact your Dacor dealer or visit www.everythingdacor.com. Connect the cooktop... Knobs and Trim Rings 1. If necessary, you may be replaced if they are needed for each trim ring before removal. Dacor recommends hand dishwashing liquid. 6. Cleaning the Optional Griddle Clean the griddle after each use abrasives or abrasive cleaners. Disconnect the ...

Use & Care Manuals
Page 16
... the product purchased? A. Replacement only B. Part of expressing our gratitude! We are very grateful that under no conditions will be activated until you very much for your name or any of such information to Dacor products? (Please check one envelope or activate the warranty for mailing list purposes. Magazine ...
... the product purchased? A. Replacement only B. Part of expressing our gratitude! We are very grateful that under no conditions will be activated until you very much for your name or any of such information to Dacor products? (Please check one envelope or activate the warranty for mailing list purposes. Magazine ...