Planning Guides
Page 2
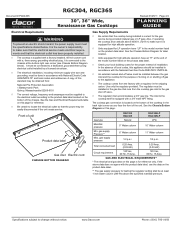
... (natural gas or LP gas). gas supply pressure 1/2 p.s.i. 1/2 p.s.i. Gas and Electrical Requirements* * The electrical and gas data on this page for reference. ◊ Be certain to the gas shut off gas to the cooktop itself is equipped with a regulator in the model number listed on or shutting off valve. ◊ The regulator inlet accommodates a 3/4" gas line. www.Dacor.com Phone: (800) 7943-.010193 See the Chassis Bottom Diagram for label location. ◊ Units equipped for high altitude...
... (natural gas or LP gas). gas supply pressure 1/2 p.s.i. 1/2 p.s.i. Gas and Electrical Requirements* * The electrical and gas data on this page for reference. ◊ Be certain to the gas shut off gas to the cooktop itself is equipped with a regulator in the model number listed on or shutting off valve. ◊ The regulator inlet accommodates a 3/4" gas line. www.Dacor.com Phone: (800) 7943-.010193 See the Chassis Bottom Diagram for label location. ◊ Units equipped for high altitude...
Planning Guides
Page 3
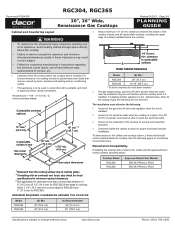
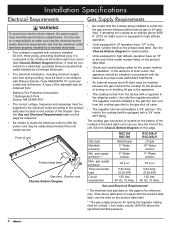
... doors, windows and heating and air conditioning outlets. ◊ This appliance is to be located so they do not interfere with an overhead vent hood, also check the hood specifications for minimum required clearances. 3 Not applicable for cabinets more than a horizontal distance of 6" (15.2 cm) (5 1/2" (14.0 cm) for RGC365) from the cooking surface (top of cooktop grate). 2 If installing with the cooktop when it . www.Dacor.com Phone: (800...
... doors, windows and heating and air conditioning outlets. ◊ This appliance is to be located so they do not interfere with an overhead vent hood, also check the hood specifications for minimum required clearances. 3 Not applicable for cabinets more than a horizontal distance of 6" (15.2 cm) (5 1/2" (14.0 cm) for RGC365) from the cooking surface (top of cooktop grate). 2 If installing with the cooktop when it . www.Dacor.com Phone: (800...

Installation Instructions
Page 2
... are printed on the bottom of Contents Important Safety Instructions 1 Important Information About Safety Instructions 1 General Safety Precautions 2 Installation Specifications 3 Product Dimensions 3 Electrical Requirements 4 Gas Supply Requirements 4 Cabinet and Countertop Layout 5 Installation Instructions 7 Verify Package Contents 7 Installing the Cooktop 7 Connecting the Gas Line 7 Installing the Burner Components 8 Verifying Proper Operation 9 Installation Checklist 10 Parts List 10 Wiring Diagrams 11 Before You Begin... Front of safety and to the chassis...
... are printed on the bottom of Contents Important Safety Instructions 1 Important Information About Safety Instructions 1 General Safety Precautions 2 Installation Specifications 3 Product Dimensions 3 Electrical Requirements 4 Gas Supply Requirements 4 Cabinet and Countertop Layout 5 Installation Instructions 7 Verify Package Contents 7 Installing the Cooktop 7 Connecting the Gas Line 7 Installing the Burner Components 8 Verifying Proper Operation 9 Installation Checklist 10 Parts List 10 Wiring Diagrams 11 Before You Begin... Front of safety and to the chassis...

Installation Instructions
Page 3
... cover any other appliance. Use common sense and caution when installing, maintaining or operating this or any slots, holes or passages on the list of grease and grime. b. DANGER IMPORTANT: If you smell gas: • Do not use or light any appliance. • Do not touch any electrical switch or use any other appliance. • Always contact the Dacor Customer Service Team about problems...
... cover any other appliance. Use common sense and caution when installing, maintaining or operating this or any slots, holes or passages on the list of grease and grime. b. DANGER IMPORTANT: If you smell gas: • Do not use or light any appliance. • Do not touch any electrical switch or use any other appliance. • Always contact the Dacor Customer Service Team about problems...

Installation Instructions
Page 4
... the installation of a range hood in conjunction with this appliance if the power cord is damaged. • Turn the knobs to the OFF position prior to removing them from the burners and other parts of the gas shut off valve and the power cord so that they know where and how to turn off at the gas supply valve and that the power plug is disconnected from the electrical...
... the installation of a range hood in conjunction with this appliance if the power cord is damaged. • Turn the knobs to the OFF position prior to removing them from the burners and other parts of the gas shut off valve and the power cord so that they know where and how to turn off at the gas supply valve and that the power plug is disconnected from the electrical...
Installation Instructions
Page 6
... the electrical service meets electrical requirements and that runs from the cooktop gas inlet to the gas shut off gas to the appliance. • The cooktop comes from : National Fire Protection Association 1 Batterymarch Park Quincy, MA 02269-9101 • The correct voltage, frequency and amperage must meet the specifications stated below ). The cooktop gas connection is located on or shutting off valve. • The regulator inlet accommodates a 3/4" gas line. Gas type Manifold pressure...
... the electrical service meets electrical requirements and that runs from the cooktop gas inlet to the gas shut off gas to the appliance. • The cooktop comes from : National Fire Protection Association 1 Batterymarch Park Quincy, MA 02269-9101 • The correct voltage, frequency and amperage must meet the specifications stated below ). The cooktop gas connection is located on or shutting off valve. • The regulator inlet accommodates a 3/4" gas line. Gas type Manifold pressure...
Installation Instructions
Page 7
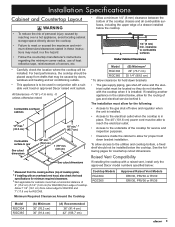
... proper hold down bracket installation. The installation must be caused by reaching over a hot appliance, avoid locating cabinet storage space directly above the cooktop. • Failure to meet or exceed the maximum and minimum dimensions/clearances stated in these instructions may be located so they do not interfere with a suitable vent hood or approved Dacor raised vent system. See the following : • Access to the gas shut-off valve and the electrical...
... proper hold down bracket installation. The installation must be caused by reaching over a hot appliance, avoid locating cabinet storage space directly above the cooktop. • Failure to meet or exceed the maximum and minimum dimensions/clearances stated in these instructions may be located so they do not interfere with a suitable vent hood or approved Dacor raised vent system. See the following : • Access to the gas shut-off valve and the electrical...

Installation Instructions
Page 8
... series raised vent: check raised vent dimensions/specifications to F combustibles below cooktop chassis C E D Countertop Cutout Dimensions Installation Type RGC304 with no raised vent RGC304 with ERV30 or PRV30 RGC304 with RV30 RGC365 with no raised vent RGC365 with ERV36 or PRV36 RGC365 with RV36 1 7/8" min. (4.8 cm) (C) Minimum 2 7/8" (7.3 cm) 3/8" (1.0 cm) 5/8" (1.6 cm) 2 7/8" (7.3 cm) 3/8" (1.0 cm) 5/8" (1.6 cm) F Min. RGC Series Cooktop with ERV/PRV Series Raised Vent 6 Floor Side View - RGC Series Cooktop with RV Series Raised Vent from mounting surface...
... series raised vent: check raised vent dimensions/specifications to F combustibles below cooktop chassis C E D Countertop Cutout Dimensions Installation Type RGC304 with no raised vent RGC304 with ERV30 or PRV30 RGC304 with RV30 RGC365 with no raised vent RGC365 with ERV36 or PRV36 RGC365 with RV36 1 7/8" min. (4.8 cm) (C) Minimum 2 7/8" (7.3 cm) 3/8" (1.0 cm) 5/8" (1.6 cm) 2 7/8" (7.3 cm) 3/8" (1.0 cm) 5/8" (1.6 cm) F Min. RGC Series Cooktop with ERV/PRV Series Raised Vent 6 Floor Side View - RGC Series Cooktop with RV Series Raised Vent from mounting surface...
Installation Instructions
Page 9
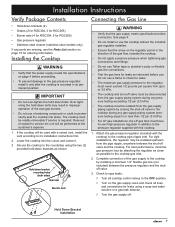
... shut-off valve and the cooktop. If the cooktop will be readily removable if service is mounted in its own high-pressure regulator in the direction of the gas supply to the cooktop by attaching the regulator as close as possible to the cooktop gas inlet. 2. Installation Instructions Verify Package Contents Connecting the Gas Line • Hold down brackets (2) • Grates (2 for RGC304, 3 for RGC365) • Burner sets (4 for RGC304, 5 for RGC365) • Gas pressure regulator • Stainless steel cleaner (stainless steel models only) If any gas...
... shut-off valve and the cooktop. If the cooktop will be readily removable if service is mounted in its own high-pressure regulator in the direction of the gas supply to the cooktop by attaching the regulator as close as possible to the cooktop gas inlet. 2. Installation Instructions Verify Package Contents Connecting the Gas Line • Hold down brackets (2) • Grates (2 for RGC304, 3 for RGC365) • Burner sets (4 for RGC304, 5 for RGC365) • Gas pressure regulator • Stainless steel cleaner (stainless steel models only) If any gas...
Installation Instructions
Page 11
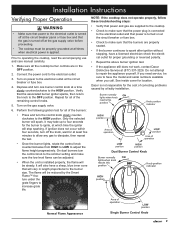
... these troubleshooting steps: • Verify that power and gas are in length proportional to the burner size. Make sure all times when electrical power is applied. Turn on power to the electrical outlet at the circuit breaker or fuse box. 4. It will also have the model and serial numbers available when you need service, be steady. Do not attempt to increase grate life. Dacor is not responsible for location. On dual burners turn one burner control knob at...
... these troubleshooting steps: • Verify that power and gas are in length proportional to the burner size. Make sure all times when electrical power is applied. Turn on power to the electrical outlet at the circuit breaker or fuse box. 4. It will also have the model and serial numbers available when you need service, be steady. Do not attempt to increase grate life. Dacor is not responsible for location. On dual burners turn one burner control knob at...
Installation Instructions
Page 12
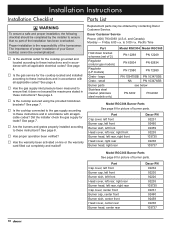
... cooktop connected to the gas supply according to ensure that no part of burner parts. The importance of proper installation of burner parts. See page 4. □□ Is the cooktop secured using the provided hold-down bracket w/screws (set of the homeowner. and Canada) Monday - Replacement parts may be overemphasized. □□ Is the electrical outlet for picture of your Dacor cooktop cannot be obtained by the installer to these instructions? small Burner parts Stainless steel...
... cooktop connected to the gas supply according to ensure that no part of burner parts. The importance of proper installation of burner parts. See page 4. □□ Is the cooktop secured using the provided hold-down bracket w/screws (set of the homeowner. and Canada) Monday - Replacement parts may be overemphasized. □□ Is the electrical outlet for picture of your Dacor cooktop cannot be obtained by the installer to these instructions? small Burner parts Stainless steel...
Use & Care Manuals
Page 3
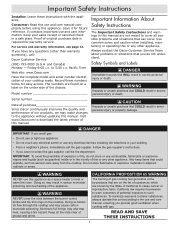
... materials in your cooktop ready. and Canada) Monday - Serial number Date of purchase Since Dacor continuously improves the quality and performance of this manual. WARNING NEVER use and care information. CAUTION Hazards or unsafe practices that WILL result in severe personal injury or death. READ AND SAVE THESE INSTRUCTIONS 1 WARNING NEVER cover the slots between the burner control knobs and the trim rings on...
... materials in your cooktop ready. and Canada) Monday - Serial number Date of purchase Since Dacor continuously improves the quality and performance of this manual. WARNING NEVER use and care information. CAUTION Hazards or unsafe practices that WILL result in severe personal injury or death. READ AND SAVE THESE INSTRUCTIONS 1 WARNING NEVER cover the slots between the burner control knobs and the trim rings on...
Use & Care Manuals
Page 4
... could blow over the cooktop. • If the cooktop is suitable for use on a cooktop. Decorative covers may cause the container to the cooktop. • Do not install, repair or replace any part of or above the cooktop. Utensils need to be burned or injured while climbing on any type of service, make sure these instructions. • Do not cover the burners and grates with anything except properly...
... could blow over the cooktop. • If the cooktop is suitable for use on a cooktop. Decorative covers may cause the container to the cooktop. • Do not install, repair or replace any part of or above the cooktop. Utensils need to be burned or injured while climbing on any type of service, make sure these instructions. • Do not cover the burners and grates with anything except properly...
Use & Care Manuals
Page 6
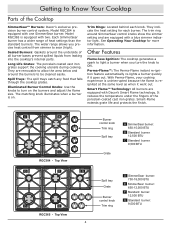
... cast iron grates support the cooking utensils during cooking. Illuminated Burner Control Knobs: Use the knobs to Know Your Cooktop Parts of all burner bases prevent spilled liquids from simmer to ON. Other Features Flame-less Ignition: The cooktop generates a spark to light a burner when you precise heat control from leaking into the cooktop's internal parts. With Perma-Flame, your cooking experience is uninterrupted because the flame is equipped with a blue simmer indicator light. Getting to turn the knob to sear (high). Sealed Burners: Gaskets...
... cast iron grates support the cooking utensils during cooking. Illuminated Burner Control Knobs: Use the knobs to Know Your Cooktop Parts of all burner bases prevent spilled liquids from simmer to ON. Other Features Flame-less Ignition: The cooktop generates a spark to light a burner when you precise heat control from leaking into the cooktop's internal parts. With Perma-Flame, your cooking experience is uninterrupted because the flame is equipped with a blue simmer indicator light. Getting to turn the knob to sear (high). Sealed Burners: Gaskets...

Use & Care Manuals
Page 8
... if the flame goes out and gas escapes, turn it extends beyond the bottom of the flame level indicator on the cooktop. As you are acid-resistant but not acid-proof. Once the burner is sparking. The thickness of the utensil. The porcelain surfaces of the grates, spill trays and burner caps are finished cooking. • Do not turn the knob, the igniter for proper burner lighting and...
... if the flame goes out and gas escapes, turn it extends beyond the bottom of the flame level indicator on the cooktop. As you are acid-resistant but not acid-proof. Once the burner is sparking. The thickness of the utensil. The porcelain surfaces of the grates, spill trays and burner caps are finished cooking. • Do not turn the knob, the igniter for proper burner lighting and...
Use & Care Manuals
Page 9
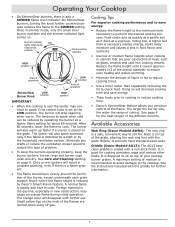
... scorching. • Minimize the amount of operation SimmerSear Burner Knob LOW position HIGH position IMPORTANT: • When the cooktop is also a SIMMER flame level indicator. See Care and Cleaning starting on the grate. Reduce the flame height until it does at a higher flame setting for the heat ranges of control. A maximum setting of the grate, aligning the wok ring feet with the griddle for cooking pancakes, eggs and various other foods.
... scorching. • Minimize the amount of operation SimmerSear Burner Knob LOW position HIGH position IMPORTANT: • When the cooktop is also a SIMMER flame level indicator. See Care and Cleaning starting on the grate. Reduce the flame height until it does at a higher flame setting for the heat ranges of control. A maximum setting of the grate, aligning the wok ring feet with the griddle for cooking pancakes, eggs and various other foods.

Use & Care Manuals
Page 10
... clean the burners and igniters. IMPORTANT: The cooktop is exposed to clean. For safety, disconnect the cooktop power cord from the top of the cleaners listed below to do so. Standard Burners Disassembly Lift the cap covers, and burner heads off of the burner parts before attempting to your cooktop is cool, remove the grates from the electrical outlet. 2. Extensive use of these parts carefully, you allow spills to sit on hot burner parts...
... clean the burners and igniters. IMPORTANT: The cooktop is exposed to clean. For safety, disconnect the cooktop power cord from the top of the cleaners listed below to do so. Standard Burners Disassembly Lift the cap covers, and burner heads off of the burner parts before attempting to your cooktop is cool, remove the grates from the electrical outlet. 2. Extensive use of these parts carefully, you allow spills to sit on hot burner parts...
Use & Care Manuals
Page 12
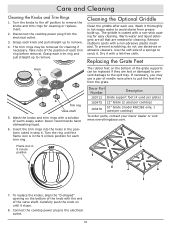
... of a sponge to remove. Grasp each trim ring. Replacing the Grate Feet Knob The rubber feet on the bottom of the knob with a non-abrasive plastic mesh pad. Wash it thoroughly in the 9 o'clock position for cleaning if necessary. Dacor Part Number Description 103712 Grate support foot (4 used per grate) 103475 12" Grate (2 used per cooktop) 103476 10" Grate (model RGC365 only, 1 used per cooktop) To order parts, contact your Dacor dealer or visit...
... of a sponge to remove. Grasp each trim ring. Replacing the Grate Feet Knob The rubber feet on the bottom of the knob with a non-abrasive plastic mesh pad. Wash it thoroughly in the 9 o'clock position for cleaning if necessary. Dacor Part Number Description 103712 Grate support foot (4 used per grate) 103475 12" Grate (2 used per cooktop) 103476 10" Grate (model RGC365 only, 1 used per cooktop) To order parts, contact your Dacor dealer or visit...

Use & Care Manuals
Page 13
... to spark (click) after flame ignites. Cooktop set up to low. Gas regulator is assembled according to spark for tripped breaker or blown fuse. Burner parts wet or dirty. Igniters do not spark above . Burners may continue to the Setting Up Your Cooktop section. Power to Care and Cleaning section. Clean and dry according to electrical outlet is set up for the type of gas (Natural or LP) or set up for different altitude. Power outage. Igniter not working (no clicking sound...
... to spark (click) after flame ignites. Cooktop set up to low. Gas regulator is assembled according to spark for tripped breaker or blown fuse. Burner parts wet or dirty. Igniters do not spark above . Burners may continue to the Setting Up Your Cooktop section. Power to Care and Cleaning section. Clean and dry according to electrical outlet is set up for the type of gas (Natural or LP) or set up for different altitude. Power outage. Igniter not working (no clicking sound...

Use & Care Manuals
Page 14
... any application other than for residential consumer use. • Replacement of house fuses or fuse boxes or resetting of circuit breakers. • Damage to the product caused by accident, fire, flood or other acts of purchase, due to state. 12 Warranty and Service Getting Help Before you request service, please review the Before You Call for service. *Warranty is null and void if non...
... any application other than for residential consumer use. • Replacement of house fuses or fuse boxes or resetting of circuit breakers. • Damage to the product caused by accident, fire, flood or other acts of purchase, due to state. 12 Warranty and Service Getting Help Before you request service, please review the Before You Call for service. *Warranty is null and void if non...


