
Planning Guides
Page 1
... cm) 27 1/2" * (69.9 cm) * including embosses in side of chassis Product dimensions - model rgc365 Specifications subject to cooking surface * including embosses in side of chassis Product dimensions - www.Dacor.com Phone: (800) 7943-.010093 model rgc304 36" (91.4 cm) 21" (53.3 cm) 4"... (10.2 cm) chassis height Axis2 19 1/2" * (49.5 cm) 33 5/8" * (85.4 cm) 2 1/8" (5.4 cm) bottom of base to change without notice. Document # PG04-005 RGC304, RGC365 30", 36" Wide Renaissance Gas Cooktops...
... cm) 27 1/2" * (69.9 cm) * including embosses in side of chassis Product dimensions - model rgc365 Specifications subject to cooking surface * including embosses in side of chassis Product dimensions - www.Dacor.com Phone: (800) 7943-.010093 model rgc304 36" (91.4 cm) 21" (53.3 cm) 4"... (10.2 cm) chassis height Axis2 19 1/2" * (49.5 cm) 33 5/8" * (85.4 cm) 2 1/8" (5.4 cm) bottom of base to change without notice. Document # PG04-005 RGC304, RGC365 30", 36" Wide Renaissance Gas Cooktops...
Planning Guides
Page 2
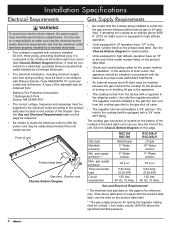
... the shipping carton. gas supply pressure 1/2 p.s.i. 1/2 p.s.i. www.Dacor.com Phone: (800) 7943-.010193 In the absence of installation. The cooktop gas connection is the owner's responsibility to the appliance. ◊ The cooktop comes from : National Fire Protection Association 1 Batterymarch Park Quincy, ... Requirements* * The electrical and gas data on the product data label. Document # PG04-005 RGC304, RGC365 30", 36" Wide, Renaissance Gas Cooktops Revised 01/25/11 Page 2/4 PLANNING GUIDE Electrical Requirements WARNING To prevent an electric shock hazard, the power...
... the shipping carton. gas supply pressure 1/2 p.s.i. 1/2 p.s.i. www.Dacor.com Phone: (800) 7943-.010193 In the absence of installation. The cooktop gas connection is the owner's responsibility to the appliance. ◊ The cooktop comes from : National Fire Protection Association 1 Batterymarch Park Quincy, ... Requirements* * The electrical and gas data on the product data label. Document # PG04-005 RGC304, RGC365 30", 36" Wide, Renaissance Gas Cooktops Revised 01/25/11 Page 2/4 PLANNING GUIDE Electrical Requirements WARNING To prevent an electric shock hazard, the power...
Planning Guides
Page 3
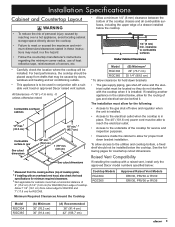
... these instructions may be located so they do not interfere with a raised vent, install only the approved Dacor model numbers specified below the cooktop. 1/4" (6 mm) min. RGC304, RGC365 Document # PG04-005 30", 36" Wide, Renaissance Gas Cooktops Revised 01/25/11 Page 3/4 PLANNING GUIDE Cabinet and Countertop Layout WARNING • To reduce the risk...
... these instructions may be located so they do not interfere with a raised vent, install only the approved Dacor model numbers specified below the cooktop. 1/4" (6 mm) min. RGC304, RGC365 Document # PG04-005 30", 36" Wide, Renaissance Gas Cooktops Revised 01/25/11 Page 3/4 PLANNING GUIDE Cabinet and Countertop Layout WARNING • To reduce the risk...

Planning Guides
Page 4
... ERV/PRV Series Raised Vent Floor Side View - distance to determine proper fit Floor Side View - www.Dacor.com Phone: (800) 7943-.010393 Document # PG04-005 Cutout Dimensions RGC304, RGC365 30", 36" Wide, Renaissance Gas Cooktops Revised 01/25/11 Page 4/4 PLANNING GUIDE All tolerances: +1/16" (+1.6 mm), -0, unless otherwise stated Vertical combustible surface...
... ERV/PRV Series Raised Vent Floor Side View - distance to determine proper fit Floor Side View - www.Dacor.com Phone: (800) 7943-.010393 Document # PG04-005 Cutout Dimensions RGC304, RGC365 30", 36" Wide, Renaissance Gas Cooktops Revised 01/25/11 Page 4/4 PLANNING GUIDE All tolerances: +1/16" (+1.6 mm), -0, unless otherwise stated Vertical combustible surface...

Installation Instructions
Page 2
...Product Dimensions 3 Electrical Requirements 4 Gas Supply Requirements 4 Cabinet and Countertop Layout 5 Installation Instructions 7 Verify Package Contents 7 Installing the Cooktop 7 Connecting the Gas Line 7 Installing the Burner Components 8 Verifying Proper Operation 9 Installation Checklist 10 Parts List 10 Wiring Diagrams 11...instructions completely and carefully before you have the model and serial number of safety and to specifications. © 2008 Dacor, all rights reserved. If you begin the installation process. For repairs to the chassis on the product data ...
...Product Dimensions 3 Electrical Requirements 4 Gas Supply Requirements 4 Cabinet and Countertop Layout 5 Installation Instructions 7 Verify Package Contents 7 Installing the Cooktop 7 Connecting the Gas Line 7 Installing the Burner Components 8 Verifying Proper Operation 9 Installation Checklist 10 Parts List 10 Wiring Diagrams 11...instructions completely and carefully before you have the model and serial number of safety and to specifications. © 2008 Dacor, all rights reserved. If you begin the installation process. For repairs to the chassis on the product data ...

Installation Instructions
Page 3
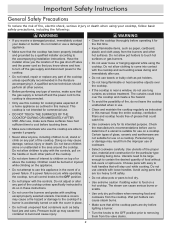
...• The Important Safety Instructions and warnings in these substances, always operate this or any other appliance. • Always contact the Dacor Customer Service Team about problems and conditions that you don't understand. Use common sense and caution when installing, maintaining or operating this ...called. ◊ You can occur. warning WARNING - c. Doing so may result in adjacent cabinets or areas (including above and below the cooktop). warning TO REDUCE THE RISK OF INJURY TO PERSONS IN THE EVENT OF A RANGE TOP GREASE FIRE: a. To minimize exposure to these instructions...
...• The Important Safety Instructions and warnings in these substances, always operate this or any other appliance. • Always contact the Dacor Customer Service Team about problems and conditions that you don't understand. Use common sense and caution when installing, maintaining or operating this ...called. ◊ You can occur. warning WARNING - c. Doing so may result in adjacent cabinets or areas (including above and below the cooktop). warning TO REDUCE THE RISK OF INJURY TO PERSONS IN THE EVENT OF A RANGE TOP GREASE FIRE: a. To minimize exposure to these instructions...

Installation Instructions
Page 4
... frayed or damaged. • Connect to heat sealed containers. Do not install or use a damaged appliance. • This cooktop must be properly installed and grounded by a qualified installer according to these installation instructions prior to use long curtains as pot holders...your protection against possible electric shock hazards. Remove birds to play with a threeprong grounding plug for cooking tasks expected of the cooktop. Dacor strongly recommends the installation of the appliance. • Do not leave children alone or unattended in conjunction with a surface (...
... frayed or damaged. • Connect to heat sealed containers. Do not install or use a damaged appliance. • This cooktop must be properly installed and grounded by a qualified installer according to these installation instructions prior to use long curtains as pot holders...your protection against possible electric shock hazards. Remove birds to play with a threeprong grounding plug for cooking tasks expected of the cooktop. Dacor strongly recommends the installation of the appliance. • Do not leave children alone or unattended in conjunction with a surface (...
Installation Instructions
Page 6
...* * The electrical and gas data on this page is located on this standard may be done in the shipping carton. A copy of the cooktop in the gas line that the electrical outlet has been properly installed by a licensed electrician. • The electrical installation, including minimum supply wire ...shock hazard, the power supply must be easily disconnected if the unit needs service. gas supply pressure Total connected load Circuit requirement RGC304 RGC365 Natural gas 5" Water column 6" Water column 1/2 p.s.i. 0.25 Amp. (0.03 kW) 120 Vac, 60 Hz, 15 Amp. Gas type Manifold pressure...
...* * The electrical and gas data on this page is located on this standard may be done in the shipping carton. A copy of the cooktop in the gas line that the electrical outlet has been properly installed by a licensed electrician. • The electrical installation, including minimum supply wire ...shock hazard, the power supply must be easily disconnected if the unit needs service. gas supply pressure Total connected load Circuit requirement RGC304 RGC365 Natural gas 5" Water column 6" Water column 1/2 p.s.i. 0.25 Amp. (0.03 kW) 120 Vac, 60 Hz, 15 Amp. Gas type Manifold pressure...
Installation Instructions
Page 7
... allow clearance for the following pages for RGC365) from the cooking surface (top of cooktop grate). 2 If installing with the cooktop when it . Raised Vent Compatibility If installing the cooktop with a raised vent, install only the approved Dacor model numbers specified below , allow access to the utilities and cooktop bottom, a fixed shelf should be placed away...
... allow clearance for the following pages for RGC365) from the cooking surface (top of cooktop grate). 2 If installing with the cooktop when it . Raised Vent Compatibility If installing the cooktop with a raised vent, install only the approved Dacor model numbers specified below , allow access to the utilities and cooktop bottom, a fixed shelf should be placed away...

Installation Instructions
Page 8
... RV series raised vent: check raised vent dimensions/specifications to F combustibles below cooktop chassis C E D Countertop Cutout Dimensions Installation Type RGC304 with no raised vent RGC304 with ERV30 or PRV30 RGC304 with RV30 RGC365 with no raised vent RGC365 with ERV36 or PRV36 RGC365 with RV36 1 7/8" min. (4.8 cm) (C) Minimum 2 7/8" (7.3 cm) 3/8" (1.0 cm) 5/8" (1.6 cm) 2 7/8" (7.3 cm) 3/8" (1.0 cm) 5/8" (1.6 cm...
... RV series raised vent: check raised vent dimensions/specifications to F combustibles below cooktop chassis C E D Countertop Cutout Dimensions Installation Type RGC304 with no raised vent RGC304 with ERV30 or PRV30 RGC304 with RV30 RGC365 with no raised vent RGC365 with ERV36 or PRV36 RGC365 with RV36 1 7/8" min. (4.8 cm) (C) Minimum 2 7/8" (7.3 cm) 3/8" (1.0 cm) 5/8" (1.6 cm) 2 7/8" (7.3 cm) 3/8" (1.0 cm) 5/8" (1.6 cm...
Installation Instructions
Page 9
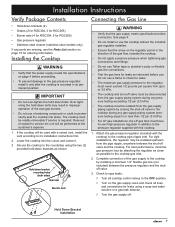
... regulator, install it 's installation instructions first. 2. Hold down bolts. Installing the Cooktop WARNING • Verify that the power supply meets the specifications on page 10 for RGC365) • Gas pressure regulator • Stainless steel cleaner (stainless steel models only...down brackets (2) • Grates (2 for RGC304, 3 for RGC365) • Burner sets (4 for RGC304, 5 for ordering information. Hold Down Bracket Installation 7 The cooktop must have its permanent position. If the cooktop will be disconnected from the gas supply piping system during any ...
... regulator, install it 's installation instructions first. 2. Hold down bolts. Installing the Cooktop WARNING • Verify that the power supply meets the specifications on page 10 for RGC365) • Gas pressure regulator • Stainless steel cleaner (stainless steel models only...down brackets (2) • Grates (2 for RGC304, 3 for RGC365) • Burner sets (4 for RGC304, 5 for ordering information. Hold Down Bracket Installation 7 The cooktop must have its permanent position. If the cooktop will be disconnected from the gas supply piping system during any ...

Installation Instructions
Page 10
... properly unless all of the burner pieces are positioned in the dimples. Installation Instructions Installing the Burner Components warning • Never attempt to operate the cooktop with igniter Cap cover Burner head Igniter Single Burner Assembly Burner base Cap cover Burner cap Skirt Wide side down! Dual Burner Assembly Burner head...
... properly unless all of the burner pieces are positioned in the dimples. Installation Instructions Installing the Burner Components warning • Never attempt to operate the cooktop with igniter Cap cover Burner head Igniter Single Burner Assembly Burner base Cap cover Burner cap Skirt Wide side down! Dual Burner Assembly Burner head...

Installation Instructions
Page 11
...in the OFF position. 2. Make sure all times when electrical power is applied. Verify that will be properly grounded at all the cooktop burner controls are properly seated. • If the burner continues to spark after ignition without stopping, have a licensed electrician check ...the electrical outlet for the cost of operation LOW position Single Burner Control Knob 9 Dacor is not responsible for proper grounding or reversed polarity. • Repeat the above burner ignition test. • If the appliance still...
...in the OFF position. 2. Make sure all times when electrical power is applied. Verify that will be properly grounded at all the cooktop burner controls are properly seated. • If the burner continues to spark after ignition without stopping, have a licensed electrician check ...the electrical outlet for the cost of operation LOW position Single Burner Control Knob 9 Dacor is not responsible for proper grounding or reversed polarity. • Repeat the above burner ignition test. • If the appliance still...
Installation Instructions
Page 12
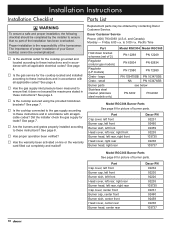
...front Head cover, right rear Burner head, right rear Dacor PN 92231 92460 92459 92235 103735 92236 103737 Model RGC365 Burner Parts See page 8 for picture of burner parts. See page 7. □□ Is the cooktop connected to the gas supply according to these instructions ... List warning To ensure a safe and proper installation, the following checklist should be completed by contacting Dacor Customer Service. The importance of proper installation of your Dacor cooktop cannot be overemphasized. □□ Is the electrical outlet for picture of burner parts. Proper installation...
...front Head cover, right rear Burner head, right rear Dacor PN 92231 92460 92459 92235 103735 92236 103737 Model RGC365 Burner Parts See page 8 for picture of burner parts. See page 7. □□ Is the cooktop connected to the gas supply according to these instructions ... List warning To ensure a safe and proper installation, the following checklist should be completed by contacting Dacor Customer Service. The importance of proper installation of your Dacor cooktop cannot be overemphasized. □□ Is the electrical outlet for picture of burner parts. Proper installation...

Use & Care Manuals
Page 1
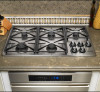
G Use and Care Manual Renaissance Cooktop Models: RGC304, RGC365 Style varies, model RGC365 shown Table o f C o nt e nt s Important Safety Instructions 1 Getting to Know Your Cooktop 4 Setting Up Your Cooktop 5 Operating Your Cooktop 6 Care and Cleaning 8 Before You Call for Service 11 Warranty and Service 12 Warranty Card Back Cover Part No. 103779 Rev.
G Use and Care Manual Renaissance Cooktop Models: RGC304, RGC365 Style varies, model RGC365 shown Table o f C o nt e nt s Important Safety Instructions 1 Getting to Know Your Cooktop 4 Setting Up Your Cooktop 5 Operating Your Cooktop 6 Care and Cleaning 8 Before You Call for Service 11 Warranty and Service 12 Warranty Card Back Cover Part No. 103779 Rev.
Use & Care Manuals
Page 3
...trim rings on the list of substances which are on the cooktop. Use common sense and caution when installing, maintaining or operating this use and care information. Serial number Date of purchase Since Dacor continuously improves the quality and performance of explosion or fire,... also trap heat, causing a fire hazard. Also keep items that WILL result in severe personal injury or death. Keep your cooktop ready. Keep all possible problems and situations that can occur. Important Safety Instructions Installer: Leave these instructions with gas. It contains...
...trim rings on the list of substances which are on the cooktop. Use common sense and caution when installing, maintaining or operating this use and care information. Serial number Date of purchase Since Dacor continuously improves the quality and performance of explosion or fire,... also trap heat, causing a fire hazard. Also keep items that WILL result in severe personal injury or death. Keep your cooktop ready. Keep all possible problems and situations that can occur. Important Safety Instructions Installer: Leave these instructions with gas. It contains...
Use & Care Manuals
Page 4
...after use. • Do not use towels or bulky cloth as paper, cardboard, plastic and cloth away from the cooktop. Keep the entire cooktop, ventilation filters and cooktop hoods free of cooking being done. Use utensils of the proper size, material and construction for the particular type of ... to play with loose handles. The steam can cause steam burns. • Make sure that could blow over the cooktop. • If the cooktop is accidentally turned on a cooktop. Do not install or use utensils with the controls, pull on the handle or touch other hot surfaces. A qualified...
...after use. • Do not use towels or bulky cloth as paper, cardboard, plastic and cloth away from the cooktop. Keep the entire cooktop, ventilation filters and cooktop hoods free of cooking being done. Use utensils of the proper size, material and construction for the particular type of ... to play with loose handles. The steam can cause steam burns. • Make sure that could blow over the cooktop. • If the cooktop is accidentally turned on a cooktop. Do not install or use utensils with the controls, pull on the handle or touch other hot surfaces. A qualified...

Use & Care Manuals
Page 5
... a cutting board. • Do not try to remain on the cooktop's surfaces. The porcelain finish may stain. • Never use the cooktop surface as a knife or metal spatula. Important Safety Instructions WARNING • The cooktop should never be operated without the knobs in the area where it is...to operate it. ◊ The fire is frayed or damaged. ◊ Plug the cooktop into an electrical outlet with your protection against possible electric shock hazards. a violent steam explosion may scratch the cooktop's surfaces. • Do not expose the knobs or trim rings to direct flame, ...
... a cutting board. • Do not try to remain on the cooktop's surfaces. The porcelain finish may stain. • Never use the cooktop surface as a knife or metal spatula. Important Safety Instructions WARNING • The cooktop should never be operated without the knobs in the area where it is...to operate it. ◊ The fire is frayed or damaged. ◊ Plug the cooktop into an electrical outlet with your protection against possible electric shock hazards. a violent steam explosion may scratch the cooktop's surfaces. • Do not expose the knobs or trim rings to direct flame, ...
Use & Care Manuals
Page 6
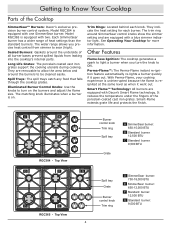
It reduces the temperature under the fingers of the Cooktop SimmerSear™ Burners: Dacor's exclusive precision burner control system. Top View G F D E RGC365 - The wider range allows you turn on . Spill Trays: The spill trays catch any food that falls through the cooktop grates. With Perma-Flame, your cooking experience is uninterrupted because the flame is...
It reduces the temperature under the fingers of the Cooktop SimmerSear™ Burners: Dacor's exclusive precision burner control system. Top View G F D E RGC365 - The wider range allows you turn on . Spill Trays: The spill trays catch any food that falls through the cooktop grates. With Perma-Flame, your cooking experience is uninterrupted because the flame is...

Use & Care Manuals
Page 7
...size. 3. On model RGC365 be sure to match the correct size. Match the correct sizes. Line up notch with the ignitor on the matching base. 2. Burner head* Base SimmerSear Burner Assembly *The burner head on the burner head of the spill tray. Setting Up Your Cooktop Burner and Grate Assembly...the cap covers on the burner bases as shown below . Put the burner heads on top of the cap inside the base. On model RGC365 be removed by the customer. 5 Twist each head with igniter Cap cover Burner head Notch Igniter Burner base Standard Burner Assembly Grates Gently set...
...size. 3. On model RGC365 be sure to match the correct size. Match the correct sizes. Line up notch with the ignitor on the matching base. 2. Burner head* Base SimmerSear Burner Assembly *The burner head on the burner head of the spill tray. Setting Up Your Cooktop Burner and Grate Assembly...the cap covers on the burner bases as shown below . Put the burner heads on top of the cap inside the base. On model RGC365 be removed by the customer. 5 Twist each head with igniter Cap cover Burner head Notch Igniter Burner base Standard Burner Assembly Grates Gently set...


