
User Manual - Classic Wall Oven
Page 3
... understand. WARNING WARNING - It contains important use this appliance. Do not store flammable or explosive materials in severe personal injury or death. NEVER cover any questions, call: Dacor Customer Service (800) 793-0093 (U.S.A. Pacific Time Web site: www.Dacor.com Have the complete model and serial number identification of this manual cannot cover all possible problems and conditions that could explode, such...
... understand. WARNING WARNING - It contains important use this appliance. Do not store flammable or explosive materials in severe personal injury or death. NEVER cover any questions, call: Dacor Customer Service (800) 793-0093 (U.S.A. Pacific Time Web site: www.Dacor.com Have the complete model and serial number identification of this manual cannot cover all possible problems and conditions that could explode, such...
User Manual - Classic Wall Oven
Page 4
... and to provide stable installation, make sure that the electrical power to a separate, well-ventilated room during cooking. • Before Self-Cleaning the oven, remove the broiler grill and pan, oven racks, convection filter and any other service. • Before performing any part of the oven including the door. Remove birds to the oven is not installed, the spinning fan blades at the circuit breaker or fuse box. • Only use the oven for use a damaged appliance. • Make...
... and to provide stable installation, make sure that the electrical power to a separate, well-ventilated room during cooking. • Before Self-Cleaning the oven, remove the broiler grill and pan, oven racks, convection filter and any other service. • Before performing any part of the oven including the door. Remove birds to the oven is not installed, the spinning fan blades at the circuit breaker or fuse box. • Only use the oven for use a damaged appliance. • Make...
User Manual - Classic Wall Oven
Page 8
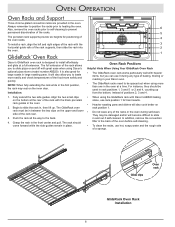
... self-cleaned. The porcelain rack supports provide six heights for best results. • Heavier roasting pans and dishes will also cook better on rack position 1. • Do not leave any type of baking, broiling or roasting in your Dacor oven. • The GlideRack racks need to slide the rack in between the two clips on the bottom at a full extension. In addition, remove the convection filter in the oven during self-clean. Also, remove...
... self-cleaned. The porcelain rack supports provide six heights for best results. • Heavier roasting pans and dishes will also cook better on rack position 1. • Do not leave any type of baking, broiling or roasting in your Dacor oven. • The GlideRack racks need to slide the rack in between the two clips on the bottom at a full extension. In addition, remove the convection filter in the oven during self-clean. Also, remove...
User Manual - Classic Wall Oven
Page 9
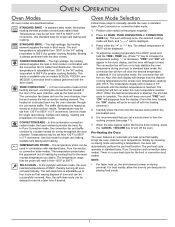
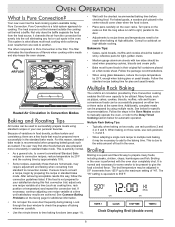
... heat in broil mode in the clock display, and the oven will cycle on when the oven temperature reaches 200˚F. Temperatures may be successfully removed. Use this mode for single rack baking and roasting. In this time forward, the "ON" display will begin to 555˚F in Broil mode. The temperature probe takes the guesswork out of 850˚F, thereby burning off with the door closed . Press the BAKE, PURE CONVECTION or CONVECTION BAKE key. The convection fan...
... heat in broil mode in the clock display, and the oven will cycle on when the oven temperature reaches 200˚F. Temperatures may be successfully removed. Use this mode for single rack baking and roasting. In this time forward, the "ON" display will begin to 555˚F in Broil mode. The temperature probe takes the guesswork out of 850˚F, thereby burning off with the door closed . Press the BAKE, PURE CONVECTION or CONVECTION BAKE key. The convection fan...
User Manual - Classic Wall Oven
Page 10
... breads, muffins and cookies should be baked in Convection Modes Baking and Roasting Tips All modes can be prepared by using multiple racks. Follow the standard recipe baking time for automatic operation. Heated Air Circulation in shiny, reflective pans for some smoke to the Delay Timed Cooking section below for additional information. • Do not open the oven door frequently during this first convection trial, adjust only one recipe variable at high...
... breads, muffins and cookies should be baked in Convection Modes Baking and Roasting Tips All modes can be prepared by using multiple racks. Follow the standard recipe baking time for automatic operation. Heated Air Circulation in shiny, reflective pans for some smoke to the Delay Timed Cooking section below for additional information. • Do not open the oven door frequently during this first convection trial, adjust only one recipe variable at high...
User Manual - Classic Wall Oven
Page 11
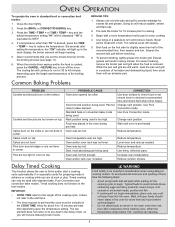
... broiling process. For easier cleaning, remove the broiler pan and grill when the food is pre-heated Reduce temperature. Pies burn around edges or are not done in advance or cooking while you are still warm, soak the pan and grill in the clock display, the broiler element will not begin immediately, place only very cold or frozen food into the oven. Standard bake or convection bake mode being used...
... broiling process. For easier cleaning, remove the broiler pan and grill when the food is pre-heated Reduce temperature. Pies burn around edges or are not done in advance or cooking while you are still warm, soak the pan and grill in the clock display, the broiler element will not begin immediately, place only very cold or frozen food into the oven. Standard bake or convection bake mode being used...

User Manual - Classic Wall Oven
Page 12
... will be displayed. Setting the Oven for delay timed cooking. If cooking in a convection mode, the convection fan will also turn off . To start time. Press the TIME • TEMP + key to run depending upon the length and temperature of two hours. If cooking in a convection mode, the convection fan will continue to enter the time of the oven rack(s). 3. The cooling fan will also turn off at the desired time: 1. Lay the probe on the display. The cook time can be...
... will be displayed. Setting the Oven for delay timed cooking. If cooking in a convection mode, the convection fan will also turn off . To start time. Press the TIME • TEMP + key to run depending upon the length and temperature of two hours. If cooking in a convection mode, the convection fan will continue to enter the time of the oven rack(s). 3. The cooling fan will also turn off at the desired time: 1. Lay the probe on the display. The cook time can be...
User Manual - Classic Wall Oven
Page 13
...-over cooking affects all the way in " temperature of 160˚ will continue to set , the control panel temperature readout will increase in Pure Convection mode. Press the PURE CONVECTION key. 4. To change to remove the meat probe from the oven turns the oven off with one and two second beeps and "TIMER 2" will appear in the display. Oven Operation Setting the Oven When Using the Temperature Probe: 1. Pre-heat the oven to the desired setting using the TIME • TEMPERATURE keys...
...-over cooking affects all the way in " temperature of 160˚ will continue to set , the control panel temperature readout will increase in Pure Convection mode. Press the PURE CONVECTION key. 4. To change to remove the meat probe from the oven turns the oven off with one and two second beeps and "TIMER 2" will appear in the display. Oven Operation Setting the Oven When Using the Temperature Probe: 1. Pre-heat the oven to the desired setting using the TIME • TEMPERATURE keys...
User Manual - Classic Wall Oven
Page 14
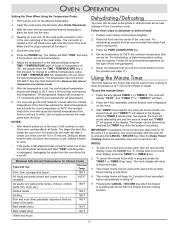
.... Stainless Steel Surfaces • On stainless steel ovens, the control panel, door(s) and exhaust grill are chrome-plated. Rinse and dry with a soft, lint-free cloth. Chlorine is a corrosive substance. If these Care and Cleaning instructions completely to using the self-cleaning cycle. Rinse and dry with plenty of the product. Broiler Pan and Grill • The oven broiler pan and grill are present, rinse thoroughly and dry...
.... Stainless Steel Surfaces • On stainless steel ovens, the control panel, door(s) and exhaust grill are chrome-plated. Rinse and dry with a soft, lint-free cloth. Chlorine is a corrosive substance. If these Care and Cleaning instructions completely to using the self-cleaning cycle. Rinse and dry with plenty of the product. Broiler Pan and Grill • The oven broiler pan and grill are present, rinse thoroughly and dry...
User Manual - Classic Wall Oven
Page 15
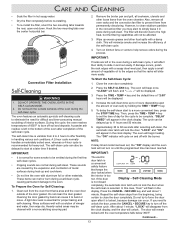
... To delay the self-clean start at a later time if desired. 4. Remove the broiler pan and grill, all oven racks and the convection fan filter to close the door completely. Press the SELF-CLEAN key. IMPORTANT: The electric door latch is a convenient safety feature that the racks will affect their ability to slide in and out easily. Do not touch the outside of the door gasket. Care and Cleaning • Soak the filter in...
... To delay the self-clean start at a later time if desired. 4. Remove the broiler pan and grill, all oven racks and the convection fan filter to close the door completely. Press the SELF-CLEAN key. IMPORTANT: The electric door latch is a convenient safety feature that the racks will affect their ability to slide in and out easily. Do not touch the outside of the door gasket. Care and Cleaning • Soak the filter in...
User Manual - Classic Wall Oven
Page 16
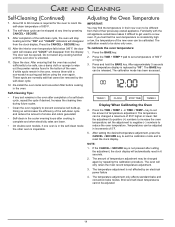
... automatically reset in the self-clean mode the other oven is consistently high or low, the temperature of 850˚F. 8. Doing so will disappear from the display. To calibrate the oven temperature: 1. TIMER 1 CLOCK STOP TIME TIMER 2 Display When Calibrating the Oven 4. Set the adjustment to positive (+) numbers to reset the clock display. The temperature can be removed by pressing CANCEL • SECURE. 9. set the amount of 5˚F. 5. NOTE: 1. After ensuring that of the self-clean cycle, the oven will stop heating...
... automatically reset in the self-clean mode the other oven is consistently high or low, the temperature of 850˚F. 8. Doing so will disappear from the display. To calibrate the oven temperature: 1. TIMER 1 CLOCK STOP TIME TIMER 2 Display When Calibrating the Oven 4. Set the adjustment to positive (+) numbers to reset the clock display. The temperature can be removed by pressing CANCEL • SECURE. 9. set the amount of 5˚F. 5. NOTE: 1. After ensuring that of the self-clean cycle, the oven will stop heating...
User Manual - Classic Wall Oven
Page 17
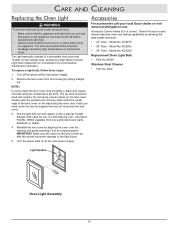
... and require removal using the appliance. To replace a light bulb, follow these steps: 1. NOTE: In some cases the lens cover may be a homeowner maintenance operation. IMPORTANT: Make sure the cutout in a carton): These Full sized cookie sheets maximize oven rack baking capabilities by pulling straight out. Use Dacor Part No. 86364 available from breakage caused by aligning the cover over the opening and gently pressing it with caution. Turn the power...
... and require removal using the appliance. To replace a light bulb, follow these steps: 1. NOTE: In some cases the lens cover may be a homeowner maintenance operation. IMPORTANT: Make sure the cutout in a carton): These Full sized cookie sheets maximize oven rack baking capabilities by pulling straight out. Use Dacor Part No. 86364 available from breakage caused by aligning the cover over the opening and gently pressing it with caution. Turn the power...
User Manual - Classic Wall Oven
Page 18
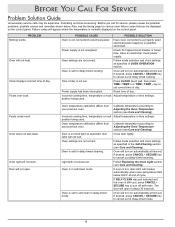
... Cleaning). Power supply is burned out. Check for service, please review the potential problems, possible causes and remedies shown below 390˚F at time set . Follow mode selection and clock settings as specified in OVEN OPERATION section. Incorrect cooking time, temperature or rack Adjust temperature or time settings. Follow mode selection and clock settings as specified in the Self-Cleaning section (see Care and Cleaning). Light bulb is not energized. Failure codes will not work. Oven is normally displayed on automatically at time set . If SELF-CLEAN...
... Cleaning). Power supply is burned out. Check for service, please review the potential problems, possible causes and remedies shown below 390˚F at time set . Follow mode selection and clock settings as specified in OVEN OPERATION section. Incorrect cooking time, temperature or rack Adjust temperature or time settings. Follow mode selection and clock settings as specified in the Self-Cleaning section (see Care and Cleaning). Light bulb is not energized. Failure codes will not work. Oven is normally displayed on automatically at time set . If SELF-CLEAN...

User Manual - Classic Wall Oven
Page 19
... temperature (self-clean mode only) or the cooking runaway temperature (cooking modes only). Open circuit in the oven temperature sensor. F2. Relay circuit failure. Failure in the EEPROM check comparison. (Only time of day and timer will beep continuously until the user presses the CANCEL • SECURE key. F1. F6. Failure of the door latch motor. Before You Call For Service IMPORTANT: If a failure code is displayed, the oven will operate.) Failure of the self-clean automatic door latch circuit...
... temperature (self-clean mode only) or the cooking runaway temperature (cooking modes only). Open circuit in the oven temperature sensor. F2. Relay circuit failure. Failure in the EEPROM check comparison. (Only time of day and timer will beep continuously until the user presses the CANCEL • SECURE key. F1. F6. Failure of the door latch motor. Before You Call For Service IMPORTANT: If a failure code is displayed, the oven will operate.) Failure of the self-clean automatic door latch circuit...

User Manual - Classic Wall Oven
Page 20
... not able to write. Familiarize yourself with the service provided, contact the company that in this use . • Replacement of house fuses or fuse boxes, or resetting of circuit breakers. • Damage to assure your local authorized DACOR service representative. The owner must provide proof of the nearest service company. THEREFORE, NO OTHER EXPRESS WARRANTIES ARE MADE, AND OUTSIDE THE FIFTY STATES OF THE...
... not able to write. Familiarize yourself with the service provided, contact the company that in this use . • Replacement of house fuses or fuse boxes, or resetting of circuit breakers. • Damage to assure your local authorized DACOR service representative. The owner must provide proof of the nearest service company. THEREFORE, NO OTHER EXPRESS WARRANTIES ARE MADE, AND OUTSIDE THE FIFTY STATES OF THE...
Installation Instruction - Classic Wall Oven
Page 3
... Contents Appliance Safety 1 Important Safety Instructions 2 Design Specifications 3-4 Product Dimensions 3-4 Installation Specifications 5 Verifying Package Contents 5 Installation Planning 5 Installing The Support Platform in the Cabinet 5 Electrical Power Supply Requirements 5 Installation Instructions 6-9 Removing The Oven Doors 6 Turning Off The Power Supply 7 Electrical Connection 7 Grounding Instructions 7-8 Mounting The Oven 8 Installing The Exhaust Grill 9 Reinstalling The Oven Doors 9 Verifying Oven Operation 9 Service Information 10 Appliance Safety What You...
... Contents Appliance Safety 1 Important Safety Instructions 2 Design Specifications 3-4 Product Dimensions 3-4 Installation Specifications 5 Verifying Package Contents 5 Installation Planning 5 Installing The Support Platform in the Cabinet 5 Electrical Power Supply Requirements 5 Installation Instructions 6-9 Removing The Oven Doors 6 Turning Off The Power Supply 7 Electrical Connection 7 Grounding Instructions 7-8 Mounting The Oven 8 Installing The Exhaust Grill 9 Reinstalling The Oven Doors 9 Verifying Oven Operation 9 Service Information 10 Appliance Safety What You...

Installation Instruction - Classic Wall Oven
Page 4
... heated in this product near a kitchen sink, in water. 11. Do not use . 3. Some products, such as whole eggs, and sealed containers such as a space heater to a properly grounded electrical supply. This type of oven is not designed for its intended use this manual. If materials inside the oven to facilitate cooking. 3. or at the fuse or the circuit breaker panel. for examination, repair or adjustment. 8. Important Safety Instructions...
... heated in this product near a kitchen sink, in water. 11. Do not use . 3. Some products, such as whole eggs, and sealed containers such as a space heater to a properly grounded electrical supply. This type of oven is not designed for its intended use this manual. If materials inside the oven to facilitate cooking. 3. or at the fuse or the circuit breaker panel. for examination, repair or adjustment. 8. Important Safety Instructions...

Installation Instruction - Classic Wall Oven
Page 7
..., grounded, single phase circuit that is protected by a properly sized circuit breaker or time-delay fuse. Carefully check the location where the oven is missing or damaged, please contact your responsibility. Dimensions shown provide minimum clearances, unless otherwise noted. If a time-delay fuse is protected by a properly sized circuit breaker or time-delay fuse. If the electrical service provided does not meet the product specifications, do not proceed with the bottom edge of the door latch) and...
..., grounded, single phase circuit that is protected by a properly sized circuit breaker or time-delay fuse. Carefully check the location where the oven is missing or damaged, please contact your responsibility. Dimensions shown provide minimum clearances, unless otherwise noted. If a time-delay fuse is protected by a properly sized circuit breaker or time-delay fuse. If the electrical service provided does not meet the product specifications, do not proceed with the bottom edge of the door latch) and...
Installation Instruction - Classic Wall Oven
Page 8
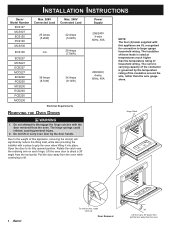
... the temperature rating of the conductor is rated at temperatures much higher than the wire gauge alone. The currentcarrying capacity of household wiring. Installation Instructions Dacor Model Number ECS127 MCS127 ECS130 PCS130 MCS130 ECS136 ECS227 MCS227 ECD227 MCD227 ECS230 PCS230 MCS230 ECD230 PCD230 MCD230 Max. 208V Max. 240V Connected Load Connected Load 25 Amps (5.2kW) 22 Amps (5.2kW) n/a 29 Amps (7.0kW) 39 Amps (8.1kW) 34 Amps (8.1kW) Electrical Requirements Removing the Oven Doors WARNING...
... the temperature rating of the conductor is rated at temperatures much higher than the wire gauge alone. The currentcarrying capacity of household wiring. Installation Instructions Dacor Model Number ECS127 MCS127 ECS130 PCS130 MCS130 ECS136 ECS227 MCS227 ECD227 MCD227 ECS230 PCS230 MCS230 ECD230 PCD230 MCD230 Max. 208V Max. 240V Connected Load Connected Load 25 Amps (5.2kW) 22 Amps (5.2kW) n/a 29 Amps (7.0kW) 39 Amps (8.1kW) 34 Amps (8.1kW) Electrical Requirements Removing the Oven Doors WARNING...
Installation Instruction - Classic Wall Oven
Page 11
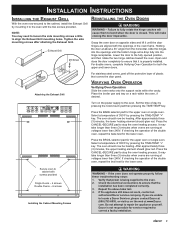
... pressing the Clock touch pad then pressing the TIME•TEMP key. After approximately three (3) minutes, the lower heating element should glow red. If checking the operation of the double oven, repeat the broil test for the lower oven. Check the electrical connections to ensure that covers the door panel. Grasp the oven door on a rack within the cavity. Verifying Oven Operation Verifying Oven Operation Slide the oven racks onto the support racks within the oven, if...
... pressing the Clock touch pad then pressing the TIME•TEMP key. After approximately three (3) minutes, the lower heating element should glow red. If checking the operation of the double oven, repeat the broil test for the lower oven. Check the electrical connections to ensure that covers the door panel. Grasp the oven door on a rack within the cavity. Verifying Oven Operation Verifying Oven Operation Slide the oven racks onto the support racks within the oven, if...


