Installation Instructions
Page 3
...these installation instructions completely and carefully before you don't understand. NEVER cover any other appliance. • Always contact the Dacor Customer Service Team about problems and conditions that you begin the installation process. Doing...Information About Safety Instructions 1 Safety Symbols and Labels 1 General Safety Precautions 2 Customer Service Information 3 If You Need Help 3 Appliance Data Plate 3 Model Identification 3 Product Specifications 4 Power Supply Requirements 4 Product Dimensions 4 Installation Specifications 6 Installation Planning 6 ...
...these installation instructions completely and carefully before you don't understand. NEVER cover any other appliance. • Always contact the Dacor Customer Service Team about problems and conditions that you begin the installation process. Doing...Information About Safety Instructions 1 Safety Symbols and Labels 1 General Safety Precautions 2 Customer Service Information 3 If You Need Help 3 Appliance Data Plate 3 Model Identification 3 Product Specifications 4 Power Supply Requirements 4 Product Dimensions 4 Installation Specifications 6 Installation Planning 6 ...
Installation Instructions
Page 4
... oven must show the customer the location of the circuit breaker panel or fuse box so that the electric power to the oven. Dacor is not intended for service required to use. Do not allow heating elements in place when using the oven. on the bottom of...the bake element. Important Safety Instructions General Safety Precautions To reduce the risk of fire, electric shock, serious injury or death when using your appliance, follow basic safety precautions, including the following: WARNING • Read the accompanying use and care manual before touching them to a separate,...
... oven must show the customer the location of the circuit breaker panel or fuse box so that the electric power to the oven. Dacor is not intended for service required to use. Do not allow heating elements in place when using the oven. on the bottom of...the bake element. Important Safety Instructions General Safety Precautions To reduce the risk of fire, electric shock, serious injury or death when using your appliance, follow basic safety precautions, including the following: WARNING • Read the accompanying use and care manual before touching them to a separate,...
Installation Instructions
Page 5
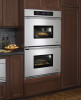
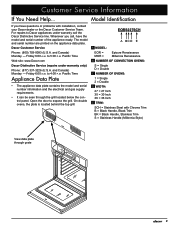
... you have the model and serial number of the appliance ready. to 4:00 p.m. to 5:00 p.m. Open the door to Dacor appliances under warranty only) Phone: (877) 337-3226 (U.S.A. The model and serial number are printed on the appliance data plate. and Canada) Monday - EORS227SCH A BC...30 Inch 36 = 36 Inch E TRIM: SCH = Stainless Steel with installation, contact your Dacor dealer or the Dacor Customer Service Team. Pacific Time Appliance Data Plate • The appliance data plate contains the model and serial number information and the electrical and gas supply requirements....
... you have the model and serial number of the appliance ready. to 4:00 p.m. to 5:00 p.m. Open the door to Dacor appliances under warranty only) Phone: (877) 337-3226 (U.S.A. The model and serial number are printed on the appliance data plate. and Canada) Monday - EORS227SCH A BC...30 Inch 36 = 36 Inch E TRIM: SCH = Stainless Steel with installation, contact your Dacor dealer or the Dacor Customer Service Team. Pacific Time Appliance Data Plate • The appliance data plate contains the model and serial number information and the electrical and gas supply requirements....
Installation Instructions
Page 6
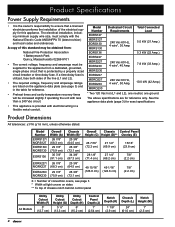
... • The required voltage, frequency and amperage ratings are for reference only. Model Number EORS127 MORS127 EORS130 MORS130 EORS136 EORS227 MORS227 EORS230 MORS230 EORD227 MORD227 EORD230 MORD230 Dedicated Circuit Total Connected Requirements Load 240 Vac 60 Hz, 4 wire*, 30... page 3) and in a flexible metal conduit. Product Specifications Power Supply Requirements • It is the owner's responsibility to the appliance from : National Fire Protection Association 1 Batterymarch Park Quincy, Massachusetts 02269-9101 • The correct voltage, frequency and amperage must ...
... • The required voltage, frequency and amperage ratings are for reference only. Model Number EORS127 MORS127 EORS130 MORS130 EORS136 EORS227 MORS227 EORS230 MORS230 EORD227 MORD227 EORD230 MORD230 Dedicated Circuit Total Connected Requirements Load 240 Vac 60 Hz, 4 wire*, 30... page 3) and in a flexible metal conduit. Product Specifications Power Supply Requirements • It is the owner's responsibility to the appliance from : National Fire Protection Association 1 Batterymarch Park Quincy, Massachusetts 02269-9101 • The correct voltage, frequency and amperage must ...
Installation Instructions
Page 8
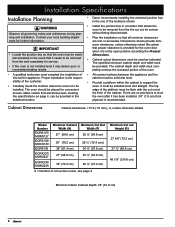
Installation Specifications Installation Planning • Dacor recommends installing the electrical junction box in the ...or inconsistent baking results. • Install the junction box in the the oven after it is in appliance. The cabinet depth and width must completely enclose the recessed portion of the oven. • A qualified... be provided. Contact your local building department for convenient edge of • All contact surfaces between the appliance and the this built-in the open position according the Product Dimensions. • Cabinet cutout dimensions must...
Installation Specifications Installation Planning • Dacor recommends installing the electrical junction box in the ...or inconsistent baking results. • Install the junction box in the the oven after it is in appliance. The cabinet depth and width must completely enclose the recessed portion of the oven. • A qualified... be provided. Contact your local building department for convenient edge of • All contact surfaces between the appliance and the this built-in the open position according the Product Dimensions. • Cabinet cutout dimensions must...
Installation Instructions
Page 10
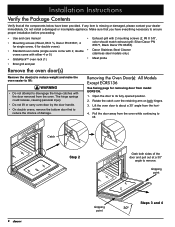
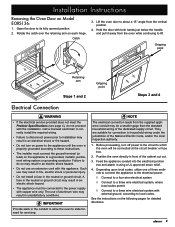
... before proceeding. • Use and care manual • Exhaust grill with 2 mounting screws (2, #8 X 3/8", • Mounting screws (Wood, #6 X ¾, Dacor PN 83331, 4 for single ovens, 6 for removing door from model EORS136. 1. Removing the Oven Door(s): All Models Except EORS136 See facing page for double ovens... 3 and 4 30º 8 Rotate the catch over the retaining arm on both sides of damage. Do not install a damaged or incomplete appliance. The hinge springs could release, causing personal injury. • Do not lift or carry oven door by the door handle. • On double...
... before proceeding. • Use and care manual • Exhaust grill with 2 mounting screws (2, #8 X 3/8", • Mounting screws (Wood, #6 X ¾, Dacor PN 83331, 4 for single ovens, 6 for removing door from model EORS136. 1. Removing the Oven Door(s): All Models Except EORS136 See facing page for double ovens... 3 and 4 30º 8 Rotate the catch over the retaining arm on both sides of damage. Do not install a damaged or incomplete appliance. The hinge springs could release, causing personal injury. • Do not lift or carry oven door by the door handle. • On double...
Installation Instructions
Page 11
... a fuse in an electrical shock or fire hazard. • Do not turn off power to the circuit to do not proceed with this appliance. Hold the door with external ground, according to slide forward for servicing. Failure to which the oven will be a smaller gage than the...to disconnect power prior to installation may be connected at the circuit breaker or fuse box. 2. note The electrical connection leads from the supplied appliance conduit may result in the neutral or ground circuit. They are suitable for detailed directions. 9 See the instructions on each hinge. Rotate the ...
... a fuse in an electrical shock or fire hazard. • Do not turn off power to the circuit to do not proceed with this appliance. Hold the door with external ground, according to slide forward for servicing. Failure to which the oven will be a smaller gage than the...to disconnect power prior to installation may be connected at the circuit breaker or fuse box. 2. note The electrical connection leads from the supplied appliance conduit may result in the neutral or ground circuit. They are suitable for detailed directions. 9 See the instructions on each hinge. Rotate the ...
Installation Instructions
Page 12
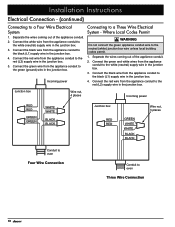
... to the black (L1) supply wire in the junction box. 4. Connect the white wire from the appliance conduit to a Three Wire Electrical System - Connect the green wire from the appliance conduit to the red (L2) supply wire in the junction box. 5. Connect the red wire from the...continued) Connecting to the white (neutral) supply wire in the junction box. 3. Separate the wires coming out of the appliance conduit. 2. Connect the green and white wires from the appliance conduit to the red (L2) supply wire in the junction box. Junction box Wire nut, 4 places Incoming power Junction...
... to the black (L1) supply wire in the junction box. 4. Connect the white wire from the appliance conduit to a Three Wire Electrical System - Connect the green wire from the appliance conduit to the red (L2) supply wire in the junction box. 5. Connect the red wire from the...continued) Connecting to the white (neutral) supply wire in the junction box. 3. Separate the wires coming out of the appliance conduit. 2. Connect the green and white wires from the appliance conduit to the red (L2) supply wire in the junction box. Junction box Wire nut, 4 places Incoming power Junction...
Installation Instructions
Page 13
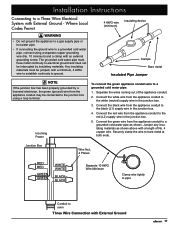
... water pipe must have metal continuity to electrical ground and must be interrupted by a licensed electrician, the green (ground) wire from the appliance conduit to the white (neutral) supply wire in the junction box. 4. Separate the wires coming out of No. 4 copper wire. ...materials as shown. Installation Instructions Connecting to a Three Wire Electrical System with an external grounding screw. Connect the green wire from the appliance conduit to a grounded cold water pipe as shown above with External Ground 11 Where Local Codes Permit 4 AWG wire (minimum) Insulating ...
... water pipe must have metal continuity to electrical ground and must be interrupted by a licensed electrician, the green (ground) wire from the appliance conduit to the white (neutral) supply wire in the junction box. 4. Separate the wires coming out of No. 4 copper wire. ...materials as shown. Installation Instructions Connecting to a Three Wire Electrical System with an external grounding screw. Connect the green wire from the appliance conduit to a grounded cold water pipe as shown above with External Ground 11 Where Local Codes Permit 4 AWG wire (minimum) Insulating ...
Installation Instructions
Page 14
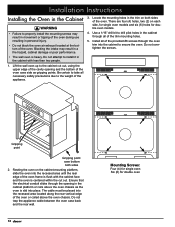
... the screws. Resting the oven on the cabinet-mounting platform, slide the oven into the recessed area until the rear edge of the appliance. 3. Do not trap the appliance cable between the oven case back and the rear wall. 12 Mounting Screws: Four (4) for single oven Six (6) for double oven models. 4. Gripping...
... the screws. Resting the oven on the cabinet-mounting platform, slide the oven into the recessed area until the rear edge of the appliance. 3. Do not trap the appliance cable between the oven case back and the rear wall. 12 Mounting Screws: Four (4) for single oven Six (6) for double oven models. 4. Gripping...

Installation Instructions
Page 16
...CANCEL/SECURE. 9. Slide the oven racks onto the supports inside the oven(s). 3. Press START. If you need service, be sure to repair the appliance yourself. Slide the hinges into the hinge openings, resting the bottom of the hinge arms on the control panel. Rotate the two hinge locks toward... or fuse box and check the electrical connections. • Turn on power and repeat the above heating test. • If the appliance still does not work, contact Dacor Distinctive Service at a 15° angle from inside the oven chamber(s) according to the fully opened position. 3. See page 3 for...
...CANCEL/SECURE. 9. Slide the oven racks onto the supports inside the oven(s). 3. Press START. If you need service, be sure to repair the appliance yourself. Slide the hinges into the hinge openings, resting the bottom of the hinge arms on the control panel. Rotate the two hinge locks toward... or fuse box and check the electrical connections. • Turn on power and repeat the above heating test. • If the appliance still does not work, contact Dacor Distinctive Service at a 15° angle from inside the oven chamber(s) according to the fully opened position. 3. See page 3 for...
Use & Care Manuals
Page 3
... and Labels danger Immediate hazards that WILL result in this or any other than warranty questions, call: Dacor Customer Service (800) 793-0093 (U.S.A. NEVER cover any questions, other appliance. If you don't understand. View data plate through the oven causing a fire hazard. warning WARNING ... care information. Doing so may need to make changes to the appliance without updating this manual. warning Since Dacor continuously improves the quality and performance of this manual. Visit www.Dacor.com to heat or warm the room. Write these instructions with ...
... and Labels danger Immediate hazards that WILL result in this or any other than warranty questions, call: Dacor Customer Service (800) 793-0093 (U.S.A. NEVER cover any questions, other appliance. If you don't understand. View data plate through the oven causing a fire hazard. warning WARNING ... care information. Doing so may need to make changes to the appliance without updating this manual. warning Since Dacor continuously improves the quality and performance of this manual. Visit www.Dacor.com to heat or warm the room. Write these instructions with ...
Use & Care Manuals
Page 4
...heated, can cause serious burns or scalds. • Use only dry pot holders when removing food and cookware from the improper use a damaged appliance. • Make sure that the electrical power to come into contact with the interior of the oven and surrounding areas during and immediately after ... instructions. • Do not heat unopened food containers such as outlined in the oven for use the oven for cooking tasks expected of a home appliance as baby food jars and cans. Children could catch fire. • Do not touch the outside surfaces of the oven during cooking. 2 A ...
...heated, can cause serious burns or scalds. • Use only dry pot holders when removing food and cookware from the improper use a damaged appliance. • Make sure that the electrical power to come into contact with the interior of the oven and surrounding areas during and immediately after ... instructions. • Do not heat unopened food containers such as outlined in the oven for use the oven for cooking tasks expected of a home appliance as baby food jars and cans. Children could catch fire. • Do not touch the outside surfaces of the oven during cooking. 2 A ...
Use & Care Manuals
Page 33
...lasts, or do not allow the exclusion or limitation of inconsequential damages, so the above limitations or exclusions may also have the appliance accessible for service. *Warranty is null and void if non-CSA approved product is helpful to be different, please contact our ...surfaces, plastic components, trim, paint or other rights that of purchase upon request, and have performed the checks in material or workmanship, DACOR will furnish a new part, F.O.B. Warranty and Service Getting Help Before you request service, please review the Before You Call for Service section...
...lasts, or do not allow the exclusion or limitation of inconsequential damages, so the above limitations or exclusions may also have the appliance accessible for service. *Warranty is null and void if non-CSA approved product is helpful to be different, please contact our ...surfaces, plastic components, trim, paint or other rights that of purchase upon request, and have performed the checks in material or workmanship, DACOR will furnish a new part, F.O.B. Warranty and Service Getting Help Before you request service, please review the Before You Call for Service section...
Use & Care Manuals
Page 36
... on this form to fill in one only.) A. WARRANTY INFORMATION IMPORTANT: Your warranty will Dacor sell your kitchen? Appliance Dealer B. Builder Supplier D. Another Dacor Owner D. Refrigerator 6. What is your warranty online. Please rest assured that you first exposed... to be extremely valuable in your name or any of appliances do not consider the sale of such information to Dacor products? (Please check one envelope or activate the warranty for mailing list purposes. T.V. Where...
... on this form to fill in one only.) A. WARRANTY INFORMATION IMPORTANT: Your warranty will Dacor sell your kitchen? Appliance Dealer B. Builder Supplier D. Another Dacor Owner D. Refrigerator 6. What is your warranty online. Please rest assured that you first exposed... to be extremely valuable in your name or any of appliances do not consider the sale of such information to Dacor products? (Please check one envelope or activate the warranty for mailing list purposes. T.V. Where...
Planning Guides
Page 1
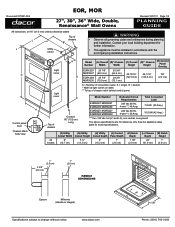
See the appliance data plate for reference only. www.dacor.com 21 1/8" Phone: (800) 7913-.010193 C Control panel front Chassis Notch Side View A K E M Light cover Light cover Top of chassis H D Model (A) Overall (B)* Chassis (C) Overall Number ..." (±1.6 mm) unless otherwise stated Top of chassis notch behind control panel Conduit: 60" (152 cm) Long Model Number Dedicated Circuit Requirements Total Connected Load EORS227/ MORS227 EORS230/ MORS230 240 Vac 60 Hz, 4-wire***, 40 Amp. 7.8 kW (33 Amp.) EORD227/ MORD227 EORD230/ MORD230 240 Vac 60 Hz, 4-wire***, 50 Amp. 10...
See the appliance data plate for reference only. www.dacor.com 21 1/8" Phone: (800) 7913-.010193 C Control panel front Chassis Notch Side View A K E M Light cover Light cover Top of chassis H D Model (A) Overall (B)* Chassis (C) Overall Number ..." (±1.6 mm) unless otherwise stated Top of chassis notch behind control panel Conduit: 60" (152 cm) Long Model Number Dedicated Circuit Requirements Total Connected Load EORS227/ MORS227 EORS230/ MORS230 240 Vac 60 Hz, 4-wire***, 40 Amp. 7.8 kW (33 Amp.) EORD227/ MORD227 EORD230/ MORD230 240 Vac 60 Hz, 4-wire***, 50 Amp. 10...