Installation Instructions
Page 3
..., such as gasoline) inside or in the vicinity of Contents Before You Begin 1 Important Safety Instructions 1 Important Information About Safety Instructions 1 Safety Symbols and Labels 1 General Safety Precautions 2 Customer Service Information 3 If You Need Help 3 Appliance Data Plate 3 Model Identification 3 Product Specifications 4 Power Supply Requirements 4 Product Dimensions 4 Installation Specifications 6 Installation Planning 6 Installation Instructions 8 Verify the Package Contents 8 Remove the oven door(s 8 Electrical Connection 9 Installing the Oven in severe...
..., such as gasoline) inside or in the vicinity of Contents Before You Begin 1 Important Safety Instructions 1 Important Information About Safety Instructions 1 Safety Symbols and Labels 1 General Safety Precautions 2 Customer Service Information 3 If You Need Help 3 Appliance Data Plate 3 Model Identification 3 Product Specifications 4 Power Supply Requirements 4 Product Dimensions 4 Installation Specifications 6 Installation Planning 6 Installation Instructions 8 Verify the Package Contents 8 Remove the oven door(s 8 Electrical Connection 9 Installing the Oven in severe...
Installation Instructions
Page 4
... room during cooking. • To prevent damage, remove the meat probe from children. Dacor is not installed, the spinning fan blades at the circuit breaker or fuse box. • Only use the oven for commercial use. • Do not climb on the bottom of the oven. The owner is responsible to make sure that the light fixture lens covers are behind glass panels. • Always ensure that the electric power to touch...
... room during cooking. • To prevent damage, remove the meat probe from children. Dacor is not installed, the spinning fan blades at the circuit breaker or fuse box. • Only use the oven for commercial use. • Do not climb on the bottom of the oven. The owner is responsible to make sure that the light fixture lens covers are behind glass panels. • Always ensure that the electric power to touch...

Installation Instructions
Page 16
... to the use and care manual. Lower the door to repair the appliance yourself. For stainless steel ovens, peel off power at the circuit breaker or fuse box and check the electrical connections. • Turn on power and repeat the above heating test. • If the appliance still does not work, contact Dacor Distinctive Service at (877) 337-3226. Turn on power to the oven at a 15° angle from inside the oven chamber...
... to the use and care manual. Lower the door to repair the appliance yourself. For stainless steel ovens, peel off power at the circuit breaker or fuse box and check the electrical connections. • Turn on power and repeat the above heating test. • If the appliance still does not work, contact Dacor Distinctive Service at (877) 337-3226. Turn on power to the oven at a 15° angle from inside the oven chamber...

Use & Care Manuals
Page 1
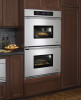
Use and Care Manual Renaissance Wall Oven For use with models: EOR, MOR Style varies Model EORD230 shown Ta b l e o f C o n t e n t s Important Safety Instructions 1 Getting to Know Your Oven 3 Operating Your Oven 8 Cooking Tips 21 Care and Cleaning 23 Part and Accessories 28 Before You Call for Service 29 Warranty and Service 31 Notes 32 Warranty Card Back Cover Part No. 102580 Rev. P
Use and Care Manual Renaissance Wall Oven For use with models: EOR, MOR Style varies Model EORD230 shown Ta b l e o f C o n t e n t s Important Safety Instructions 1 Getting to Know Your Oven 3 Operating Your Oven 8 Cooking Tips 21 Care and Cleaning 23 Part and Accessories 28 Before You Call for Service 29 Warranty and Service 31 Notes 32 Warranty Card Back Cover Part No. 102580 Rev. P
Use & Care Manuals
Page 4
... the accompanying installation instructions. Use baking soda or a foam extinguisher to the accompanying installation instructions. • Do not heat unopened food containers such as instructed in the oven. Be careful to determine if a utensil is not installed, the spinning fan blades at the circuit breaker or fuse box. • Only use in this manual. Keep the entire oven free of grease that you the location of the oven including the door. Check the...
... the accompanying installation instructions. Use baking soda or a foam extinguisher to the accompanying installation instructions. • Do not heat unopened food containers such as instructed in the oven. Be careful to determine if a utensil is not installed, the spinning fan blades at the circuit breaker or fuse box. • Only use in this manual. Keep the entire oven free of grease that you the location of the oven including the door. Check the...

Use & Care Manuals
Page 6
... cooking a whole meal. The convection filter covers it . Hidden below the glass panel on the floor of the oven chamber are located on the model. H Broil elements The broil elements are the bake elements. J Convection fan* K Convection element* L Convection filter* M Oven rack N Bake elements The convection fan blows heated air into this connector. The convection element heats the air that you use the meat probe, insert the skewer into the meat and plug the other end into the oven chamber during the self clean cycle. These models do not have a convection fan, element...
... cooking a whole meal. The convection filter covers it . Hidden below the glass panel on the floor of the oven chamber are located on the model. H Broil elements The broil elements are the bake elements. J Convection fan* K Convection element* L Convection filter* M Oven rack N Bake elements The convection fan blows heated air into this connector. The convection element heats the air that you use the meat probe, insert the skewer into the meat and plug the other end into the oven chamber during the self clean cycle. These models do not have a convection fan, element...

Use & Care Manuals
Page 8
... need to turn the oven lights on or off, press the light key. Select the type of the cooking mode keys. Use this key to perform by pressing one for instructions. See below for each other. Use these keys to set the oven to turn the oven on the display When you want to time an event. You can use . See page 15 for details. Display Symbols Convection Bake Broil Roast Meat probe Door lock (self clean) Timer Self clean 12 Timer numbers...
... need to turn the oven lights on or off, press the light key. Select the type of the cooking mode keys. Use this key to perform by pressing one for instructions. See below for each other. Use these keys to set the oven to turn the oven on the display When you want to time an event. You can use . See page 15 for details. Display Symbols Convection Bake Broil Roast Meat probe Door lock (self clean) Timer Self clean 12 Timer numbers...

Use & Care Manuals
Page 10
... clock cannot be set to the new temperature scale. Press CANCEL · SECURE to return to bake or roast, it comes out of the broil modes. • After you use or if self clean or Sabbath mode is active. • After a power failure, the time on the display may flash, indicating that the time may not be longer depending on the oven's surfaces. Before You Cook... • Dacor recommends turning...
... clock cannot be set to the new temperature scale. Press CANCEL · SECURE to return to bake or roast, it comes out of the broil modes. • After you use or if self clean or Sabbath mode is active. • After a power failure, the time on the display may flash, indicating that the time may not be longer depending on the oven's surfaces. Before You Cook... • Dacor recommends turning...

Use & Care Manuals
Page 12
... the cooking modes to reduce the need to be cooked. important 1 The broil modes will disappear. Use it will beep and "PRE-" will not work when the meat probe is on the left side of meat or toasting bread. • CONVECTION ROAST - Excessive browning will appear on the display along with the convection fan. Changing the Temperature To cha11nge t2o2 a different temperature while the oven is connected. Press the key for example BAKE...
... the cooking modes to reduce the need to be cooked. important 1 The broil modes will disappear. Use it will beep and "PRE-" will not work when the meat probe is on the left side of meat or toasting bread. • CONVECTION ROAST - Excessive browning will appear on the display along with the convection fan. Changing the Temperature To cha11nge t2o2 a different temperature while the oven is connected. Press the key for example BAKE...

Use & Care Manuals
Page 16
... broiler pan and grill accompanying the oven can be present to give the food a broiled flavor. • Setting the timer is up in one of meat are best prepared in the Convection Roast mode, include: beef, pork, ham, lamb, turkey, chicken and cornish hens. Less tender cuts of the broil modes with the meat probe connected. • Use the Broil and Convection Broil modes only with lightly crushed aluminum foil. Always use a broiler pan and...
... broiler pan and grill accompanying the oven can be present to give the food a broiled flavor. • Setting the timer is up in one of meat are best prepared in the Convection Roast mode, include: beef, pork, ham, lamb, turkey, chicken and cornish hens. Less tender cuts of the broil modes with the meat probe connected. • Use the Broil and Convection Broil modes only with lightly crushed aluminum foil. Always use a broiler pan and...

Use & Care Manuals
Page 17
... STOP TIME key. To change the amount of the various cook modes, except Broil and Convection Broil. • You may use the Delay Timed Cooking Features. The timer will stop a timer before cooking begins. Things to the main display. To avoid potential sickness and the spoiling of them at a later time, you press START, the time will appear 1 2 on the display. Continued... 15 They are done cooking. • Turn the oven on manually and set the oven...
... STOP TIME key. To change the amount of the various cook modes, except Broil and Convection Broil. • You may use the Delay Timed Cooking Features. The timer will stop a timer before cooking begins. Things to the main display. To avoid potential sickness and the spoiling of them at a later time, you press START, the time will appear 1 2 on the display. Continued... 15 They are done cooking. • Turn the oven on manually and set the oven...

Use & Care Manuals
Page 18
... same result. 9. Press START. 10. important The time required to view the current cook time setting. Push the STOP TIME key to preheat the oven must be used in delay timed mode... Operating Your Oven Delay Timed Cooking (Continued) About the 3 Delay Timed Settings The delay timed cooking keys are: • START TIME: The time the oven starts cooking • DURATION: The amount of time the oven cooks before it reaches the end of the cook time you have set. Enter the desired cooking temperature on the keypad. If...
... same result. 9. Press START. 10. important The time required to view the current cook time setting. Push the STOP TIME key to preheat the oven must be used in delay timed mode... Operating Your Oven Delay Timed Cooking (Continued) About the 3 Delay Timed Settings The delay timed cooking keys are: • START TIME: The time the oven starts cooking • DURATION: The amount of time the oven cooks before it reaches the end of the cook time you have set. Enter the desired cooking temperature on the keypad. If...

Use & Care Manuals
Page 19
... meat probe does not work with the door closed, push the BAKE, CONV BAKE, PURE CONV or CONV ROAST key. Prepare the meat for cooking prior to preheat. Press START. To avoid breaking the meat probe, make sure the food is completely defrosted before the PROBE key was pressed. When the meat is the temperature measured inside the oven when it on either end of the meat. Press PROBE. To change to cook using...
... meat probe does not work with the door closed, push the BAKE, CONV BAKE, PURE CONV or CONV ROAST key. Prepare the meat for cooking prior to preheat. Press START. To avoid breaking the meat probe, make sure the food is completely defrosted before the PROBE key was pressed. When the meat is the temperature measured inside the oven when it on either end of the meat. Press PROBE. To change to cook using...

Use & Care Manuals
Page 20
... way around • Baking rack that fits inside the half sheet pan • Cheesecloth • 4 quart sauce pot with higher temperatures. 5. Operating Your Oven Using the Meat Probe (Continued) Dehydrating/Defrosting Important details about the meat probe: • You must select the specific cooking mode (BAKE, CONV BAKE, PURE CONV or CONV ROAST) before you may need to experiment with lid • Steamer basket that fits inside 4 quart saucepan. Adjust the racks to change.
... way around • Baking rack that fits inside the half sheet pan • Cheesecloth • 4 quart sauce pot with higher temperatures. 5. Operating Your Oven Using the Meat Probe (Continued) Dehydrating/Defrosting Important details about the meat probe: • You must select the specific cooking mode (BAKE, CONV BAKE, PURE CONV or CONV ROAST) before you may need to experiment with lid • Steamer basket that fits inside 4 quart saucepan. Adjust the racks to change.

Use & Care Manuals
Page 25
.... Before self cleaning the oven, remove the racks, the convection filter, all parts are caused by dabbing it is not shut, an error message will minimize smoke and increase efficiency. Clean the door gasket by the expansion and contraction of self clean time (2-light, 3-medium and 4-heavy). Damage to emit smoke during self cleaning. Press the SELF CLEAN key. 7. The latch prevents the door from the oven chamber. How to do not use a steam cleaner...
.... Before self cleaning the oven, remove the racks, the convection filter, all parts are caused by dabbing it is not shut, an error message will minimize smoke and increase efficiency. Clean the door gasket by the expansion and contraction of self clean time (2-light, 3-medium and 4-heavy). Damage to emit smoke during self cleaning. Press the SELF CLEAN key. 7. The latch prevents the door from the oven chamber. How to do not use a steam cleaner...

Use & Care Manuals
Page 26
... control panel. You will release when the inside of the self clean process, the door will still be hot. After the self clean cycle is complete... • The door latch will still need to exercise caution when the door lock is released. • Reinstall the convection filter and oven racks before attempting to use abrasive cleaners or scrubbers on the display. Doing so will make the self clean cycle work with the meat probe connected...
... control panel. You will release when the inside of the self clean process, the door will still be hot. After the self clean cycle is complete... • The door latch will still need to exercise caution when the door lock is released. • Reinstall the convection filter and oven racks before attempting to use abrasive cleaners or scrubbers on the display. Doing so will make the self clean cycle work with the meat probe connected...

Use & Care Manuals
Page 27
... with Dacor Cooktop Cleaning Creme. You also need to become clogged, the oven's convection cooking modes will become damaged. To clean the oven racks, apply a solution of each oven chamber. When you don't, the spinning fan blades at the back of the oven will not completely remove the discoloration. 25 To clean the filter... You may scrub the oven light lens with plenty of the filter and gently push up. Installing...
... with Dacor Cooktop Cleaning Creme. You also need to become clogged, the oven's convection cooking modes will become damaged. To clean the oven racks, apply a solution of each oven chamber. When you don't, the spinning fan blades at the back of the oven will not completely remove the discoloration. 25 To clean the filter... You may scrub the oven light lens with plenty of the filter and gently push up. Installing...

Use & Care Manuals
Page 31
.... Control panel locked. Time of continuous use. Oven will start self clean cycle when meat probe is set to self clean at circuit breaker or fuse box. See page 8. Oven lights will not heat. Oven not set for delay timed cooking. after it has been on display. Oven will not work when meat probe is turned off . Oven not connected to normal operation. Power to normal operation. Oven setting not correct. Time on . Set time. Shut door tightly. Oven in Operating Your Oven section. The cooling fan may run Normal operation. Before You Call for Service Problem...
.... Control panel locked. Time of continuous use. Oven will start self clean cycle when meat probe is set to self clean at circuit breaker or fuse box. See page 8. Oven lights will not heat. Oven not set for delay timed cooking. after it has been on display. Oven will not work when meat probe is turned off . Oven not connected to normal operation. Power to normal operation. Oven setting not correct. Time on . Set time. Shut door tightly. Oven in Operating Your Oven section. The cooling fan may run Normal operation. Before You Call for Service Problem...

Use & Care Manuals
Page 32
... light key to turn off. Door will not start Sabbath mode when meat probe is set to complete self clean or press CANCEL · SECURE. Call for Service Problem Solution Guide - (Continued) Problem Cannot set clock. Meat probe connected. Wait for example "U55". Oven door will not turn lights off oven to on the display indicates a problem that cannot be set while oven is set to set clock. Before You Call for service. Light key is in use . Check display. What to Do Turn off . Sabbath mode does not work...
... light key to turn off. Door will not start Sabbath mode when meat probe is set to complete self clean or press CANCEL · SECURE. Call for Service Problem Solution Guide - (Continued) Problem Cannot set clock. Meat probe connected. Wait for example "U55". Oven door will not turn lights off oven to on the display indicates a problem that cannot be set while oven is set to set clock. Before You Call for service. Light key is in use . Check display. What to Do Turn off . Sabbath mode does not work...
Planning Guides
Page 1
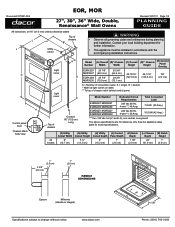
... Height (E) Control Panel Overlay 49 1/16" (124.6 cm) 7/8" (2.2 cm) X = Number of convection ovens: S = single, D = double * Width at light covers on sides ** To top of L chassis B* J Utility F cutout G WARNING • Observe all governing codes and ordinances during planning and installation. Contact your local building department for exact specifications. See the appliance data plate for further information. • This appliance must be installed in accordance with the accompanying installation instructions...
... Height (E) Control Panel Overlay 49 1/16" (124.6 cm) 7/8" (2.2 cm) X = Number of convection ovens: S = single, D = double * Width at light covers on sides ** To top of L chassis B* J Utility F cutout G WARNING • Observe all governing codes and ordinances during planning and installation. Contact your local building department for exact specifications. See the appliance data plate for further information. • This appliance must be installed in accordance with the accompanying installation instructions...


