Planning Guides
Page 1
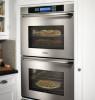
... 3/8" (64.4 cm) 28 3/8" (72.0 cm) 9/16" (1.4 cm) 1" (2.5 cm) 1 7/8" (4.6 cm) product DIMENSIONS Specifications subject to change without notice. Document # PG01-002 EO, MOH, MOV 27 and 30 Inch Wide, Double, Discovery™ Wall Ovens Revised 10/01/11 Page 1/2 PLANNING GUIDE warning • Observe all governing codes and ordinances during planning and installation. Product tolerances: ±1/16" (±1.6 mm), unless otherwise stated. Contact...
... 3/8" (64.4 cm) 28 3/8" (72.0 cm) 9/16" (1.4 cm) 1" (2.5 cm) 1 7/8" (4.6 cm) product DIMENSIONS Specifications subject to change without notice. Document # PG01-002 EO, MOH, MOV 27 and 30 Inch Wide, Double, Discovery™ Wall Ovens Revised 10/01/11 Page 1/2 PLANNING GUIDE warning • Observe all governing codes and ordinances during planning and installation. Product tolerances: ±1/16" (±1.6 mm), unless otherwise stated. Contact...

Installation Instructions
Page 3
...Before You Begin 1 Important Safety Instructions 1 Important Information About Safety Instructions 1 Safety Symbols and Labels 1 General Safety Precautions 2 Customer Service Information 3 If You Need Help 3 Product Data Plate 3 Model Identification 3 Product Specifications 4 Product Dimensions 4 Planning the Installation 6 Selecting the Location 6 Cabinet Cutout 6 Electrical Specifications 9 Installation Instructions 9 Parts List 9 Electrical Service Installation 10 Final Installation 12 Verify Proper Operation 14 Installation Checklist 15 Before You Begin... Doing...
...Before You Begin 1 Important Safety Instructions 1 Important Information About Safety Instructions 1 Safety Symbols and Labels 1 General Safety Precautions 2 Customer Service Information 3 If You Need Help 3 Product Data Plate 3 Model Identification 3 Product Specifications 4 Product Dimensions 4 Planning the Installation 6 Selecting the Location 6 Cabinet Cutout 6 Electrical Specifications 9 Installation Instructions 9 Parts List 9 Electrical Service Installation 10 Final Installation 12 Verify Proper Operation 14 Installation Checklist 15 Before You Begin... Doing...
Installation Instructions
Page 4
... not install or use the oven for service required to cook without the convection filter installed. The installer must be hot. Do not install or use . They will be properly installed and grounded by high oven temperatures or mechanical shock. 2 Remove birds to water. • Do not install, repair or replace any part of the oven are in the oven. In addition, the objects themselves could damage the bake element. Do not install or use the door handle...
... not install or use the oven for service required to cook without the convection filter installed. The installer must be hot. Do not install or use . They will be properly installed and grounded by high oven temperatures or mechanical shock. 2 Remove birds to water. • Do not install, repair or replace any part of the oven are in the oven. In addition, the objects themselves could damage the bake element. Do not install or use the door handle...

Installation Instructions
Page 5
... located inside the oven door, in the slot above the left hinge (inside the lower door on the data plate: 1. To read the information on a double oven). Model Identification If you call the Dacor Distinctive Service line. Whenever you have the model and serial number of the appliance ready. The model and serial number are printed on the product data plate. Friday 6:00 a.m. and Canada) Monday - trim) = EO = MOH = MOV B = CONFIGURATION Single oven = 1 Double oven = 2 C = SIZE 27 inch...
... located inside the oven door, in the slot above the left hinge (inside the lower door on the data plate: 1. To read the information on a double oven). Model Identification If you call the Dacor Distinctive Service line. Whenever you have the model and serial number of the appliance ready. The model and serial number are printed on the product data plate. Friday 6:00 a.m. and Canada) Monday - trim) = EO = MOH = MOV B = CONFIGURATION Single oven = 1 Double oven = 2 C = SIZE 27 inch...
Installation Instructions
Page 11
... dealer immediately. For the exact ratings see the product data plate. See page 3 for reference only. stainless steel models only PN A302 • Product literature ◊ Double oven screw kit - PN 700486-2 • Meat probe, one (1) ◊ 27" GlideRack™ oven rack - Model Type Single 27" Single 30" Dedicated Circuit Requirements 240 Vac 60 Hz., 4 wire*, 30 Amp. Installation Instructions Parts List Verify that a qualified electrician performs the electrical connection of this standard may be...
... dealer immediately. For the exact ratings see the product data plate. See page 3 for reference only. stainless steel models only PN A302 • Product literature ◊ Double oven screw kit - PN 700486-2 • Meat probe, one (1) ◊ 27" GlideRack™ oven rack - Model Type Single 27" Single 30" Dedicated Circuit Requirements 240 Vac 60 Hz., 4 wire*, 30 Amp. Installation Instructions Parts List Verify that a qualified electrician performs the electrical connection of this standard may be...

Installation Instructions
Page 16
... oven door(s). Do not attempt to have the model and serial numbers available when you need service, be sure to repair the appliance yourself. Dacor is mounted below the oven chamber in the use and care manual completely before attempting to the oven. • Check for proper electrical connection. • Repeat the above bake test. • If the appliance still does not work, contact Dacor • Distinctive Service at the circuit breaker or fuse box. Installation Instructions Install...
... oven door(s). Do not attempt to have the model and serial numbers available when you need service, be sure to repair the appliance yourself. Dacor is mounted below the oven chamber in the use and care manual completely before attempting to the oven. • Check for proper electrical connection. • Repeat the above bake test. • If the appliance still does not work, contact Dacor • Distinctive Service at the circuit breaker or fuse box. Installation Instructions Install...

Use & Care Manuals
Page 4
... how to turn off the power. • Always make sure food is cool before looking or reaching into the oven. • Do not store combustible, flammable or explosive materials in the oven or in adjacent cabinets. • Do not use the oven to cook without the convection filter(s) installed. The porcelain finish may result. • Before self-cleaning the oven, remove the broiler pan grill and pan, oven racks, convection filter, meat probe, and...
... how to turn off the power. • Always make sure food is cool before looking or reaching into the oven. • Do not store combustible, flammable or explosive materials in the oven or in adjacent cabinets. • Do not use the oven to cook without the convection filter(s) installed. The porcelain finish may result. • Before self-cleaning the oven, remove the broiler pan grill and pan, oven racks, convection filter, meat probe, and...

Use & Care Manuals
Page 5
... the control panel or open the oven door. ture and time adjustments or adjustments to some of the keys on or off to time an event. Light key: If you have a double oven, use them even if the oven is set ), the current cook settings, and the available cooking modes. If you use the number keypad. 12 for instructions. IMPORTANT: When the oven is closed, touch the light key. START key: When you have a single SECURE oven, use...
... the control panel or open the oven door. ture and time adjustments or adjustments to some of the keys on or off to time an event. Light key: If you have a double oven, use them even if the oven is set ), the current cook settings, and the available cooking modes. If you use the number keypad. 12 for instructions. IMPORTANT: When the oven is closed, touch the light key. START key: When you have a single SECURE oven, use...

Use & Care Manuals
Page 6
...; Bake elements: Hidden below the glass panel on automatically when you open and through the oven window when the door is closed . 4 The convection filter covers it covers the moving fan blades for safety purposes. • Self-clean latch: The self-clean latch automatically locks the oven door during the self-clean cycle. • Door gasket: The door gasket prevents heat from one food to another when you use the control panel to control all the oven's features (sometimes called modes). • Oven racks...
...; Bake elements: Hidden below the glass panel on automatically when you open and through the oven window when the door is closed . 4 The convection filter covers it covers the moving fan blades for safety purposes. • Self-clean latch: The self-clean latch automatically locks the oven door during the self-clean cycle. • Door gasket: The door gasket prevents heat from one food to another when you use the control panel to control all the oven's features (sometimes called modes). • Oven racks...

Use & Care Manuals
Page 8
... ▼ LOWER BAKE PURE PURE MAX CONV/SEAR CONVECTION BROIL DACOR GUIDE MAIN MENU SET CLOCK 12:25 PM CLOCK MENU DISABLE CLOCK 24/12 HOUR SMALL FONT LARGE FONT HELP • Touch ADDITIONAL SETTINGS. ▲ UPPER 12:25 PM ▼ LOWER • Using the number keypad, enter the current time. Oven Setup NOTE: If you have a single oven, you have a double oven, it is on the control panel to return...
... ▼ LOWER BAKE PURE PURE MAX CONV/SEAR CONVECTION BROIL DACOR GUIDE MAIN MENU SET CLOCK 12:25 PM CLOCK MENU DISABLE CLOCK 24/12 HOUR SMALL FONT LARGE FONT HELP • Touch ADDITIONAL SETTINGS. ▲ UPPER 12:25 PM ▼ LOWER • Using the number keypad, enter the current time. Oven Setup NOTE: If you have a single oven, you have a double oven, it is on the control panel to return...

Use & Care Manuals
Page 10
...; UPPER 12:25 PM ▼ LOWER BAKE PURE PURE MAX CONV/SEAR CONVECTION BROIL DACOR GUIDE MAIN MENU • Touch DISPLAY COLOR. To change the temperature scale: • Touch ADDITIONAL SETTINGS. ▲ UPPER 12:25 PM ▼ LOWER BAKING ADDITIONAL SAVED ROASTING BROILING SETTINGS GUIDE MORE • Touch the CANCEL/SECURE key on the control panel to return to switch the background color with the text color...
...; UPPER 12:25 PM ▼ LOWER BAKE PURE PURE MAX CONV/SEAR CONVECTION BROIL DACOR GUIDE MAIN MENU • Touch DISPLAY COLOR. To change the temperature scale: • Touch ADDITIONAL SETTINGS. ▲ UPPER 12:25 PM ▼ LOWER BAKING ADDITIONAL SAVED ROASTING BROILING SETTINGS GUIDE MORE • Touch the CANCEL/SECURE key on the control panel to return to switch the background color with the text color...

Use & Care Manuals
Page 13
... turn the oven off both oven chambers at a different temperature, enter the temperature on the home screen for grilling meats or toasting breads. Locking The Control Panel • If you want to cook at once. Bake • Bottom heat source, mode commonly used modes are using PURE CONVECTION™ SEAR or MAX BROIL, carefully place the food in the display until the oven reaches the set temperature for example: BAKE). Starting the Oven(s) • Position the racks...
... turn the oven off both oven chambers at a different temperature, enter the temperature on the home screen for grilling meats or toasting breads. Locking The Control Panel • If you want to cook at once. Bake • Bottom heat source, mode commonly used modes are using PURE CONVECTION™ SEAR or MAX BROIL, carefully place the food in the display until the oven reaches the set temperature for example: BAKE). Starting the Oven(s) • Position the racks...

Use & Care Manuals
Page 15
... or meat category. If you turn on the keypad. MEAT OPTIONS SELECT A MEAT CATEGORY • If you want to stop a timer before it . 00:00:05). • The time entered appears just above the TIMER 1 (or How to the regular cooking display. For example: if you the amount of food, and the oven will start counting, touch START. DACOR GUIDE DACOR GUIDE HAS PRESET TEMPERATURES, TIMES, AND MODES FOR VARIOUS...
... or meat category. If you turn on the keypad. MEAT OPTIONS SELECT A MEAT CATEGORY • If you want to stop a timer before it . 00:00:05). • The time entered appears just above the TIMER 1 (or How to the regular cooking display. For example: if you the amount of food, and the oven will start counting, touch START. DACOR GUIDE DACOR GUIDE HAS PRESET TEMPERATURES, TIMES, AND MODES FOR VARIOUS...

Use & Care Manuals
Page 16
...; LOWER BAKING ROASTING ADDITIONAL BROILING SETTINGS SAVED GUIDE MORE • If the display instructs you use the meat probe. Touch the for the amount of time shown on the Dacor® Guide HELP key for detailed instructions on the number keypad. ◊ Double oven: Touch UPPER ON/OFF or LOWER ON/OFF. or "SET TIMER FOR..." In other instances, the oven will automatically stop cooking when the meat has reached the desired temperature. Touch...
...; LOWER BAKING ROASTING ADDITIONAL BROILING SETTINGS SAVED GUIDE MORE • If the display instructs you use the meat probe. Touch the for the amount of time shown on the Dacor® Guide HELP key for detailed instructions on the number keypad. ◊ Double oven: Touch UPPER ON/OFF or LOWER ON/OFF. or "SET TIMER FOR..." In other instances, the oven will automatically stop cooking when the meat has reached the desired temperature. Touch...

Use & Care Manuals
Page 18
... a time (such as needed. May Be Caused By: What To Do: Oven door opened too often. Pan too Change rack position. Incorrect baking mode being used . Level oven and rack as cooking time, AIR FLOW rack position or temperature) and repeat the convection test. You can successfully prepare food, like cakes, cookies, muffins, and rolls on the bottom. Food placed in the center should come clean when the food is preheated. Direction...
... a time (such as needed. May Be Caused By: What To Do: Oven door opened too often. Pan too Change rack position. Incorrect baking mode being used . Level oven and rack as cooking time, AIR FLOW rack position or temperature) and repeat the convection test. You can successfully prepare food, like cakes, cookies, muffins, and rolls on the bottom. Food placed in the center should come clean when the food is preheated. Direction...

Use & Care Manuals
Page 27
..., connect and unplug the meat probe using one of the cook settings, when the duration time expires, the oven will appear on the display. For example, to 200°F. ▲ UPPER 10:00 AM STOP TIME RESET DURATION TIME 12:25 PM PRESS START START SUN 4/03 10:00 AM STOP SUN 4/03 10:00 AM STOP TIME AM - continued... 25 If you want to change the temperature, meat probe or delay settings while...
..., connect and unplug the meat probe using one of the cook settings, when the duration time expires, the oven will appear on the display. For example, to 200°F. ▲ UPPER 10:00 AM STOP TIME RESET DURATION TIME 12:25 PM PRESS START START SUN 4/03 10:00 AM STOP SUN 4/03 10:00 AM STOP TIME AM - continued... 25 If you want to change the temperature, meat probe or delay settings while...

Use & Care Manuals
Page 30
... CONVECTION BROIL DACOR GUIDE MAIN MENU 28 Do not try to force the door open after the oven completely cools. • If you have a double oven, the control panel will remain locked until it is heated to very high temperatures which burns off any deposits on kitchen fans or vents to the amount of soil. Please keep in one oven chamber at a time due to help remove odors during the self-clean...
... CONVECTION BROIL DACOR GUIDE MAIN MENU 28 Do not try to force the door open after the oven completely cools. • If you have a double oven, the control panel will remain locked until it is heated to very high temperatures which burns off any deposits on kitchen fans or vents to the amount of soil. Please keep in one oven chamber at a time due to help remove odors during the self-clean...
Use & Care Manuals
Page 31
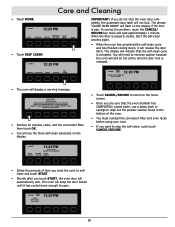
... time you want the oven to selfclean and touch START. • Shortly after you do not shut the oven door completely, the automatic door latch will not lock. When the door is released. CLOSE OVEN DOOR REFER TO USE/CARE MANUAL FOR COMPLETE INSTRUCTIONS OK PRESS OK TO CONTINUE • Remove all utensils, racks, and the convection filter, then touch OK. • You will see the three self-clean selections on the display...
... time you want the oven to selfclean and touch START. • Shortly after you do not shut the oven door completely, the automatic door latch will not lock. When the door is released. CLOSE OVEN DOOR REFER TO USE/CARE MANUAL FOR COMPLETE INSTRUCTIONS OK PRESS OK TO CONTINUE • Remove all utensils, racks, and the convection filter, then touch OK. • You will see the three self-clean selections on the display...

Use & Care Manuals
Page 32
.... NOTE: Your oven's self-clean feature eliminates the need to re-activate the control panel on your oven. A-302) on back of oven wall Removing The Convection Filter To clean the filter(s): • Soak the filter in the back of each oven chamber. You also need for manual scrubbing of interior surfaces. Be careful not to the directions on the package. Use it according to scratch the lens. • Glass surfaces may also...
.... NOTE: Your oven's self-clean feature eliminates the need to re-activate the control panel on your oven. A-302) on back of oven wall Removing The Convection Filter To clean the filter(s): • Soak the filter in the back of each oven chamber. You also need for manual scrubbing of interior surfaces. Be careful not to the directions on the package. Use it according to scratch the lens. • Glass surfaces may also...

Use & Care Manuals
Page 35
.... See Replacing the Light Bulbs on . Problem Solution Guide Problem: Nothing works. May be expensive, frustrating, and time-consuming. Oven is on ("LOCKED" appears on the display). Touch CANCEL/SECURE. Touch any control panel key or open . Oven set for delay timed cleaning. Clock disabled. Light bulbs burned out. Oven will not open the oven door to cause the display to self-clean at preset time. Wait for completion of day not set. Check display. Lock-out feature is in the self-clean cycle. Ovens Sabbath feature...
.... See Replacing the Light Bulbs on . Problem Solution Guide Problem: Nothing works. May be expensive, frustrating, and time-consuming. Oven is on ("LOCKED" appears on the display). Touch CANCEL/SECURE. Touch any control panel key or open . Oven set for delay timed cleaning. Clock disabled. Light bulbs burned out. Oven will not open the oven door to cause the display to self-clean at preset time. Wait for completion of day not set. Check display. Lock-out feature is in the self-clean cycle. Ovens Sabbath feature...


