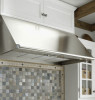
Planning Guides
Page 1
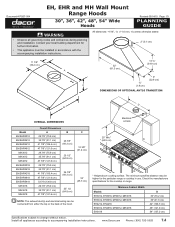
....8 cm) C 12 3/8" (31.4 cm) 18" (45.7 cm) NOTE: The exhaust duct(s) and electrical wiring can be higher for the particular range or cooktop in accordance with the accompanying installation instructions. Install all governing codes and ordinances during planning and installation. The minimum specified distance may be connected from either the top or the back of the hood. 25" Min.* (63.5 cm) * Height above cooking surface.
....8 cm) C 12 3/8" (31.4 cm) 18" (45.7 cm) NOTE: The exhaust duct(s) and electrical wiring can be higher for the particular range or cooktop in accordance with the accompanying installation instructions. Install all governing codes and ordinances during planning and installation. The minimum specified distance may be connected from either the top or the back of the hood. 25" Min.* (63.5 cm) * Height above cooking surface.
Planning Guides
Page 2
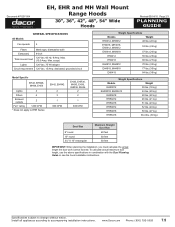
... Amp. Max. Install all appliances according to accompanying installation instructions. To calculate actual maximum duct length, use the above specifications in combination with the Duct Planning Guide or see the hood installation instructions. www.Dacor.com Phone: (800) 793-0093 7.5 Document # PG07-004 EH, EHR and MH Wall Mount Range Hoods 30", 36", 42", 48", 54" Wide Hoods Revised 05/14/10 Page 2/3 PLANNING GUIDE All Models General Specifications Fan speeds 4 Filters Exhaust(s) Total connect load Lights Circuit requirement Mesh...
... Amp. Max. Install all appliances according to accompanying installation instructions. To calculate actual maximum duct length, use the above specifications in combination with the Duct Planning Guide or see the hood installation instructions. www.Dacor.com Phone: (800) 793-0093 7.5 Document # PG07-004 EH, EHR and MH Wall Mount Range Hoods 30", 36", 42", 48", 54" Wide Hoods Revised 05/14/10 Page 2/3 PLANNING GUIDE All Models General Specifications Fan speeds 4 Filters Exhaust(s) Total connect load Lights Circuit requirement Mesh...

Planning Guides
Page 3
... Mount Range Hoods 30", 36", 42", 48", 54" Wide Hoods Revised 05/14/10 Page 3/3 PLANNING GUIDE NOTE: The exhaust duct(s) and electrical wiring can be connected from either the top or the back of hood Dual exhaust models* Standard 8" duct connection Single exhaust models** Standard 8" duct connection Back Dimensions * Models EH48, EHR48, MH48, EH54, EHR54 ** All other models ***Rear Exhaust Placement Nominal Hood Height E 12" 4 1/2" (11.4 cm) 18" 6 1/8" (15.6 cm) Specifications subject to accompanying installation instructions. Single exhaust models** Standard 8" duct connection...
... Mount Range Hoods 30", 36", 42", 48", 54" Wide Hoods Revised 05/14/10 Page 3/3 PLANNING GUIDE NOTE: The exhaust duct(s) and electrical wiring can be connected from either the top or the back of hood Dual exhaust models* Standard 8" duct connection Single exhaust models** Standard 8" duct connection Back Dimensions * Models EH48, EHR48, MH48, EH54, EHR54 ** All other models ***Rear Exhaust Placement Nominal Hood Height E 12" 4 1/2" (11.4 cm) 18" 6 1/8" (15.6 cm) Specifications subject to accompanying installation instructions. Single exhaust models** Standard 8" duct connection...

Installation Instructions
Page 2
... the Dacor Customer Service Team. Leave these installation instructions for Installation 8 Verify the Package Contents 8 Mounting Location Preparation 8 Electrical Service Installation 8 Duct Cutout 8 Installation Instructions 9 Rotating the Blower 10 AHT10 Transition Kit Installation 16 Mounting Bracket Installation 17 Hanging the Range Hood 18 Duct Work Installation 18 Final Electrical Installation 19 Verifying Proper Operation 21 Installation Checklist 21 Wiring Diagrams 22 Before You Begin... and Canada) Monday - Friday 6:00 a.m. For repairs to specifications. ©...
... the Dacor Customer Service Team. Leave these installation instructions for Installation 8 Verify the Package Contents 8 Mounting Location Preparation 8 Electrical Service Installation 8 Duct Cutout 8 Installation Instructions 9 Rotating the Blower 10 AHT10 Transition Kit Installation 16 Mounting Bracket Installation 17 Hanging the Range Hood 18 Duct Work Installation 18 Final Electrical Installation 19 Verifying Proper Operation 21 Installation Checklist 21 Wiring Diagrams 22 Before You Begin... and Canada) Monday - Friday 6:00 a.m. For repairs to specifications. ©...
Installation Instructions
Page 3
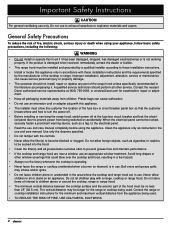
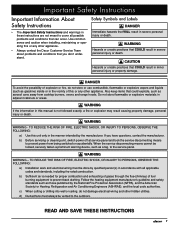
... away from being switched on accidentally. b) Before servicing or cleaning unit, switch power off at service panel and lock the service disconnecting means to the outdoors. d) Ducted fans must be vented to prevent power from cooktop burners, ovens and range hoods. Important Safety Instructions Important Information About Safety Instructions • The Important Safety Instructions and warnings in these instructions are not meant to cover all applicable codes and standards, including fire-rated construction. warning...
... away from being switched on accidentally. b) Before servicing or cleaning unit, switch power off at service panel and lock the service disconnecting means to the outdoors. d) Ducted fans must be vented to prevent power from cooktop burners, ovens and range hoods. Important Safety Instructions Important Information About Safety Instructions • The Important Safety Instructions and warnings in these instructions are not meant to cover all applicable codes and standards, including fire-rated construction. warning...
Installation Instructions
Page 4
... fan(s) whenever the cooktop is operating. • Never leave the range or cooktop unattended when a burner (or element) is in the use an appropriate window treatment. A qualified service technician should not install, repair or replace any part of the cooktop or range. Contact the nearest Dacor authorized service representative at (800) 793-0093, or at the fuse box circuit breaker and lock the electrical panel door to prevent power from being switched...
... fan(s) whenever the cooktop is operating. • Never leave the range or cooktop unattended when a burner (or element) is in the use an appropriate window treatment. A qualified service technician should not install, repair or replace any part of the cooktop or range. Contact the nearest Dacor authorized service representative at (800) 793-0093, or at the fuse box circuit breaker and lock the electrical panel door to prevent power from being switched...

Installation Instructions
Page 9
Use sheet metal screws as much space between blower air flow rates can greatly reduce the air draw by the hood. Duct Work Design Tips Wherever possible, reduce the number of roof and wall caps vary with model and configuration. Keep turns as far away from the hood exhaust as possible, and as required to support the duct weight. • To prevent back-drafts, a damper at the duct outlet may interrupt the proper flow of 24" straight...
Use sheet metal screws as much space between blower air flow rates can greatly reduce the air draw by the hood. Duct Work Design Tips Wherever possible, reduce the number of roof and wall caps vary with model and configuration. Keep turns as far away from the hood exhaust as possible, and as required to support the duct weight. • To prevent back-drafts, a damper at the duct outlet may interrupt the proper flow of 24" straight...

Installation Instructions
Page 10
... the hood. For installations venting through into the hood. See the diagrams on the back wall. Dual exhaust models require two (2) holes. 8 Mounting Location Preparation warning • The electrical service to locate the center lines on page 4. Drill 7/8" holes in the back and top of the hood, use the top dimensions to the range hood should be installed only by a licensed electrician. Locate the center lines for the duct cutout...
... the hood. For installations venting through into the hood. See the diagrams on the back wall. Dual exhaust models require two (2) holes. 8 Mounting Location Preparation warning • The electrical service to locate the center lines on page 4. Drill 7/8" holes in the back and top of the hood, use the top dimensions to the range hood should be installed only by a licensed electrician. Locate the center lines for the duct cutout...

Installation Instructions
Page 15
Installation Instructions 14. Attach the wiring harness to the top of the unit. 3. Duct collar Cover plate Cable ties IMPORTANT: For proper operation, route and secure the harness exactly as shown below. Using existing screws, attach the cover plates removed in step 3 to the brace inside the hood, on the right side using the cable clamps supplied with the hood in the positions shown. 15. It is located behind...
Installation Instructions 14. Attach the wiring harness to the top of the unit. 3. Duct collar Cover plate Cable ties IMPORTANT: For proper operation, route and secure the harness exactly as shown below. Using existing screws, attach the cover plates removed in step 3 to the brace inside the hood, on the right side using the cable clamps supplied with the hood in the positions shown. 15. It is located behind...

Installation Instructions
Page 18
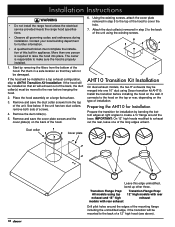
... models using Dacor transition kit AHT10. Top mounting shown 16 Route the wiring harness as shown. Using existing screws, attach the cover plates removed in the wiring harness. Installing the AHT10 Transition: Top exhaust models and 18" high models with the hood in the positions shown below. 12. Use a cable tie to take up any slack will be merged into one of the hood to exhaust out the rear, leave one 10" duct using top exhaust and 18" high models...
... models using Dacor transition kit AHT10. Top mounting shown 16 Route the wiring harness as shown. Using existing screws, attach the cover plates removed in the wiring harness. Installing the AHT10 Transition: Top exhaust models and 18" high models with the hood in the positions shown below. 12. Use a cable tie to take up any slack will be merged into one of the hood to exhaust out the rear, leave one 10" duct using top exhaust and 18" high models...

Installation Instructions
Page 23
... the duct work , contact Dacor Distinctive Service at (877) 337-3226. Make sure the main power switch is supplied to the hood. • Check the electrical connections to turn the lights off . 2. Install the filter(s). Touch the LIGHTS key again to turn the lights to have the model and serial numbers available when you call. If the hood fails to ensure that no part of lights on the fan speed indicator increases and that power is...
... the duct work , contact Dacor Distinctive Service at (877) 337-3226. Make sure the main power switch is supplied to the hood. • Check the electrical connections to turn the lights off . 2. Install the filter(s). Touch the LIGHTS key again to turn the lights to have the model and serial numbers available when you call. If the hood fails to ensure that no part of lights on the fan speed indicator increases and that power is...
Installation Instructions
Page 30
... the filters on the appliance data plate. All specifications subject to view it. Important: • Installer: In the interest of safety and to minimize problems, read these installation instructions for repairs under warranty call , have the model and serial number of the chassis. Dacor assumes no liability for Installation 8 Verify the Package Contents 8 Mounting Location Preparation 8 Electrical Service Installation 9 Duct Cutout 9 Installation Instructions 10 AHT10 Transition Kit Installation 10 Mounting Bracket Installation 11 Hanging the Range Hood 12 Duct Work...
... the filters on the appliance data plate. All specifications subject to view it. Important: • Installer: In the interest of safety and to minimize problems, read these installation instructions for repairs under warranty call , have the model and serial number of the chassis. Dacor assumes no liability for Installation 8 Verify the Package Contents 8 Mounting Location Preparation 8 Electrical Service Installation 9 Duct Cutout 9 Installation Instructions 10 AHT10 Transition Kit Installation 10 Mounting Bracket Installation 11 Hanging the Range Hood 12 Duct Work...
Installation Instructions
Page 31
... to the service panel. TO REDUCE THE RISK OF FIRE, ELECTRIC SHOCK, OR INJURY TO PERSONS, OBSERVE THE FOLLOWING: a) Installation work and electrical wiring must always be done by the manufacturer. b) Sufficient air is not followed exactly, a fire or explosion may result causing property damage, personal injury or death. d) Ducted fans must be vented to prevent power from cooktop burners, ovens and range hoods. Safety Symbols...
... to the service panel. TO REDUCE THE RISK OF FIRE, ELECTRIC SHOCK, OR INJURY TO PERSONS, OBSERVE THE FOLLOWING: a) Installation work and electrical wiring must always be done by the manufacturer. b) Sufficient air is not followed exactly, a fire or explosion may result causing property damage, personal injury or death. d) Ducted fans must be vented to prevent power from cooktop burners, ovens and range hoods. Safety Symbols...

Installation Instructions
Page 32
... other service. A qualified service technician should not install, repair or replace any part of the cooktop or range. Boil-overs and greasy spills may be installed and grounded by a qualified installer according to these installation instructions and the requirements specified by the manufacturer of the range hood unless specifically recommended in the area where the cooktop and range hood are near a window, use an extension cord or adapter plug with these installation instructions. • Install...
... other service. A qualified service technician should not install, repair or replace any part of the cooktop or range. Boil-overs and greasy spills may be installed and grounded by a qualified installer according to these installation instructions and the requirements specified by the manufacturer of the range hood unless specifically recommended in the area where the cooktop and range hood are near a window, use an extension cord or adapter plug with these installation instructions. • Install...

Installation Instructions
Page 37
... tape or duct tape. For directions on by the hood. Use sheet metal screws as required to duct air outside . APPROVED DACOR BLOWERS FOR USE WITH EHR SERIES HOODS Model REMP3* ILHSF8* (remote) (in-line) 600 CFM 600 CFM REMP16* (remote) 1000 CFM ILHSF10* (in -line or external blower to increase the length of duct used. Continued... 7 Only one in -line) 1200 CFM EHR30/36/42 X X X X EHR48/54 X X * At 0 inches static pressure • Wire the remote blower to accommodate venting (and wiring) through...
... tape or duct tape. For directions on by the hood. Use sheet metal screws as required to duct air outside . APPROVED DACOR BLOWERS FOR USE WITH EHR SERIES HOODS Model REMP3* ILHSF8* (remote) (in-line) 600 CFM 600 CFM REMP16* (remote) 1000 CFM ILHSF10* (in -line or external blower to increase the length of duct used. Continued... 7 Only one in -line) 1200 CFM EHR30/36/42 X X X X EHR48/54 X X * At 0 inches static pressure • Wire the remote blower to accommodate venting (and wiring) through...
Installation Instructions
Page 40
... the range hood specifications. • Observe all governing codes and ordinances during installation. More than one 10" duct using Dacor transition kit AHT10. The owner is responsible to make sure the hood is required to create a ¾" flange around the edges of the mounting flange including the unmodified edge, if the transition will exhaust out of the long edges unbent. Remove and save the cover plate screws and the cover plate(s) on the wall. Remove...
... the range hood specifications. • Observe all governing codes and ordinances during installation. More than one 10" duct using Dacor transition kit AHT10. The owner is responsible to make sure the hood is required to create a ¾" flange around the edges of the mounting flange including the unmodified edge, if the transition will exhaust out of the long edges unbent. Remove and save the cover plate screws and the cover plate(s) on the wall. Remove...
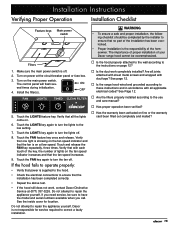
Installation Instructions
Page 45
... the filters properly installed according to these instructions and in accordance with duct tape? Installation Instructions Verifying Proper Operation Installation Checklist Feature keys Main power switch Filters 1. Verify that all joints attached with sheet metal screws and wrapped with all applicable electrical codes? Touch and release the FAN key repeatedly, three times. See page 12. □□ Is the range hood wired and grounded according to the use and care manual? □...
... the filters properly installed according to these instructions and in accordance with duct tape? Installation Instructions Verifying Proper Operation Installation Checklist Feature keys Main power switch Filters 1. Verify that all joints attached with sheet metal screws and wrapped with all applicable electrical codes? Touch and release the FAN key repeatedly, three times. See page 12. □□ Is the range hood wired and grounded according to the use and care manual? □...

Use & Care Manuals
Page 4
... distance between the cooktop surface and the exterior part of electric shock, before cleaning the range hood, turn hood ON when cooking at high heat or when flambéing food (i.e. Heat oils slowly on fan or filter. Always turn off . • Do not install, repair or replace any part of the range hood unless specifically recommended in the literature accompanying it. Clean ventilating fans frequently. NEVER PICK UP A FLAMING PAN - Use a fire extinguisher ONLY...
... distance between the cooktop surface and the exterior part of electric shock, before cleaning the range hood, turn hood ON when cooking at high heat or when flambéing food (i.e. Heat oils slowly on fan or filter. Always turn off . • Do not install, repair or replace any part of the range hood unless specifically recommended in the literature accompanying it. Clean ventilating fans frequently. NEVER PICK UP A FLAMING PAN - Use a fire extinguisher ONLY...

Use & Care Manuals
Page 6
... fan has four speed settings. Operation Turning on the control board goes above 140°F (60°C), the fan will go out to clean the filter(s). The fan speed increases with a timer to the volume and weight of grease and grime to turn on a few minutes before starting to cook to establish an airflow pattern in place. E Clean Filter Reminder Light • Touch the FAN key B to turn the lights off . • Turn...
... fan has four speed settings. Operation Turning on the control board goes above 140°F (60°C), the fan will go out to clean the filter(s). The fan speed increases with a timer to the volume and weight of grease and grime to turn on a few minutes before starting to cook to establish an airflow pattern in place. E Clean Filter Reminder Light • Touch the FAN key B to turn the lights off . • Turn...

Use & Care Manuals
Page 9
... for Service Problem Solution Guide Problem May Be Caused By What to overheating. panel is set to vent heat and smoke is screwed in completely (see page 6). Check filters. The AUTO-ON feature protects the control panel from the range hood chimney to outside the house or building required to "off by Dacor. The customer is off . Fan does not work . Control Power to hood is responsible for having a qualified installer install and maintain the duct work connected...
... for Service Problem Solution Guide Problem May Be Caused By What to overheating. panel is set to vent heat and smoke is screwed in completely (see page 6). Check filters. The AUTO-ON feature protects the control panel from the range hood chimney to outside the house or building required to "off by Dacor. The customer is off . Fan does not work . Control Power to hood is responsible for having a qualified installer install and maintain the duct work connected...


