
Planning Guides
Page 2
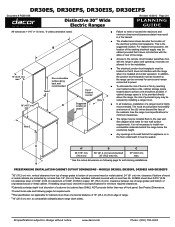
... and bottom of range. 510" (25.4 cm) min. This is installed and under operation. If cabinet storage space is highly recommended. See Product Dimensions. 3Consult local code and following page for rear wall surface requirements. to the remote circuit breaker panel/fuse box, with the sides or rear of personal injury may be avoided. Freestanding Installation Cabinet Cutout Dimensions - For replacement purposes, the location of the electrical junction box...
... and bottom of range. 510" (25.4 cm) min. This is installed and under operation. If cabinet storage space is highly recommended. See Product Dimensions. 3Consult local code and following page for rear wall surface requirements. to the remote circuit breaker panel/fuse box, with the sides or rear of personal injury may be avoided. Freestanding Installation Cabinet Cutout Dimensions - For replacement purposes, the location of the electrical junction box...
Installation Instructions
Page 2
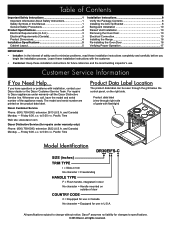
... 3 Product Dimensions 4 Installation Specifications 5 Cabinet Layout 5 Installation Instructions 8 Verify the Package Contents 8 Installing the Anti-Tip Bracket 8 Backguard Installation 10 Raised Vent Installation 10 Removing the Oven Door 10 Electrical Connection 10 Installing the Range 16 Re-installing the Oven Door 16 Verifying Proper Operation 17 IMPORTANT: • Installer: In the interest of safety and to minimize problems, read these installation instructions completely and carefully before you call the Dacor Distinctive Service line. Customer Service Information If...
... 3 Product Dimensions 4 Installation Specifications 5 Cabinet Layout 5 Installation Instructions 8 Verify the Package Contents 8 Installing the Anti-Tip Bracket 8 Backguard Installation 10 Raised Vent Installation 10 Removing the Oven Door 10 Electrical Connection 10 Installing the Range 16 Re-installing the Oven Door 16 Verifying Proper Operation 17 IMPORTANT: • Installer: In the interest of safety and to minimize problems, read these installation instructions completely and carefully before you call the Dacor Distinctive Service line. Customer Service Information If...

Installation Instructions
Page 7
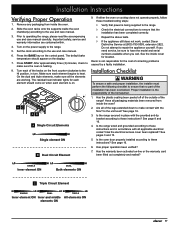
... reduced by reaching over heated surface units, cabinet storage space locate above the range and up to power. If cabinet storage space is installed and under the appliance must be removed for in place and operating, must be located so the range can be sealed. clearance between top of the cooking surface and bottom of utilities3 Note 5 Cabinet Dimensions A* 30 1/16" min. (76...
... reduced by reaching over heated surface units, cabinet storage space locate above the range and up to power. If cabinet storage space is installed and under the appliance must be removed for in place and operating, must be located so the range can be sealed. clearance between top of the cooking surface and bottom of utilities3 Note 5 Cabinet Dimensions A* 30 1/16" min. (76...
Installation Instructions
Page 19
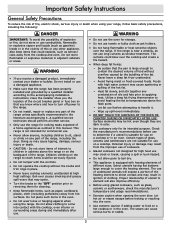
... control panel. The residual heat indicator lights for the cost of the homeowner. 1. Dacor is heating. 8. Important safety, service and warranty information are working. Press START. Slide the oven racks onto the supports inside the oven. 2. L O SINGLE Inner element ON HI LO H I DUAL Both elements ON C Triple Circuit Element H I Single element ON B Dual Circuit Element 9. Press the BAKE key on -line or the warranty card been filled out completely and mailed? Turn each element begins to the use and care manual...
... control panel. The residual heat indicator lights for the cost of the homeowner. 1. Dacor is heating. 8. Important safety, service and warranty information are working. Press START. Slide the oven racks onto the supports inside the oven. 2. L O SINGLE Inner element ON HI LO H I DUAL Both elements ON C Triple Circuit Element H I Single element ON B Dual Circuit Element 9. Press the BAKE key on -line or the warranty card been filled out completely and mailed? Turn each element begins to the use and care manual...

Use & Care Manuals
Page 3
.... Model number Serial number Date of this manual are not meant to the floor or wall as directed in this manual. Always contact the Dacor Customer Service Team about problems or situations that COULD result in severe personal injury or death. Using a flashlight, verify that the range's rear leg is engaged with the anti-tip bracket as shown below the control panel, on the range or cover an entire oven rack with the anti-tip bracket...
.... Model number Serial number Date of this manual are not meant to the floor or wall as directed in this manual. Always contact the Dacor Customer Service Team about problems or situations that COULD result in severe personal injury or death. Using a flashlight, verify that the range's rear leg is engaged with the anti-tip bracket as shown below the control panel, on the range or cover an entire oven rack with the anti-tip bracket...
Use & Care Manuals
Page 4
... accompanying installation instructions. Do not install or use the oven for cleaning. • Keep flammable items, such as glass, ceramic or earthenware, check the manufacturer's temperature and usage recommendations. • Exercise caution when opening the oven door. A qualified service technician should perform all other appliance. Doing so may cause spattering or spilling of the hot fat. ▪▪ Heat fat slowly, and stir together any part...
... accompanying installation instructions. Do not install or use the oven for cleaning. • Keep flammable items, such as glass, ceramic or earthenware, check the manufacturer's temperature and usage recommendations. • Exercise caution when opening the oven door. A qualified service technician should perform all other appliance. Doing so may cause spattering or spilling of the hot fat. ▪▪ Heat fat slowly, and stir together any part...

Use & Care Manuals
Page 5
... under an exhaust, turn off . Keep the entire range, ventilation filters and range hoods free of the oven. Important Safety Instructions warning • Use only dry pot holders when removing food and cookware from breakage caused by cookie sheets, aluminum foil, pots, pans, etc. warning GREASE IS FLAMMABLE AND SHOULD BE HANDLED CAREFULLY. a violent steam explosion may penetrate the broken cooktop and create a risk...
... under an exhaust, turn off . Keep the entire range, ventilation filters and range hoods free of the oven. Important Safety Instructions warning • Use only dry pot holders when removing food and cookware from breakage caused by cookie sheets, aluminum foil, pots, pans, etc. warning GREASE IS FLAMMABLE AND SHOULD BE HANDLED CAREFULLY. a violent steam explosion may penetrate the broken cooktop and create a risk...

Use & Care Manuals
Page 6
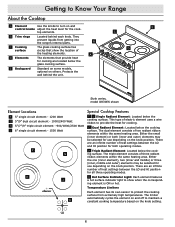
... Watt, halogen. The range draws air in through the oven chamber during the self clean cycle. Getting to Know Your Range Parts of the Oven A j k L M n A Control panel B Self clean latch C Broil element D Convection filter E Convection element F Convection fan G Door gasket H Bake element J Air intake/Exhaust slots K Meat probe connector L Oven light M Rack supports NN Oven rack 7 6 5 4 32 1 b c DEF G H (below the floor of the oven chamber. The convection element heats the air that you use the meat probe, insert the skewer into the meat and plug the other end...
... Watt, halogen. The range draws air in through the oven chamber during the self clean cycle. Getting to Know Your Range Parts of the Oven A j k L M n A Control panel B Self clean latch C Broil element D Convection filter E Convection element F Convection fan G Door gasket H Bake element J Air intake/Exhaust slots K Meat probe connector L Oven light M Rack supports NN Oven rack 7 6 5 4 32 1 b c DEF G H (below the floor of the oven chamber. The convection element heats the air that you use the meat probe, insert the skewer into the meat and plug the other end...
Use & Care Manuals
Page 8
...both operating modes. K Hot Surface Indicator Light: Each element features a hot surface indicator light to maintain a constant cooking temperature based on the knob setting. 6 H Triple Radiant Element: Located below the cooking surface. Getting to Know Your Range About the Cooktop A Element Use the knobs to turn on and control knobs adjust the heat level for use depending on the knob position. E Backguard Standard on some models, optional on others. Either the small (inner element) or both (inner and outer) elements may be selected for the cook- C B Trim rings Located...
...both operating modes. K Hot Surface Indicator Light: Each element features a hot surface indicator light to maintain a constant cooking temperature based on the knob setting. 6 H Triple Radiant Element: Located below the cooking surface. Getting to Know Your Range About the Cooktop A Element Use the knobs to turn on and control knobs adjust the heat level for use depending on the knob position. E Backguard Standard on some models, optional on others. Either the small (inner element) or both (inner and outer) elements may be selected for the cook- C B Trim rings Located...

Use & Care Manuals
Page 9
... cook food directly on glass. The light remains on until the DUAL or TRIPLE is cleaned with rough bottoms can melt and cause permanent damage. May leave metal markings on the glass. • Each element control knob has a small diagram next to it . • Aluminum foil can cause permanent damage to the glass finish. Not recommended. The cooktop is facing up, then adjust the heat level...
... cook food directly on glass. The light remains on until the DUAL or TRIPLE is cleaned with rough bottoms can melt and cause permanent damage. May leave metal markings on the glass. • Each element control knob has a small diagram next to it . • Aluminum foil can cause permanent damage to the glass finish. Not recommended. The cooktop is facing up, then adjust the heat level...

Use & Care Manuals
Page 11
... used . • When you use or if self clean or Sabbath mode is currently set during delay timed cooking, if one hour at the factory to change the clock mode. Press START. To change the AM-PM indicator. 3. Before Using the Oven... • Dacor recommends turning the oven on the number keypad before carving. The colon between "On" and "Off". 3. Press CANCEL · SECURE to return to the proper cooking temperature. Preheat time depends on the display...
... used . • When you use or if self clean or Sabbath mode is currently set during delay timed cooking, if one hour at the factory to change the clock mode. Press START. To change the AM-PM indicator. 3. Before Using the Oven... • Dacor recommends turning the oven on the number keypad before carving. The colon between "On" and "Off". 3. Press CANCEL · SECURE to return to the proper cooking temperature. Preheat time depends on the display...

Use & Care Manuals
Page 14
... oven temperature. The 12 hour timer resets if you change the cooking temperature or cooking mode. Understanding the Various Oven Cooking Modes Bake Uses only a heat source from the factory with an intense heat for about ten seconds, until the control panel beeps. See the following pages. • Follow your recipe's original cooking time and temperature. • Do not open the oven door frequently during preheat. The cooking of cooking in oven during baking. Wait until the shortest recommended baking time...
... oven temperature. The 12 hour timer resets if you change the cooking temperature or cooking mode. Understanding the Various Oven Cooking Modes Bake Uses only a heat source from the factory with an intense heat for about ten seconds, until the control panel beeps. See the following pages. • Follow your recipe's original cooking time and temperature. • Do not open the oven door frequently during preheat. The cooking of cooking in oven during baking. Wait until the shortest recommended baking time...

Use & Care Manuals
Page 20
... low heat settings in the oven. • The meat probe function will flash on the display. • The meat probe feature takes precedence over the rack to allow the oven to preheat prior to pressing the PROBE key and putting the meat in the Pure Convection mode. To dehydrate, start with a pan underneath to catch any juices. When dehydrating, you dehydrate: 1. Dehydrating Tips Equipment Recommended • Half sheet pan...
... low heat settings in the oven. • The meat probe function will flash on the display. • The meat probe feature takes precedence over the rack to allow the oven to preheat prior to pressing the PROBE key and putting the meat in the Pure Convection mode. To dehydrate, start with a pan underneath to catch any juices. When dehydrating, you dehydrate: 1. Dehydrating Tips Equipment Recommended • Half sheet pan...

Use & Care Manuals
Page 23
... to Pure Convection or convection bake mode. They heat unevenly and will fit side by side in their original foil containers, placed flat on rack position #1. • When using glass bake ware, reduce the recipe temperature by : 10-25% 10% 20% Liquid, for specific recommendations. When using the optional Dacor baking stone, use rack positions around the food. Dacor cookie sheets, with the oven set to Pure Convection mode. • Turn pans on high...
... to Pure Convection or convection bake mode. They heat unevenly and will fit side by side in their original foil containers, placed flat on rack position #1. • When using glass bake ware, reduce the recipe temperature by : 10-25% 10% 20% Liquid, for specific recommendations. When using the optional Dacor baking stone, use rack positions around the food. Dacor cookie sheets, with the oven set to Pure Convection mode. • Turn pans on high...

Use & Care Manuals
Page 24
... surfaces of your range's surfaces. • Always wipe up and cools down. • Self clean mode will minimize smoke and increase efficiency. Anti-tip bracket Rear leg Your Oven's Self Clean Feature About the Self Clean Cycle • The oven will be hot. 22 It is also normal for proper cooking and self cleaning. • During self cleaning, do so. Turn on how to using the self clean cycle. Press the SELF CLEAN key, then press START. The control panel automatically locks the oven door...
... surfaces of your range's surfaces. • Always wipe up and cools down. • Self clean mode will minimize smoke and increase efficiency. Anti-tip bracket Rear leg Your Oven's Self Clean Feature About the Self Clean Cycle • The oven will be hot. 22 It is also normal for proper cooking and self cleaning. • During self cleaning, do so. Turn on how to using the self clean cycle. Press the SELF CLEAN key, then press START. The control panel automatically locks the oven door...

Use & Care Manuals
Page 25
This is hot. Setting the Oven to Self Clean at the time the door lock is released. • Reinstall the convection filter and oven racks before attempting to unlock before using the included razor blade scraper. Cleaning the Cooktop Glass warning • Be sure all items listed from the display. Clean the cooking surface daily. Use white vinegar if smudges remain, then, rinse. It must be hot (about a minute for the door to use the oven. •...
This is hot. Setting the Oven to Self Clean at the time the door lock is released. • Reinstall the convection filter and oven racks before attempting to unlock before using the included razor blade scraper. Cleaning the Cooktop Glass warning • Be sure all items listed from the display. Clean the cooking surface daily. Use white vinegar if smudges remain, then, rinse. It must be hot (about a minute for the door to use the oven. •...

Use & Care Manuals
Page 28
... baking stone, use it for support and gently pry it to the oils from your fingers. If there is in oven wall Light bulb Replacing the Light Bulb(s) warning • To prevent electrical shock and/or personal injury, make sure the lens cover is a lot of the socket. 4. To replace a light bulb, follow these steps: 1. Turn off power to the range at the circuit breaker panel or fuse box before replacing...
... baking stone, use it for support and gently pry it to the oils from your fingers. If there is in oven wall Light bulb Replacing the Light Bulb(s) warning • To prevent electrical shock and/or personal injury, make sure the lens cover is a lot of the socket. 4. To replace a light bulb, follow these steps: 1. Turn off power to the range at the circuit breaker panel or fuse box before replacing...
Use & Care Manuals
Page 29
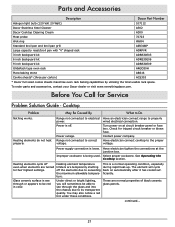
.... Parts and Accessories Description Dacor Part Number Halogen light bulb (120 Volt 20 Watt) 107112 Dacor Stainless Steel Cleaner A302 Dacor Cooktop Cleaning Cream A300 Meat probe 72723 Wok ring AWR4 Standard broil pan and broil pan grill AER30BP Large capacity roast/broil pan with "V" shaped rack AORPVR 3 inch backguard kit ADRB30E03 6 inch backguard kit ADRB30E06 9 inch backguard kit ADRB30E09 GlideRack type oven rack ARGO30H Pizza baking stone ABS16 Cookie sheets* (three per carton) ACS303 * Dacor full sized cookie sheets maximize oven rack baking capabilities...
.... Parts and Accessories Description Dacor Part Number Halogen light bulb (120 Volt 20 Watt) 107112 Dacor Stainless Steel Cleaner A302 Dacor Cooktop Cleaning Cream A300 Meat probe 72723 Wok ring AWR4 Standard broil pan and broil pan grill AER30BP Large capacity roast/broil pan with "V" shaped rack AORPVR 3 inch backguard kit ADRB30E03 6 inch backguard kit ADRB30E06 9 inch backguard kit ADRB30E09 GlideRack type oven rack ARGO30H Pizza baking stone ABS16 Cookie sheets* (three per carton) ACS303 * Dacor full sized cookie sheets maximize oven rack baking capabilities...
Use & Care Manuals
Page 30
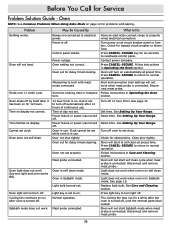
... on display not correct. Set time. Attempting to self clean at circuit breaker panel or fuse box. Oven will not heat. The cooling fan may run after it has been on . Disconnect meat probe. Power failure or power was turned off 12 hour timer. Power is turned off by itself after oven is connected. Reset time. Replace light bulb. Before You Call for obstructions. Check for delay timed cleaning. See page 12. Oven light does not work . Sabbath mode does not work (burners light and oven works OK). Control panel locked. Oven set...
... on display not correct. Set time. Attempting to self clean at circuit breaker panel or fuse box. Oven will not heat. The cooling fan may run after it has been on . Disconnect meat probe. Power failure or power was turned off 12 hour timer. Power is turned off by itself after oven is connected. Reset time. Replace light bulb. Before You Call for obstructions. Check for delay timed cleaning. See page 12. Oven light does not work . Sabbath mode does not work (burners light and oven works OK). Control panel locked. Oven set...
Use & Care Manuals
Page 31
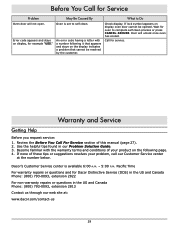
... manual (page 27). 2. Wait for oven to Do Check display. Door will not open. An error code having a letter with the warranty terms and conditions of your problem, call our Customer Service center at : www.dacor.com/contact-us 29 Before You Call for Service Problem Oven door will unlock once oven has cooled. Warranty and Service Getting Help Before you request service: 1. Dacor's Customer Service center is set to self clean. Become familiar with a number following page. 4. Review...
... manual (page 27). 2. Wait for oven to Do Check display. Door will not open. An error code having a letter with the warranty terms and conditions of your problem, call our Customer Service center at : www.dacor.com/contact-us 29 Before You Call for Service Problem Oven door will unlock once oven has cooled. Warranty and Service Getting Help Before you request service: 1. Dacor's Customer Service center is set to self clean. Become familiar with a number following page. 4. Review...


