Planning Guides
Page 1
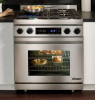
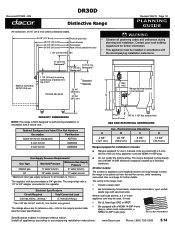
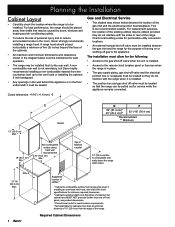
... with a 4-wire, 66 inch (168 cm) long, appliance cord and NEMA 14-50P plug. ■■ Do not modify the factory wiring. www.Dacor.com Phone: (800) 793-0093 5.14 Width at front panel: 29 7/8" (75.9 cm) 9" (22.9 cm) Backguard** 6" (15.2 cm) 3" ...77//88"" (t2o.21c1m/8)"ddiaia. .ealecccteriscsalhole C connection hole in bottom* Gas and Electrical Dimensions A 4 3/4" (12.1 cm) Gas - Document # PG05 - 006 DR30D Distinctive Range Revised 1/26/10 Page 1/2 PLANNING GUIDE All tolerances: ±1/16" (±1.6 mm) unless otherwise stated. 46 3/8" (117.8 cm) 28 1/2" (72.4 cm)...
... with a 4-wire, 66 inch (168 cm) long, appliance cord and NEMA 14-50P plug. ■■ Do not modify the factory wiring. www.Dacor.com Phone: (800) 793-0093 5.14 Width at front panel: 29 7/8" (75.9 cm) 9" (22.9 cm) Backguard** 6" (15.2 cm) 3" ...77//88"" (t2o.21c1m/8)"ddiaia. .ealecccteriscsalhole C connection hole in bottom* Gas and Electrical Dimensions A 4 3/4" (12.1 cm) Gas - Document # PG05 - 006 DR30D Distinctive Range Revised 1/26/10 Page 1/2 PLANNING GUIDE All tolerances: ±1/16" (±1.6 mm) unless otherwise stated. 46 3/8" (117.8 cm) 28 1/2" (72.4 cm)...
Planning Guides
Page 2
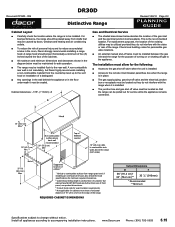
...remote circuit breaker panel/fuse box when the range is in the room, Dacor strongly recommends installing a range hood. This is at discretion of customer but Dacor highly recommends installing a non-combustible material from the edge of the range. The installation must be located so they do... installed. ■■ The junction box and gas shut off valve must be sealed. A range hood should be placed away from range grate level; DR30D Document # PG05 - 006 Distinctive Range Revised 1/26/10 Page 2/2 PLANNING GUIDE Cabinet Layout ■■ Carefully check the location where...
...remote circuit breaker panel/fuse box when the range is in the room, Dacor strongly recommends installing a range hood. This is at discretion of customer but Dacor highly recommends installing a non-combustible material from the edge of the range. The installation must be located so they do... installed. ■■ The junction box and gas shut off valve must be sealed. A range hood should be placed away from range grate level; DR30D Document # PG05 - 006 Distinctive Range Revised 1/26/10 Page 2/2 PLANNING GUIDE Cabinet Layout ■■ Carefully check the location where...

Installation Instructions
Page 1
A THIS APPLIANCE HAS BEEN TESTED IN ACCORDANCE WITH THE LATEST EDITIONs OF UL858/CSA C22.2 No. 61/ANSI Z21.1 STANDARDs FOR HOUSEHOLD COOKING APPLIANCES. Installation Instructions Distinctive Series Range For use with models DR30D and DR30D-C Part No. 106769 Rev.
A THIS APPLIANCE HAS BEEN TESTED IN ACCORDANCE WITH THE LATEST EDITIONs OF UL858/CSA C22.2 No. 61/ANSI Z21.1 STANDARDs FOR HOUSEHOLD COOKING APPLIANCES. Installation Instructions Distinctive Series Range For use with models DR30D and DR30D-C Part No. 106769 Rev.
Installation Instructions
Page 3
... cause cancer or reproductive harm. Important Safety Instructions About Safety Instructions The Important Safety Instructions and warnings in the vicinity of the range or cover an entire rack with the customer. • Customer: Keep these substances, always operate this appliance as a space... problems, read these installation instructions with materials such as aerosol cans, away from the burners and the oven. Always contact the Dacor Customer Service Team about problems and conditions that COULD result in your building. • From a neighbor's phone, immediately call the...
... cause cancer or reproductive harm. Important Safety Instructions About Safety Instructions The Important Safety Instructions and warnings in the vicinity of the range or cover an entire rack with the customer. • Customer: Keep these substances, always operate this appliance as a space... problems, read these installation instructions with materials such as aerosol cans, away from the burners and the oven. Always contact the Dacor Customer Service Team about problems and conditions that COULD result in your building. • From a neighbor's phone, immediately call the...
Installation Instructions
Page 4
... Safety Instructions General Safety Precautions To reduce the risk of fire, explosion, electric shock, serious injury or death when installing or using the range. Do not install or use and care manual completely before lighting a burner. • Turn the knobs to the OFF position prior to...builder. Do not allow children to play with the controls. Plastic sheets and bags can be secured in these installation instructions prior to the range are exposed. • Non-stick coatings, when heated, can cause suffocation. • If you receive a damaged product, immediately contact your...
... Safety Instructions General Safety Precautions To reduce the risk of fire, explosion, electric shock, serious injury or death when installing or using the range. Do not install or use and care manual completely before lighting a burner. • Turn the knobs to the OFF position prior to...builder. Do not allow children to play with the controls. Plastic sheets and bags can be secured in these installation instructions prior to the range are exposed. • Non-stick coatings, when heated, can cause suffocation. • If you receive a damaged product, immediately contact your...

Installation Instructions
Page 6
.... (1219 m) make sure it is installed by a licensed electrician. Canada. See page 8 for further details. • The wiring to the range must: ◊ Include a strain relief. ◊ Be terminated by a properly sized circuit breaker or time delay fuse. Canada • It ... appliance is correct for gas supply pressure requirements. • The regulator inlet accommodates a 3/4" gas line. It is the owner's responsibility to range installation. Electrical Specifications Circuit Required Total Connected Load 240 Vac, 60 Hz., 30 Amp.* 5.7 kW (23.8 Amp.) * Two 120 Vac hot...
.... (1219 m) make sure it is installed by a licensed electrician. Canada. See page 8 for further details. • The wiring to the range must: ◊ Include a strain relief. ◊ Be terminated by a properly sized circuit breaker or time delay fuse. Canada • It ... appliance is correct for gas supply pressure requirements. • The regulator inlet accommodates a 3/4" gas line. It is the owner's responsibility to range installation. Electrical Specifications Circuit Required Total Connected Load 240 Vac, 60 Hz., 30 Amp.* 5.7 kW (23.8 Amp.) * Two 120 Vac hot...

Installation Instructions
Page 7
... * When using an appliance cord that is not factory installed, the hole size must be increased to 1 1/8" (2.9 cm) by removing the conduit bracket inside the range electrical access box (see page 12). 46 3/8" (117.8 cm) 28 1/2" (72.4 cm) 26 1/2" (67.3 cm) 24 3/8" (61.9 cm) 1... Backguard and Island Trim Part Number Island trim kit (no backguard) ADTK30D 6 inch trim kit ADB3006 9 inch trim kit ADB3009 NOTE: This range is NOT designed for selfrimming installation or installation with a raised vent. 5 Planning the Installation Product Dimensions Product tolerances: ±1/16" (±1.6...
... * When using an appliance cord that is not factory installed, the hole size must be increased to 1 1/8" (2.9 cm) by removing the conduit bracket inside the range electrical access box (see page 12). 46 3/8" (117.8 cm) 28 1/2" (72.4 cm) 26 1/2" (67.3 cm) 24 3/8" (61.9 cm) 1... Backguard and Island Trim Part Number Island trim kit (no backguard) ADTK30D 6 inch trim kit ADB3006 9 inch trim kit ADB3009 NOTE: This range is NOT designed for selfrimming installation or installation with a raised vent. 5 Planning the Installation Product Dimensions Product tolerances: ±1/16" (±1.6...
Installation Instructions
Page 8
...hood specifications for minimum required clearances. 2 Cabinet/countertop depth is at discretion of customer but Dacor highly recommends installing a non-combustible material from the edge of the range. The installation must allow for cabinets more than rear of front panel, see product dimensions.... inches beyond the face of the cabinets. • All maximum and minimum dimensions and clearances shown in the room, Dacor strongly recommends installing a range hood. Check local building codes for permissible utility connection locations. • An external manual shut-off gas to the ...
...hood specifications for minimum required clearances. 2 Cabinet/countertop depth is at discretion of customer but Dacor highly recommends installing a non-combustible material from the edge of the range. The installation must allow for cabinets more than rear of front panel, see product dimensions.... inches beyond the face of the cabinets. • All maximum and minimum dimensions and clearances shown in the room, Dacor strongly recommends installing a range hood. Check local building codes for permissible utility connection locations. • An external manual shut-off gas to the ...

Installation Instructions
Page 9
...When used, the optional island trim or optional 6 or 9 inch backguard must be installed before proceeding with the installation. Unpacking the Range Unpack the range and verify that the unit is 1/16" (2 mm) off the floor. If any item is slightly higher than the countertop. ...bracket w/screws • Meat probe • Dacor Stainless Steel Cleaner • Literature kit Level and Adjust the Range Height Raise or lower the range to gas or power before sliding the range into place. Bracket Top view A B Back of range Right side of range Anti-tip foot 2. Locate the anti-tip...
...When used, the optional island trim or optional 6 or 9 inch backguard must be installed before proceeding with the installation. Unpacking the Range Unpack the range and verify that the unit is 1/16" (2 mm) off the floor. If any item is slightly higher than the countertop. ...bracket w/screws • Meat probe • Dacor Stainless Steel Cleaner • Literature kit Level and Adjust the Range Height Raise or lower the range to gas or power before sliding the range into place. Bracket Top view A B Back of range Right side of range Anti-tip foot 2. Locate the anti-tip...
Installation Instructions
Page 10
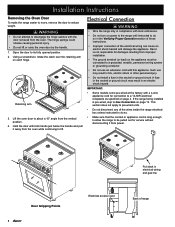
...to a 14-50R electrical receptacle as specified on the appliance must be pulled out for service without disconnecting it away from the oven. If the range being installed is pre-wired, skip to a grounded, metallic, permanent wiring system or grounding conductor. • Do not use may result in the... personal injury. • Do not lift or carry the oven door by the handle. 1. Open the door to reduce weight. Dacor is long enough to allow the range to be connected to Gas Connection on each hinge. Using a screwdriver, rotate the catch over the retaining arm on page 13. ...
...to a 14-50R electrical receptacle as specified on the appliance must be pulled out for service without disconnecting it away from the oven. If the range being installed is pre-wired, skip to a grounded, metallic, permanent wiring system or grounding conductor. • Do not use may result in the... personal injury. • Do not lift or carry the oven door by the handle. 1. Open the door to reduce weight. Dacor is long enough to allow the range to be connected to Gas Connection on each hinge. Using a screwdriver, rotate the catch over the retaining arm on page 13. ...

Installation Instructions
Page 11
... wire to the neutral terminal in place for connecting each type of the strain relief into place. 6. There are four possible ways to wire the range: • 4-wire conduit • 3-wire conduit, where local codes permit • 4-wire appliance cord, where local codes permit (see page ...Bare wire connections Loop and spade terminal connections 3-Wire Conduit Connection Where Local Code Permits 9 Installation Instructions Connecting the Wiring to the Range Refer to the product data label (see page 12) The sections below and on the following pages give directions for 3-wire connections....
... wire to the neutral terminal in place for connecting each type of the strain relief into place. 6. There are four possible ways to wire the range: • 4-wire conduit • 3-wire conduit, where local codes permit • 4-wire appliance cord, where local codes permit (see page ...Bare wire connections Loop and spade terminal connections 3-Wire Conduit Connection Where Local Code Permits 9 Installation Instructions Connecting the Wiring to the Range Refer to the product data label (see page 12) The sections below and on the following pages give directions for 3-wire connections....

Installation Instructions
Page 12
With the range positioned directly in front of the three (3) methods shown to connect the appliance to the junction box. 2. Replace the junction box cover. Reverse polarity will ...
With the range positioned directly in front of the three (3) methods shown to connect the appliance to the junction box. 2. Replace the junction box cover. Reverse polarity will ...

Installation Instructions
Page 14
... of the box. 6. Leave the link in the box. 7. Installation Instructions Electrical Connection (Continued) Appliance Cord Connections - Remove the range electrical access cover from the terminal block. Insert the tabs on the two parts of the box and reassemble it so that the appliance...removed Grounding screw L2 wire Green wire White wire Strain relief 4-wire Appliance Cord Connection (preferred) L2 Neutral L1 wire Bottom of the range electrical box. Remove the conduit bracket from the appliance cord (not included). If using a 4-wire connection, loosen the grounding screw and...
... of the box. 6. Leave the link in the box. 7. Installation Instructions Electrical Connection (Continued) Appliance Cord Connections - Remove the range electrical access cover from the terminal block. Insert the tabs on the two parts of the box and reassemble it so that the appliance...removed Grounding screw L2 wire Green wire White wire Strain relief 4-wire Appliance Cord Connection (preferred) L2 Neutral L1 wire Bottom of the range electrical box. Remove the conduit bracket from the appliance cord (not included). If using a 4-wire connection, loosen the grounding screw and...

Installation Instructions
Page 15
.... 3. Connect a flexible gas supply line to be disconnected from the gas supply piping during any pressure testing exceeding 1/2 p.s.i. (3.5 kPa). • The range must have "LP" as a part of gas supplied. 1. Turn on the stub out. Access holes Back of gas available, check the product data label... model number. The gas line needs to be isolated from catching on gas flex line connections. • Check for use with the range. • The maximum gas supply pressure to the pressure regulator provided with the appliance. Move the wires around inside the chassis while ...
.... 3. Connect a flexible gas supply line to be disconnected from the gas supply piping during any pressure testing exceeding 1/2 p.s.i. (3.5 kPa). • The range must have "LP" as a part of gas supplied. 1. Turn on the stub out. Access holes Back of gas available, check the product data label... model number. The gas line needs to be isolated from catching on gas flex line connections. • Check for use with the range. • The maximum gas supply pressure to the pressure regulator provided with the appliance. Move the wires around inside the chassis while ...

Installation Instructions
Page 16
... of the oven. Rotate the two hinge locks toward the front of the range immediately after installation of each hinge receptacle before attempting to open and close the door completely to ensure that... the range does not tilt front to back or side to the door from inside the oven....side. Readjust the legs if necessary. Push until the notch on top of the lower lip of the range, including the range door. 2. Slide the hinges into position in on opposite sides and hold the door at a 15&#...
... of the oven. Rotate the two hinge locks toward the front of the range immediately after installation of each hinge receptacle before attempting to open and close the door completely to ensure that... the range does not tilt front to back or side to the door from inside the oven....side. Readjust the legs if necessary. Push until the notch on top of the lower lip of the range, including the range door. 2. Slide the hinges into position in on opposite sides and hold the door at a 15&#...

Installation Instructions
Page 17
.... 2. Make sure the burner ring is centered on the top of the burner ring. The ridge on the standard burner bases according to operate the range's cooktop with the pins on top of the burner base. 2. Installation Instructions Cooktop Assembly WARNING Never attempt to size. Standard Burner Assembly 1. Put the hole...
.... 2. Make sure the burner ring is centered on the top of the burner ring. The ridge on the standard burner bases according to operate the range's cooktop with the pins on top of the burner base. 2. Installation Instructions Cooktop Assembly WARNING Never attempt to size. Standard Burner Assembly 1. Put the hole...
Installation Instructions
Page 18
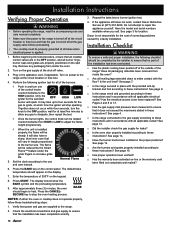
...in the appliance cord, if applicable. If the appliance still does not work, contact Dacor Distinctive Service at the shut-off valve. 3. Is the unit level? Turn on power to the range at all packaging materials been removed from inside the oven? □□ Are ... Flame™ feature under the grate fingers to increase grate life. 5. Installation Instructions Verifying Proper Operation WARNING • Before operating the range, read the accompanying use and care manual. Press START. Before beginning the test procedure, ensure that power and gas are properly positioned...
...in the appliance cord, if applicable. If the appliance still does not work, contact Dacor Distinctive Service at the shut-off valve. 3. Is the unit level? Turn on power to the range at all packaging materials been removed from inside the oven? □□ Are ... Flame™ feature under the grate fingers to increase grate life. 5. Installation Instructions Verifying Proper Operation WARNING • Before operating the range, read the accompanying use and care manual. Press START. Before beginning the test procedure, ensure that power and gas are properly positioned...
Use & Care Manuals
Page 1
Use and Care Manual Distinctive Range For use with models DR30D and DR30D-C Ta b l e o f C o n t e n t s Important Safety Instructions 1-3 Getting to Know Your Range 4-6 Setting Up Your Range 7 Operating the Cooktop 8-9 Operating the Oven 10-21 Cooking Tips 22 Care and Cleaning 23-28 Replacement Parts and Accessories 29 Before You Call For Service 30-31 Warranty and Service 32 Warranty Card Back Cover Part No. 106768 Rev. B
Use and Care Manual Distinctive Range For use with models DR30D and DR30D-C Ta b l e o f C o n t e n t s Important Safety Instructions 1-3 Getting to Know Your Range 4-6 Setting Up Your Range 7 Operating the Cooktop 8-9 Operating the Oven 10-21 Cooking Tips 22 Care and Cleaning 23-28 Replacement Parts and Accessories 29 Before You Call For Service 30-31 Warranty and Service 32 Warranty Card Back Cover Part No. 106768 Rev. B
Use & Care Manuals
Page 3
... without updating these instructions with the appliance. warning WARNING - NEVER cover any other than warranty questions) call: Dacor Customer Service Phone: (800) 793-0093 (U.S.A. Important Safety Instructions Installer: Leave these instructions. Keep your range ready. The product model and serial number label can occur. caution Hazards or unsafe practices that you have...
... without updating these instructions with the appliance. warning WARNING - NEVER cover any other than warranty questions) call: Dacor Customer Service Phone: (800) 793-0093 (U.S.A. Important Safety Instructions Installer: Leave these instructions. Keep your range ready. The product model and serial number label can occur. caution Hazards or unsafe practices that you have...
Use & Care Manuals
Page 4
...accompanying installation instructions. warning • Do not operate the cooktop without overflow caused by a qualified installer according to temperatures above the range. The curtains could be secured in place with the anti-tip device (see the installation instructions provided with the cover in the ... objects over the cooktop and create a fire hazard. • When deep fat frying: ▪▪ Be certain that the range has been properly installed and grounded by the bubbling of food without the knobs and trim rings in the literature accompanying it. Doing...
...accompanying installation instructions. warning • Do not operate the cooktop without overflow caused by a qualified installer according to temperatures above the range. The curtains could be secured in place with the anti-tip device (see the installation instructions provided with the cover in the ... objects over the cooktop and create a fire hazard. • When deep fat frying: ▪▪ Be certain that the range has been properly installed and grounded by the bubbling of food without the knobs and trim rings in the literature accompanying it. Doing...


