Planning Guides
Page 1
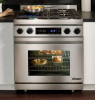
... to accompanying installation instructions. The regulator inlet accommodates a 3/4" gas line. The plug is designed to change without notice. See next page for reference only - Specifications subject to plug directly into a NEMA 14-50R electrical receptacle installed by tinned leads, closed loop terminals or open door Front of knobs Front panel Rear of trim Finished side panel * Standard ** Optional 35 3/4" (90.8 cm) to the range must : ◊ Be UL listed type SRD...
... to accompanying installation instructions. The regulator inlet accommodates a 3/4" gas line. The plug is designed to change without notice. See next page for reference only - Specifications subject to plug directly into a NEMA 14-50R electrical receptacle installed by tinned leads, closed loop terminals or open door Front of knobs Front panel Rear of trim Finished side panel * Standard ** Optional 35 3/4" (90.8 cm) to the range must : ◊ Be UL listed type SRD...
Planning Guides
Page 2
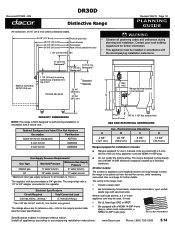
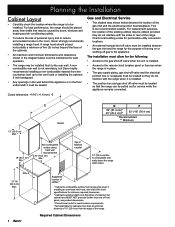
...; The gas supply piping, gas shut-off gas to combustible surface from the edge of the range. The installation must allow for the following: ■■ Access to the gas shut-off valve must be installed flush to accompanying installation instructions. to change without notice. Suggested location of 10" (25.4 cm) from range grate level; Required Cabinet Dimensions Cutout Dimensions E F 36" (91.4 cm)* 30" (76.2 cm)** 30 1/16" (916mm) * Recommended ** Minimum Specifications subject...
...; The gas supply piping, gas shut-off gas to combustible surface from the edge of the range. The installation must allow for the following: ■■ Access to the gas shut-off valve must be installed flush to accompanying installation instructions. to change without notice. Suggested location of 10" (25.4 cm) from range grate level; Required Cabinet Dimensions Cutout Dimensions E F 36" (91.4 cm)* 30" (76.2 cm)** 30 1/16" (916mm) * Recommended ** Minimum Specifications subject...
Installation Instructions
Page 3
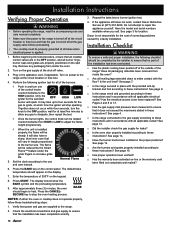
... law requires businesses to these installation instructions for Installation 7 Electrical Connection 8-13 Gas Supply Connection 13 Final Installation 14 Installing the Burner Knobs 14 Cooktop Assembly 15 Verifying Proper Operation 16 Installation Checklist 16 IMPORTANT: • Installer: In the interest of this Manual DANGER Immediate hazards that you smell gas: • Do not use or light any appliance. • Do not touch any other appliance. Always contact the Dacor Customer Service Team about problems and...
... law requires businesses to these installation instructions for Installation 7 Electrical Connection 8-13 Gas Supply Connection 13 Final Installation 14 Installing the Burner Knobs 14 Cooktop Assembly 15 Verifying Proper Operation 16 Installation Checklist 16 IMPORTANT: • Installer: In the interest of this Manual DANGER Immediate hazards that you smell gas: • Do not use or light any appliance. • Do not touch any other appliance. Always contact the Dacor Customer Service Team about problems and...
Installation Instructions
Page 4
... tamper with the anti-tip device as specified in these instructions. • Clean the cooktop thoroughly before lighting a burner. • Turn the knobs to the OFF position prior to removing them . • Make sure that the gas supply and electric power to the range are dry before operating it . Do not install or use a damaged appliance. • This range must be properly installed by a qualified installer according to these instructions. • To...
... tamper with the anti-tip device as specified in these instructions. • Clean the cooktop thoroughly before lighting a burner. • Turn the knobs to the OFF position prior to removing them . • Make sure that the gas supply and electric power to the range are dry before operating it . Do not install or use a damaged appliance. • This range must be properly installed by a qualified installer according to these instructions. • To...
Installation Instructions
Page 5
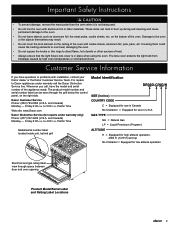
... knobs or trim rings to the oven. • Do not leave objects, such as aluminum foil, the meat probe, cookie sheets, etc. Dacor Customer Service Phone: (800) 793-0093 (U.S.A. and Canada) Monday - Pacific Time Model/serial number label located inside unit, behind grill Model Identification DR30D-C/NG/H SIZE (inches) COUNTRY CODE C = Equipped for use in Canada No Character = Equipped for low altitude operation Electrical and gas rating label, view through the grill below the control panel...
... knobs or trim rings to the oven. • Do not leave objects, such as aluminum foil, the meat probe, cookie sheets, etc. Dacor Customer Service Phone: (800) 793-0093 (U.S.A. and Canada) Monday - Pacific Time Model/serial number label located inside unit, behind grill Model Identification DR30D-C/NG/H SIZE (inches) COUNTRY CODE C = Equipped for use in Canada No Character = Equipped for low altitude operation Electrical and gas rating label, view through the grill below the control panel...

Installation Instructions
Page 6
... being installed is correct for service, while remaining connected. Electrical Requirements IMPORTANT: The information below prior to the regulator. Canada. It is the owner's responsibility to ensure that is protected by a licensed electrician as specified below does not apply to plug directly into a NEMA 14-50R electrical receptacle installed by a properly sized circuit breaker or time delay fuse. The electrical installation, including minimum supply wire size and grounding, must be supplied to...
... being installed is correct for service, while remaining connected. Electrical Requirements IMPORTANT: The information below prior to the regulator. Canada. It is the owner's responsibility to ensure that is protected by a licensed electrician as specified below does not apply to plug directly into a NEMA 14-50R electrical receptacle installed by a properly sized circuit breaker or time delay fuse. The electrical installation, including minimum supply wire size and grounding, must be supplied to...
Installation Instructions
Page 8
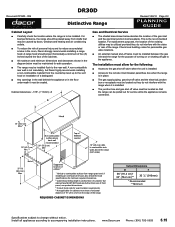
... gas shut-off valve when the unit is installed. • Access to be caused by doors, windows and heating and air conditioning outlets. • To reduce the risk of customer but Dacor highly recommends installing a non-combustible material from range grate level; Planning the Installation Cabinet Layout • Carefully check the location where the range is the recommended location. A range hood should be maintained for service while the appliance remains connected...
... gas shut-off valve when the unit is installed. • Access to be caused by doors, windows and heating and air conditioning outlets. • To reduce the risk of customer but Dacor highly recommends installing a non-combustible material from range grate level; Planning the Installation Cabinet Layout • Carefully check the location where the range is the recommended location. A range hood should be maintained for service while the appliance remains connected...

Installation Instructions
Page 9
...; Literature kit Level and Adjust the Range Height Raise or lower the range to prepare for location. Install the anti-tip bracket on the floor using the four (4) included screws. Bracket Top view A B Back of range Right side of installation. The customer must locate and secure the anti-tip bracket to 5" (12.7 cm) down Install the Anti-Tip Bracket and Foot 1. See the diagram below for final installation. Installation Instructions Preparing for Installation WARNING • If the gas or electric service provided...
...; Literature kit Level and Adjust the Range Height Raise or lower the range to prepare for location. Install the anti-tip bracket on the floor using the four (4) included screws. Bracket Top view A B Back of range Right side of installation. The customer must locate and secure the anti-tip bracket to 5" (12.7 cm) down Install the Anti-Tip Bracket and Foot 1. See the diagram below for final installation. Installation Instructions Preparing for Installation WARNING • If the gas or electric service provided...
Installation Instructions
Page 10
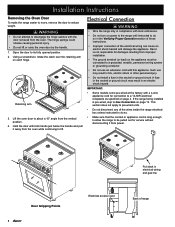
... ordinances. • Do not turn on power to the range until instructed to Gas Connection on the appliance must be pulled out for connection to a grounded, metallic, permanent wiring system or grounding conductor. • Do not use may result in electrical wiring and gas line Electrical access cover Back of range IMPORTANT: • Some models come pre-wired at the factory with the door removed from the oven. WARNING • Do not...
... ordinances. • Do not turn on power to the range until instructed to Gas Connection on the appliance must be pulled out for connection to a grounded, metallic, permanent wiring system or grounding conductor. • Do not use may result in electrical wiring and gas line Electrical access cover Back of range IMPORTANT: • Some models come pre-wired at the factory with the door removed from the oven. WARNING • Do not...

Installation Instructions
Page 15
... of range 13 Gas 7. Turn the gas shut- Do not use a flame to the regulator. To verify that the power to prevent them from the gas supply piping by closing the shut-off at or below before using a soap and water solution. Installation Instructions Bare wire connections Loop and spade terminal connections L1 terminal Neutral terminal L2 terminal Neutral to connecting the gas line. • Do not apply excessive pressure when tightening gas connections...
... of range 13 Gas 7. Turn the gas shut- Do not use a flame to the regulator. To verify that the power to prevent them from the gas supply piping by closing the shut-off at or below before using a soap and water solution. Installation Instructions Bare wire connections Loop and spade terminal connections L1 terminal Neutral terminal L2 terminal Neutral to connecting the gas line. • Do not apply excessive pressure when tightening gas connections...
Installation Instructions
Page 18
.... Remove any gas to dissipate, then repeat the test. ◊ Once the burner lights, the control knob can be rotated counterclockwise from HIGH to LOW to ensure that the gas is installed properly, the flame will stop the oven heating process. Turn on the display. 7. The default bake temperature should be reduced by the Smart Flame™ feature under the grate fingers to these instructions? Have the model and serial numbers...
.... Remove any gas to dissipate, then repeat the test. ◊ Once the burner lights, the control knob can be rotated counterclockwise from HIGH to LOW to ensure that the gas is installed properly, the flame will stop the oven heating process. Turn on the display. 7. The default bake temperature should be reduced by the Smart Flame™ feature under the grate fingers to these instructions? Have the model and serial numbers...
Use & Care Manuals
Page 3
... these numbers below the control panel, on the range or cover an entire oven rack with gas. warning WARNING - It contains important use and care manual completely before using this or any questions (other appliance. For service and warranty information, see page 32. Product model and serial number label, located inside unit, behind grill About Safety Instructions The Important Safety Instructions and warnings in this use and care information. Consumer: Read this manual are...
... these numbers below the control panel, on the range or cover an entire oven rack with gas. warning WARNING - It contains important use and care manual completely before using this or any questions (other appliance. For service and warranty information, see page 32. Product model and serial number label, located inside unit, behind grill About Safety Instructions The Important Safety Instructions and warnings in this use and care information. Consumer: Read this manual are...
Use & Care Manuals
Page 4
... range unless specifically recommended in place. • Turn the knobs to the "OFF" position prior to the accompanying installation instructions. Do not allow clothing to use combustible, flammable or explosive vapors and liquids (such as aerosol cans away from the burners and other service. • Before performing any type of service, make sure that the gas supply and electrical power to the range is turned off valve...
... range unless specifically recommended in place. • Turn the knobs to the "OFF" position prior to the accompanying installation instructions. Do not allow clothing to use combustible, flammable or explosive vapors and liquids (such as aerosol cans away from the burners and other service. • Before performing any type of service, make sure that the gas supply and electrical power to the range is turned off valve...

Use & Care Manuals
Page 5
... not expose the knobs or trim rings to operate it properly. • Clean the range thoroughly before operating it started. ▪▪ The fire department is in the oven. Keep the entire range, ventilation filters and range hoods free of the oven are dry before lighting a burner. • Do not heat eggs or unopened food containers such as aluminum foil, the meat probe, cookie sheets, etc. Eating spoiled...
... not expose the knobs or trim rings to operate it properly. • Clean the range thoroughly before operating it started. ▪▪ The fire department is in the oven. Keep the entire range, ventilation filters and range hoods free of the oven are dry before lighting a burner. • Do not heat eggs or unopened food containers such as aluminum foil, the meat probe, cookie sheets, etc. Eating spoiled...

Use & Care Manuals
Page 21
... When you dehydrate: 1. Press START. USDA Minimum Safe Internal Cooking Temperatures for maximum air circulation and to prevent the fruit from all the way around • Baking rack that fits inside the half sheet pan • Cheesecloth • 4 quart sauce pot with higher temperatures. 5. Operating the Oven Important Details About Meat Probe Use • You must select the specific cooking mode (BAKE, CONV BAKE, PURE CONV or CONV...
... When you dehydrate: 1. Press START. USDA Minimum Safe Internal Cooking Temperatures for maximum air circulation and to prevent the fruit from all the way around • Baking rack that fits inside the half sheet pan • Cheesecloth • 4 quart sauce pot with higher temperatures. 5. Operating the Oven Important Details About Meat Probe Use • You must select the specific cooking mode (BAKE, CONV BAKE, PURE CONV or CONV...

Use & Care Manuals
Page 24
... batter to Pure Convection or convection bake mode. Therefore, recipe 4 32 adjustments should bake cakes, quick breads, muffins and cookies in shiny, reflective pans for pies and yeast breads. Dacor cookie sheets, with the oven set to rise twice 1 before the final pan rising develops a better flavor. pes accordingly. Follow the standard recipe baking time for light, golden crusts. Cooking Tips Food Placement • Use the pan size and type...
... batter to Pure Convection or convection bake mode. Therefore, recipe 4 32 adjustments should bake cakes, quick breads, muffins and cookies in shiny, reflective pans for pies and yeast breads. Dacor cookie sheets, with the oven set to rise twice 1 before the final pan rising develops a better flavor. pes accordingly. Follow the standard recipe baking time for light, golden crusts. Cooking Tips Food Placement • Use the pan size and type...
Use & Care Manuals
Page 25
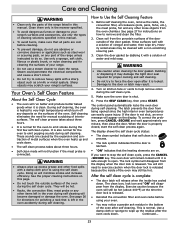
...; Use caution when cleaning the door gasket. Turn on the display. The control panel automatically locks the oven door during the self clean cycle. If the door is not shut, an error message will appear on kitchen fans or vents to help remove odors during the self clean cycle. 5. If you want to remove heavy spills with a non-scratching scouring pad. 3. You will still need for instructions on the surfaces of metal surfaces when the oven heats...
...; Use caution when cleaning the door gasket. Turn on the display. The control panel automatically locks the oven door during the self clean cycle. If the door is not shut, an error message will appear on kitchen fans or vents to help remove odors during the self clean cycle. 5. If you want to remove heavy spills with a non-scratching scouring pad. 3. You will still need for instructions on the surfaces of metal surfaces when the oven heats...

Use & Care Manuals
Page 26
... burner knobs. Dacor recommends hand dishwashing liquid. • Turn the knobs to the OFF position to use abrasive or corrosive cleaners or applicators. • If you press START, "Delay" will appear on the display and the oven door will make the self clean cycle work better and reduce smoke and odors. Press the SELF CLEAN key. 4. Clean only the outside edges of the trim rings while the knobs are removed. Care...
... burner knobs. Dacor recommends hand dishwashing liquid. • Turn the knobs to the OFF position to use abrasive or corrosive cleaners or applicators. • If you press START, "Delay" will appear on the display and the oven door will make the self clean cycle work better and reduce smoke and odors. Press the SELF CLEAN key. 4. Clean only the outside edges of the trim rings while the knobs are removed. Care...
Use & Care Manuals
Page 32
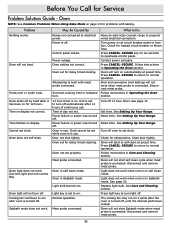
... page 13. Reset time. Reset time. Check for tripped circuit breaker or blown fuse. Oven will start to reactivate control panel. Disconnect and remove meat probe. Light bulb burned out. See page 20. Replace light bulb. Control panel locked. Attempting to broil with baking. Incorrect cooking time or temperature. Check for obstructions. Follow instructions in Care and Cleaning section. Time of continuous use. Turn off oven to set to on page 13 for six seconds to self clean at preset time. Light does not work when oven is off...
... page 13. Reset time. Reset time. Check for tripped circuit breaker or blown fuse. Oven will start to reactivate control panel. Disconnect and remove meat probe. Light bulb burned out. See page 20. Replace light bulb. Control panel locked. Attempting to broil with baking. Incorrect cooking time or temperature. Check for obstructions. Follow instructions in Care and Cleaning section. Time of continuous use. Turn off oven to set to on page 13 for six seconds to self clean at preset time. Light does not work when oven is off...

Use & Care Manuals
Page 33
... be opened. Range set to make sure air holes on the display indicates a problem that the range is assembled according to properly wired electrical connection. Have a qualified service technician check the gas regulator. Burner is distorted, yellow or very large. See Operating the Cooktop section for locations. Minimize any air drafts around the range. If lock symbol appears on position. Flame is cold. May Be Caused By What to Do Power not supplied to use...
... be opened. Range set to make sure air holes on the display indicates a problem that the range is assembled according to properly wired electrical connection. Have a qualified service technician check the gas regulator. Burner is distorted, yellow or very large. See Operating the Cooktop section for locations. Minimize any air drafts around the range. If lock symbol appears on position. Flame is cold. May Be Caused By What to Do Power not supplied to use...


