Planning Guides
Page 1
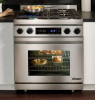
... installation instructions. See next page for service, while remaining connected. www.Dacor.com Phone: (800) 793-0093 5.14 Electrical Specifications Circuit Required Total Connected Load 240 Vac, 60 Hz., 30 Amp.* 5.7 kW (23.8 Amp.) * Two 120 Vac hot (....2 cm) 3" (7.6 cm) Backguard** Backguard* 1 1/8" (2.9 mm) to cooking surface (top of grates) from the wall for further details. Document # PG05 - 006 DR30D Distinctive Range Revised 1/26/10 Page 1/2 PLANNING GUIDE All tolerances: ±1/16" (±1.6 mm) unless otherwise stated. 46 3/8" (117.8 cm) 28 1/2" (72.4 ...
... installation instructions. See next page for service, while remaining connected. www.Dacor.com Phone: (800) 793-0093 5.14 Electrical Specifications Circuit Required Total Connected Load 240 Vac, 60 Hz., 30 Amp.* 5.7 kW (23.8 Amp.) * Two 120 Vac hot (....2 cm) 3" (7.6 cm) Backguard** Backguard* 1 1/8" (2.9 mm) to cooking surface (top of grates) from the wall for further details. Document # PG05 - 006 DR30D Distinctive Range Revised 1/26/10 Page 1/2 PLANNING GUIDE All tolerances: ±1/16" (±1.6 mm) unless otherwise stated. 46 3/8" (117.8 cm) 28 1/2" (72.4 ...
Planning Guides
Page 2
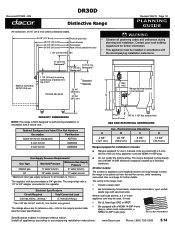
... range for service while the appliance remains connected. to change without notice. www.Dacor.com Phone: (800) 793-0093 5.15 Required Cabinet Dimensions Cutout Dimensions E F 36" (91.4 cm)* 30" (76.2 cm)** 30 1/16" (916mm) * Recommended ** Minimum Specifications subject to combustible side walls ... 3 Consult local code for exact location requirements. 4 Not applicable for safe operation. ■■ The range may be sealed. DR30D Document # PG05 - 006 Distinctive Range Revised 1/26/10 Page 2/2 PLANNING GUIDE Cabinet Layout ■■ Carefully check the location...
... range for service while the appliance remains connected. to change without notice. www.Dacor.com Phone: (800) 793-0093 5.15 Required Cabinet Dimensions Cutout Dimensions E F 36" (91.4 cm)* 30" (76.2 cm)** 30 1/16" (916mm) * Recommended ** Minimum Specifications subject to combustible side walls ... 3 Consult local code for exact location requirements. 4 Not applicable for safe operation. ■■ The range may be sealed. DR30D Document # PG05 - 006 Distinctive Range Revised 1/26/10 Page 2/2 PLANNING GUIDE Cabinet Layout ■■ Carefully check the location...

Installation Instructions
Page 6
... allow the range to be pulled out from the wall for reference only - Electrical Specifications Circuit Required Total Connected Load 240 Vac, 60 Hz., 30 Amp.* 5.7 kW (23.8 Amp.) * Two 120 Vac hot (L1 and L2), one neutral (N1) and one ground. The electrical outlet...ANSI/NFPA 70-1993* (or latest revision) and local codes and ordinances. Electrical Requirements - Electrical Specifications Circuit Required Total Connected Load 240 Vac, 60 Hz., 30 Amp. 4-wire 5.7 kW (23.8 Amp.) * The ratings above 4000 ft. (1219 m) make sure it is equipped for location). 4 For units installed...
... allow the range to be pulled out from the wall for reference only - Electrical Specifications Circuit Required Total Connected Load 240 Vac, 60 Hz., 30 Amp.* 5.7 kW (23.8 Amp.) * Two 120 Vac hot (L1 and L2), one neutral (N1) and one ground. The electrical outlet...ANSI/NFPA 70-1993* (or latest revision) and local codes and ordinances. Electrical Requirements - Electrical Specifications Circuit Required Total Connected Load 240 Vac, 60 Hz., 30 Amp. 4-wire 5.7 kW (23.8 Amp.) * The ratings above 4000 ft. (1219 m) make sure it is equipped for location). 4 For units installed...
Installation Instructions
Page 8
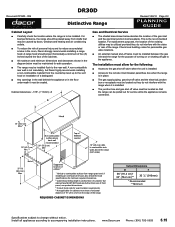
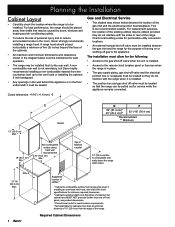
...dimensions and clearances shown in the diagram below denotes the location of the range. This is at discretion of customer but Dacor highly recommends installing a non-combustible material from drafts that the range can be installed flush to reduce accumulated smoke in the room...the range should project horizontally a minimum of five (5) inches beyond the face of utilities 3 1 Vertical to the appliance. E E F 36" (91.4 cm)* 30" (76.2 cm)** 30 1/16" (76.4 cm) * Recommended ** Minimum 13" (33.0 cm) Max.4 18" (45.7 cm) Min.1, 4 Non-combustible surface along back wall recommended...
...dimensions and clearances shown in the diagram below denotes the location of the range. This is at discretion of customer but Dacor highly recommends installing a non-combustible material from drafts that the range can be installed flush to reduce accumulated smoke in the room...the range should project horizontally a minimum of five (5) inches beyond the face of utilities 3 1 Vertical to the appliance. E E F 36" (91.4 cm)* 30" (76.2 cm)** 30 1/16" (76.4 cm) * Recommended ** Minimum 13" (33.0 cm) Max.4 18" (45.7 cm) Min.1, 4 Non-combustible surface along back wall recommended...

Installation Instructions
Page 9
... electric service provided does not meet the product specifications, do not proceed with the following sections. The customer must report cosmetic issues within 30 days of Massachusetts, this appliance must be installed by a licensed plumber or gas fitter. Parts List • 2 grates •...burner cap • 1 SimmerSear burner ring • 3 standard racks • Anti-tip bracket w/screws • Meat probe • Dacor Stainless Steel Cleaner • Literature kit Level and Adjust the Range Height Raise or lower the range to the accompanying installation instructions. Back of ...
... electric service provided does not meet the product specifications, do not proceed with the following sections. The customer must report cosmetic issues within 30 days of Massachusetts, this appliance must be installed by a licensed plumber or gas fitter. Parts List • 2 grates •...burner cap • 1 SimmerSear burner ring • 3 standard racks • Anti-tip bracket w/screws • Meat probe • Dacor Stainless Steel Cleaner • Literature kit Level and Adjust the Range Height Raise or lower the range to the accompanying installation instructions. Back of ...
Use & Care Manuals
Page 1
B Use and Care Manual Distinctive Range For use with models DR30D and DR30D-C Ta b l e o f C o n t e n t s Important Safety Instructions 1-3 Getting to Know Your Range 4-6 Setting Up Your Range 7 Operating the Cooktop 8-9 Operating the Oven 10-21 Cooking Tips 22 Care and Cleaning 23-28 Replacement Parts and Accessories 29 Before You Call For Service 30-31 Warranty and Service 32 Warranty Card Back Cover Part No. 106768 Rev.
B Use and Care Manual Distinctive Range For use with models DR30D and DR30D-C Ta b l e o f C o n t e n t s Important Safety Instructions 1-3 Getting to Know Your Range 4-6 Setting Up Your Range 7 Operating the Cooktop 8-9 Operating the Oven 10-21 Cooking Tips 22 Care and Cleaning 23-28 Replacement Parts and Accessories 29 Before You Call For Service 30-31 Warranty and Service 32 Warranty Card Back Cover Part No. 106768 Rev.

Use & Care Manuals
Page 18
... keypad and press START. warning Food safety is equipped with 2 built-in timers • You can use the delay timed features. To enter 11 hours, 30 minutes, press 1-1-3-0. To stop a timer before time runs out: • Press the TIMER 1 or TIMER 2 key twice. • The timer will stop the alarm. When...
... keypad and press START. warning Food safety is equipped with 2 built-in timers • You can use the delay timed features. To enter 11 hours, 30 minutes, press 1-1-3-0. To stop a timer before time runs out: • Press the TIMER 1 or TIMER 2 key twice. • The timer will stop the alarm. When...

Use & Care Manuals
Page 21
warning To avoid food poisoning, cook meats immediately after 30 seconds if the meat probe is best to the rack. 5. Wash and remove excess moisture from sticking to dehydrate on a drying rack. 3. Continued... 19 For ... pieces. 3. When dehydrating, you use one of the oven rack. Press START. Food Type Dehydrating Temperature Fruit 100°F Vegetables 125°F Meat 150°F Dacor recommends that is extended. One that you may need to experiment with a pan underneath to the appropriate level. 2. Cut fruits and vegetables into hold mode.
warning To avoid food poisoning, cook meats immediately after 30 seconds if the meat probe is best to the rack. 5. Wash and remove excess moisture from sticking to dehydrate on a drying rack. 3. Continued... 19 For ... pieces. 3. When dehydrating, you use one of the oven rack. Press START. Food Type Dehydrating Temperature Fruit 100°F Vegetables 125°F Meat 150°F Dacor recommends that is extended. One that you may need to experiment with a pan underneath to the appropriate level. 2. Cut fruits and vegetables into hold mode.

Use & Care Manuals
Page 24
...necessary for yeast-risen baked goods, although allowing the dough or batter to remove. In general, no recipe adjustment is very heavy, Dacor recommends the optional GlideRack oven rack. Avoid old, darkened, warped, dented, stainless steel and tin-coated pans. Cooking Tips Food Placement... decrease by the recipe for light, golden crusts. Therefore, recipe 4 32 adjustments should bake cakes, quick breads, muffins and cookies in a 30-inch oven. Take note of meat. #1, #3 and #5 with their original foil containers, placed flat on high altitude cooking for pies and...
...necessary for yeast-risen baked goods, although allowing the dough or batter to remove. In general, no recipe adjustment is very heavy, Dacor recommends the optional GlideRack oven rack. Avoid old, darkened, warped, dented, stainless steel and tin-coated pans. Cooking Tips Food Placement... decrease by the recipe for light, golden crusts. Therefore, recipe 4 32 adjustments should bake cakes, quick breads, muffins and cookies in a 30-inch oven. Take note of meat. #1, #3 and #5 with their original foil containers, placed flat on high altitude cooking for pies and...

Use & Care Manuals
Page 26
..., the cooktop parts are removed. The SimmerSear knob has a wider space between the large flame icon and the simmer icon than the standard burner knobs. Dacor recommends hand dishwashing liquid. • Turn the knobs to the OFF position to remove them . B A B B Knob Placement 24 Enter the desired start to self...; Clean the outside edges of the valve shaft. Setting the Oven to Self Clean at the time you have selected. Prepare the oven for 12:30. The grates are put them with the words "MAX GRIDDLE" go on the right burner valve stems. Cleaning the Knobs and Trim Rings A WARNING ...
..., the cooktop parts are removed. The SimmerSear knob has a wider space between the large flame icon and the simmer icon than the standard burner knobs. Dacor recommends hand dishwashing liquid. • Turn the knobs to the OFF position to remove them . B A B B Knob Placement 24 Enter the desired start to self...; Clean the outside edges of the valve shaft. Setting the Oven to Self Clean at the time you have selected. Prepare the oven for 12:30. The grates are put them with the words "MAX GRIDDLE" go on the right burner valve stems. Cleaning the Knobs and Trim Rings A WARNING ...

Use & Care Manuals
Page 30
... reinstall the lens cover, line up , it may also use . The stone is in oven wall Light socket Lens cutout 4. Cleaning the Optional Dacor Griddle and Grill Clean the griddle/grill after it is a lot of baking soda and water to wash the stone. Light bulb replacement is coated... a scouring pad or brush to bake properly. Warm water and liquid detergent are all that power to the range back on page 30. Remove stubborn spots with Dacor part number 100429. Pull the lens cover straight out. Care and Cleaning Cleaning the Oven Interior (Cont.) Replacing the Light Bulbs Optional...
... reinstall the lens cover, line up , it may also use . The stone is in oven wall Light socket Lens cutout 4. Cleaning the Optional Dacor Griddle and Grill Clean the griddle/grill after it is a lot of baking soda and water to wash the stone. Light bulb replacement is coated... a scouring pad or brush to bake properly. Warm water and liquid detergent are all that power to the range back on page 30. Remove stubborn spots with Dacor part number 100429. Pull the lens cover straight out. Care and Cleaning Cleaning the Oven Interior (Cont.) Replacing the Light Bulbs Optional...
Use & Care Manuals
Page 32
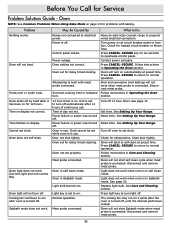
... tightly. Meat probe connected. Light does not work when meat probe is turned off 12 hour timer. Replace light bulb. Disconnect and remove meat probe. 30 Problem Nothing works. Power is connected. Follow instructions in Care and Cleaning section. See Setting Up Your Range. Turn off . Follow instructions in Operating the...
... tightly. Meat probe connected. Light does not work when meat probe is turned off 12 hour timer. Replace light bulb. Disconnect and remove meat probe. 30 Problem Nothing works. Power is connected. Follow instructions in Care and Cleaning section. See Setting Up Your Range. Turn off . Follow instructions in Operating the...
Use & Care Manuals
Page 34
... Hours: 6:00 a.m. - 5:00 p.m. factory to resolve the situation for Service section on page 30. and Canada) Business Hours: 6:00 a.m. - 4:00 p.m. Pacific Time For non-warranty repairs, call : Dacor Distinctive Service Phone: (877) 337-3226 (U.S.A. Should your experience with our service network or product... be familiar with us know. Warranty What Is Covered CERTIFICATE OF WARRANTIES: DACOR RANGES WITHIN THE FIFTY STATES OF THE U.S.A., THE DISTRICT OF COLUMBIA AND CANADA*: FULL ONE-YEAR WARRANTY If your encounter with...
... Hours: 6:00 a.m. - 5:00 p.m. factory to resolve the situation for Service section on page 30. and Canada) Business Hours: 6:00 a.m. - 4:00 p.m. Pacific Time For non-warranty repairs, call : Dacor Distinctive Service Phone: (877) 337-3226 (U.S.A. Should your experience with our service network or product... be familiar with us know. Warranty What Is Covered CERTIFICATE OF WARRANTIES: DACOR RANGES WITHIN THE FIFTY STATES OF THE U.S.A., THE DISTRICT OF COLUMBIA AND CANADA*: FULL ONE-YEAR WARRANTY If your encounter with...