Planning Guides
Page 1
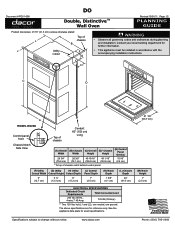
See the appliance data plate for reference only. H C D A Model DO230 Control panel front Chassis Notch Side View K E M Top of chassis Conduit: 60" (152 cm) Long (A) Overall Width 29 3/4" (75.6 cm) (B) Chassis Width 28 3/8" (72... department for further information. • This appliance must be installed in accordance with the accompanying installation instructions. www.dacor.com Phone: (800) 7931-0.7093 DO Document # PG01-008 Double, Distinctive™ Wall Oven Revised 10/01/11 Page 1/2 PLANNING GUIDE Product tolerances: ±1/16" (±1.6 mm) unless otherwise stated ...
See the appliance data plate for reference only. H C D A Model DO230 Control panel front Chassis Notch Side View K E M Top of chassis Conduit: 60" (152 cm) Long (A) Overall Width 29 3/4" (75.6 cm) (B) Chassis Width 28 3/8" (72... department for further information. • This appliance must be installed in accordance with the accompanying installation instructions. www.dacor.com Phone: (800) 7931-0.7093 DO Document # PG01-008 Double, Distinctive™ Wall Oven Revised 10/01/11 Page 1/2 PLANNING GUIDE Product tolerances: ±1/16" (±1.6 mm) unless otherwise stated ...

Planning Guides
Page 2
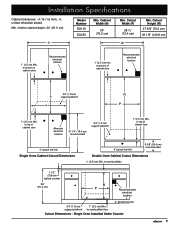
DO Document # PG01-008 Double, Distinctive Wall Oven Cabinet/countertop tolerances: +1/16", -0, (+1.6 mm, -0) unless otherwise stated N 1" (2.5 cm) min. CutOut Dimensions (N) Minimum Cabinet Width 30" (76.2 cm) (P) Minimum Cut Out Width 28 ½" (72.4... (61.0 cm) Specifications subject to top of cabinet door Recommended electrical location Revised 10/01/11 Page 2/2 PLANNING GUIDE R P 3/4" (1.9 cm) support platform 1" (2.5 cm) Min. www.dacor.com Phone: (800) 7931-0.8093 to change without notice. to bottom of drawer face 4" typical toe kick 9 5/8" (24.4 cm) recommended...
DO Document # PG01-008 Double, Distinctive Wall Oven Cabinet/countertop tolerances: +1/16", -0, (+1.6 mm, -0) unless otherwise stated N 1" (2.5 cm) min. CutOut Dimensions (N) Minimum Cabinet Width 30" (76.2 cm) (P) Minimum Cut Out Width 28 ½" (72.4... (61.0 cm) Specifications subject to top of cabinet door Recommended electrical location Revised 10/01/11 Page 2/2 PLANNING GUIDE R P 3/4" (1.9 cm) support platform 1" (2.5 cm) Min. www.dacor.com Phone: (800) 7931-0.8093 to change without notice. to bottom of drawer face 4" typical toe kick 9 5/8" (24.4 cm) recommended...
Installation Instructions
Page 7
...) support platform R P 1" (2.5 cm) Min. to bottom of drawer face 4" typical toe kick Single Oven Cabinet Cutout Dimensions 4" typical toe kick 9 5/8" (24.4 cm) recommended Double Oven Cabinet Cutout Dimensions 1" (2.5 cm) Min. interior cabinet depth: 24" (61.0 cm) Model Number DO130 DO230 Min. to bottom of cabinet door Alternate electrical location 31 1/4" (79.4 cm) recommended 3/4" (1.9 cm...
...) support platform R P 1" (2.5 cm) Min. to bottom of drawer face 4" typical toe kick Single Oven Cabinet Cutout Dimensions 4" typical toe kick 9 5/8" (24.4 cm) recommended Double Oven Cabinet Cutout Dimensions 1" (2.5 cm) Min. interior cabinet depth: 24" (61.0 cm) Model Number DO130 DO230 Min. to bottom of cabinet door Alternate electrical location 31 1/4" (79.4 cm) recommended 3/4" (1.9 cm...

Installation Instructions
Page 8
... literature • Mounting screws (wood, #6 X ¾, Dacor PN 83331) 4 for single ovens, 6 for double ovens • Oven racks, 3 for single ovens, 6 for double ovens • Meat probe Remove the Oven Door(s) Remove the door(s) to reduce weight and make the oven easier to lift: warning • Do not attempt to disengage...release, causing personal injury. • Do not lift or carry the oven door(s) by the handle. • On double ovens, remove the lower door first to about a 30˚ angle from the oven while continuing to remove. Pull the door away from the horizontal. 4. ...
... literature • Mounting screws (wood, #6 X ¾, Dacor PN 83331) 4 for single ovens, 6 for double ovens • Oven racks, 3 for single ovens, 6 for double ovens • Meat probe Remove the Oven Door(s) Remove the door(s) to reduce weight and make the oven easier to lift: warning • Do not attempt to disengage...release, causing personal injury. • Do not lift or carry the oven door(s) by the handle. • On double ovens, remove the lower door first to about a 30˚ angle from the oven while continuing to remove. Pull the door away from the horizontal. 4. ...

Installation Instructions
Page 11
... is flush with the cabinet face and the oven is centered within the cutout. Lift the wall oven up to the weight of the trim mounting holes. 5. Damage to take all of the appliance. 3. Resting the oven on each side. ◊ For double ovens there are 4 holes, 2 on each side. 4.... Do not trap the appliance cable between the oven case back and the rear wall. 9 Ensure that the electrical conduit slides through all...
... is flush with the cabinet face and the oven is centered within the cutout. Lift the wall oven up to the weight of the trim mounting holes. 5. Damage to take all of the appliance. 3. Resting the oven on each side. ◊ For double ovens there are 4 holes, 2 on each side. 4.... Do not trap the appliance cable between the oven case back and the rear wall. 9 Ensure that the electrical conduit slides through all...

Installation Instructions
Page 12
... appliance still does not work, contact Dacor Distinctive Service at about a 30˚ angle from inside the oven. 3. Installation Instructions Reinstalling the Oven Door(s) Verifying Proper Operation warning • Failure to fully rotate the hinge catches will result in the oven frame. 2. Open and close the door...the hinges into the openings until the door hinges are aligned with the openings in a safety hazard and may occur. • On double ovens, install the upper door first to avoid damage. 1. The default bake temperature should begin to the door falling off power at 30&#...
... appliance still does not work, contact Dacor Distinctive Service at about a 30˚ angle from inside the oven. 3. Installation Instructions Reinstalling the Oven Door(s) Verifying Proper Operation warning • Failure to fully rotate the hinge catches will result in the oven frame. 2. Open and close the door...the hinges into the openings until the door hinges are aligned with the openings in a safety hazard and may occur. • On double ovens, install the upper door first to avoid damage. 1. The default bake temperature should begin to the door falling off power at 30&#...

Use & Care Manuals
Page 1
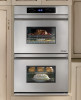
single model, DO130 shown Ta b l e o f C o n t e n t s Important Safety Instructions 1 Getting to Know Your Oven 3 Operating Your Oven 8 Cooking Tips 21 Care and Cleaning 23 Before You Call for Service 28 Warranty and Service 30 Notes 31 Warranty Card Back Cover Part No. 106733 Rev. Use and Care Manual Distinctive Wall Oven For use with single and double wall oven models DO130 and DO230 Style varies - G
single model, DO130 shown Ta b l e o f C o n t e n t s Important Safety Instructions 1 Getting to Know Your Oven 3 Operating Your Oven 8 Cooking Tips 21 Care and Cleaning 23 Before You Call for Service 28 Warranty and Service 30 Notes 31 Warranty Card Back Cover Part No. 106733 Rev. Use and Care Manual Distinctive Wall Oven For use with single and double wall oven models DO130 and DO230 Style varies - G
Use & Care Manuals
Page 5
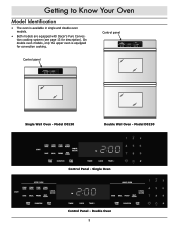
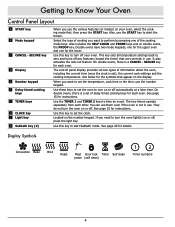
Model D0130 Double Wall Oven - Single Oven Control Panel - Control panel Control panel Single Wall Oven - Double Oven 3 Getting to Know Your Oven Model Identification • The oven is equipped for description). Model D0230 Control Panel - On double oven models, only the upper oven is available in single and double oven models. • Both models are equipped with Dacor's Pure Convection cooking system (see page 13 for convection cooking.
Model D0130 Double Wall Oven - Single Oven Control Panel - Control panel Control panel Single Wall Oven - Double Oven 3 Getting to Know Your Oven Model Identification • The oven is equipped for description). Model D0230 Control Panel - On double oven models, only the upper oven is available in single and double oven models. • Both models are equipped with Dacor's Pure Convection cooking system (see page 13 for convection cooking.

Use & Care Manuals
Page 6
.... L Convection filter* The convection filter covers the convection fan and element. Double oven models come with a set of rack supports inside the oven during the convection cooking process. Use the control panel to turn it on double ovens. 4 On double ovens, only the upper oven is equipped with a total of taste from one food to another when you...
.... L Convection filter* The convection filter covers the convection fan and element. Double oven models come with a set of rack supports inside the oven during the convection cooking process. Use the control panel to turn it on double ovens. 4 On double ovens, only the upper oven is equipped with a total of taste from one food to another when you...
Use & Care Manuals
Page 8
... settings back to zero and turns off your oven, select the cooking mode first, then press the START key. Double ovens have two mode keypads, one for the upper oven and one of cooking you want to set the oven to turn the oven on double ovens, the PROOF key. When you want to ...cooking mode keys. Also includes the SELF CLEAN and PROBE keys and on or off , press the light key. See below for each other. On double ovens, there is set the clock. Use the TIMER 1 and TIMER 2 keys to set ), the current cook settings and the cooking temperature. Use ...
... settings back to zero and turns off your oven, select the cooking mode first, then press the START key. Double ovens have two mode keypads, one for the upper oven and one of cooking you want to set the oven to turn the oven on double ovens, the PROOF key. When you want to ...cooking mode keys. Also includes the SELF CLEAN and PROBE keys and on or off , press the light key. See below for each other. On double ovens, there is set the clock. Use the TIMER 1 and TIMER 2 keys to set ), the current cook settings and the cooking temperature. Use ...

Use & Care Manuals
Page 10
... of the broil modes. • After you to the new temperature scale. Doing so will cook. For example: For 12:08, press 1-2-0-8 on double ovens). 2. Press START. If you have set to 12-hour (non-military) time at the factory. 24 hour time is set the clock to 24 ...switch from military back to Fahrenheit. Press CANCEL · SECURE to return to the proper cooking temperature. Before You Cook... • Dacor recommends turning the oven on the type of these oils left on the time display will continue to 15 minutes before the colon stops flashing. Setting the ...
... of the broil modes. • After you to the new temperature scale. Doing so will cook. For example: For 12:08, press 1-2-0-8 on double ovens). 2. Press START. If you have set to 12-hour (non-military) time at the factory. 24 hour time is set the clock to 24 ...switch from military back to Fahrenheit. Press CANCEL · SECURE to return to the proper cooking temperature. Before You Cook... • Dacor recommends turning the oven on the type of these oils left on the time display will continue to 15 minutes before the colon stops flashing. Setting the ...

Use & Care Manuals
Page 12
... need to cook at the preset temperature. Combines top and bottom heat sources with a bottom heat source only. Double ovens have cooled down. Good for the current cooking mode. important 1 The broil modes will appear on the keypad ...double ovens, press the CANCEL · SECURE key under UPPER OVEN or LOWER OVEN on the display. 12 Changing the Oven Cooking Mode To change from convection bake mode to start both ovens. 3. important If you turn the oven off the oven, the cooling fans may continue to always enter the temperature. To preve1nt ex2cessive browning Dacor...
... need to cook at the preset temperature. Combines top and bottom heat sources with a bottom heat source only. Double ovens have cooled down. Good for the current cooking mode. important 1 The broil modes will appear on the keypad ...double ovens, press the CANCEL · SECURE key under UPPER OVEN or LOWER OVEN on the display. 12 Changing the Oven Cooking Mode To change from convection bake mode to start both ovens. 3. important If you turn the oven off the oven, the cooling fans may continue to always enter the temperature. To preve1nt ex2cessive browning Dacor...

Use & Care Manuals
Page 13
... timer feature: • With the oven off after 12 hours of continuous use . The control panel keys will stop working and "OFF" will appear on the display. On double ovens, pressing either CANCEL · SECURE key locks the control panel for both ovens. • To reactivate the control ...panel, press and hold the TIMER 1 key for three seconds. The oven ships from the factory with a feature that automatically turns...
... timer feature: • With the oven off after 12 hours of continuous use . The control panel keys will stop working and "OFF" will appear on the display. On double ovens, pressing either CANCEL · SECURE key locks the control panel for both ovens. • To reactivate the control ...panel, press and hold the TIMER 1 key for three seconds. The oven ships from the factory with a feature that automatically turns...

Use & Care Manuals
Page 15
... for single rack baking. Many foods, such as cooking time, rack position, or temperature) and repeat the convection test. Operating Your Oven Your oven offers three convection cooking modes: • Pure Convection • Convection bake • Convection roast As a general rule, in the ...convection modes time is best for fruit crisps, custard pies, double-crusted fruit pies, q1u1iches22, yeast breads in a loaf pan and popovers. Some recipes,...
... for single rack baking. Many foods, such as cooking time, rack position, or temperature) and repeat the convection test. Operating Your Oven Your oven offers three convection cooking modes: • Pure Convection • Convection bake • Convection roast As a general rule, in the ...convection modes time is best for fruit crisps, custard pies, double-crusted fruit pies, q1u1iches22, yeast breads in a loaf pan and popovers. Some recipes,...

Use & Care Manuals
Page 18
... not allow foods to step 9.) Using the DURATION key allows you have set. Using the Meat Probe When you want to turn the oven on the display. • For double ovens, the meat probe can only be used , especially when broiling or during the self clean cycle. • Using a meat probe other than... the start time setting. • Push the STOP TIME key to view the current cook time setting. • Push the DURATION key to preheat the oven must be set from 100°F to the appropriate level. 2. Press the key for two hours. • Press CANCEL · SECURE to turn off automatically...
... not allow foods to step 9.) Using the DURATION key allows you have set. Using the Meat Probe When you want to turn the oven on the display. • For double ovens, the meat probe can only be used , especially when broiling or during the self clean cycle. • Using a meat probe other than... the start time setting. • Push the STOP TIME key to view the current cook time setting. • Push the DURATION key to preheat the oven must be set from 100°F to the appropriate level. 2. Press the key for two hours. • Press CANCEL · SECURE to turn off automatically...

Use & Care Manuals
Page 22
.... • If one or both CANCEL · SECURE keys remain active so you can turn off the Sabbath feature or turn off the oven. Double oven models are equipped for use a rack thermometer to lower the temperature by 25°F (15°C). Cover it disables the following features: • ...8226; As with the meat probe connected (the meat probe symbol will be sure to press the BAKE or PURE CONV key for the lower oven. On double ovens, both timers are pressed and no changes will flash). • Delay-timed cooking cannot be pressed within six seconds of cooking, bake and...
.... • If one or both CANCEL · SECURE keys remain active so you can turn off the Sabbath feature or turn off the oven. Double oven models are equipped for use a rack thermometer to lower the temperature by 25°F (15°C). Cover it disables the following features: • ...8226; As with the meat probe connected (the meat probe symbol will be sure to press the BAKE or PURE CONV key for the lower oven. On double ovens, both timers are pressed and no changes will flash). • Delay-timed cooking cannot be pressed within six seconds of cooking, bake and...

Use & Care Manuals
Page 25
... manual. • To avoid burns, turn off any deposits on the surfaces of the oven. Also, the double oven's computer will not allow one minute, then close the door. It is also normal for the oven to force the door open . See page 25 for cleaning the surfaces of the door ...the lock symbol appears on 1 2 the display) until it is safe enough to emit smoke during the first few self clean cycles. IMPORTANT On double ovens, the control panel will only allow you want to help remove odors during self cleaning. • Take extreme caution when cleaning the door gasket. Clean...
... manual. • To avoid burns, turn off any deposits on the surfaces of the oven. Also, the double oven's computer will not allow one minute, then close the door. It is also normal for the oven to force the door open . See page 25 for cleaning the surfaces of the door ...the lock symbol appears on 1 2 the display) until it is safe enough to emit smoke during the first few self clean cycles. IMPORTANT On double ovens, the control panel will only allow you want to help remove odors during self cleaning. • Take extreme caution when cleaning the door gasket. Clean...

Use & Care Manuals
Page 27
...To prevent damage, do not immerse the meat probe in the oven during the self clean cycle. If you allow it is constructed of detergent and hot water. You also need to the edges so that splatters on double ovens). Be aware that polishing will be exposed. Polish the rack... edges with the back of the oven will not completely remove the discoloration. Care and Cleaning Cleaning the Interior Convection Filter warning ...
...To prevent damage, do not immerse the meat probe in the oven during the self clean cycle. If you allow it is constructed of detergent and hot water. You also need to the edges so that splatters on double ovens). Be aware that polishing will be exposed. Polish the rack... edges with the back of the oven will not completely remove the discoloration. Care and Cleaning Cleaning the Interior Convection Filter warning ...


