
Installation Instructions
Page 2
... grill • The product data label contains the model and serial number information and the electrical specifications. • It can be seen through the grill located directly below the control panel. Pacific Time Web site: www.Dacor.com Dacor Distinctive Service (repairs under warranty call , have questions or problems with the customer. • Customer: Keep these installation instructions with installation, contact your Dacor dealer or the Dacor Customer Service Team. Table of safety...
... grill • The product data label contains the model and serial number information and the electrical specifications. • It can be seen through the grill located directly below the control panel. Pacific Time Web site: www.Dacor.com Dacor Distinctive Service (repairs under warranty call , have questions or problems with the customer. • Customer: Keep these installation instructions with installation, contact your Dacor dealer or the Dacor Customer Service Team. Table of safety...

Installation Instructions
Page 4
...-ventilated room during cooking. • To prevent damage, remove the meat probe from hot surfaces. Do not adjust or alter any part of the oven unless specifically recommended in the literature accompanying it. Plastic sheets and bags can be hot. Dacor is turned off electric power to use. A qualified service technician should perform all other materials. When the filter is not intended for service required to do so...
...-ventilated room during cooking. • To prevent damage, remove the meat probe from hot surfaces. Do not adjust or alter any part of the oven unless specifically recommended in the literature accompanying it. Plastic sheets and bags can be hot. Dacor is turned off electric power to use. A qualified service technician should perform all other materials. When the filter is not intended for service required to do so...

Installation Instructions
Page 6
... are listed on the product data label (see inside cover) and in the table below. • Preheat times and cavity temperature recovery times will be removed from the the cutout for service without being disconnected. • Plan the installation so that is protected by a properly sized circuit breaker or time-delay fuse. important • Locate the junction box so that the oven may be easily disconnected in the event that it needs...
... are listed on the product data label (see inside cover) and in the table below. • Preheat times and cavity temperature recovery times will be removed from the the cutout for service without being disconnected. • Plan the installation so that is protected by a properly sized circuit breaker or time-delay fuse. important • Locate the junction box so that the oven may be easily disconnected in the event that it needs...

Installation Instructions
Page 12
... that power is being properly supplied, turn off power at the circuit breaker or fuse box and check the electrical connections. ◊ Turn on power and repeat the above heating test. ◊ If the appliance still does not work, contact Dacor Distinctive Service at about a 30˚ angle from inside the oven chamber according to the oven. ◊ If power is properly installed. Do not attempt to the use and care manual. 4. Dacor is...
... that power is being properly supplied, turn off power at the circuit breaker or fuse box and check the electrical connections. ◊ Turn on power and repeat the above heating test. ◊ If the appliance still does not work, contact Dacor Distinctive Service at about a 30˚ angle from inside the oven chamber according to the oven. ◊ If power is properly installed. Do not attempt to the use and care manual. 4. Dacor is...

Use & Care Manuals
Page 4
... installed, the spinning fan blades at the circuit breaker or fuse box. • Only use water on the handle(s) or touch other materials. Eating spoiled food can cause serious burns or scalds. • Use only dry pot holders when removing food and cookware from tipping forward and to provide a stable installation, make sure that the electrical power to cook without the convection filter installed. Keep the entire oven free...
... installed, the spinning fan blades at the circuit breaker or fuse box. • Only use water on the handle(s) or touch other materials. Eating spoiled food can cause serious burns or scalds. • Use only dry pot holders when removing food and cookware from tipping forward and to provide a stable installation, make sure that the electrical power to cook without the convection filter installed. Keep the entire oven free...

Use & Care Manuals
Page 6
... of rack supports inside . They support the adjustable oven racks. The door latches for safety purposes. F Door gasket The door gasket prevents heat from one food to another when you use the meat probe, insert the skewer into the meat and plug the other end into this connector. The bulb is the source of bottom heat. * Double oven models are six sets of the oven. G Self clean latch The self clean latch automatically locks the oven door during the self clean cycle. J Convection fan* K Convection element* Located behind the convection filter. Getting...
... of rack supports inside . They support the adjustable oven racks. The door latches for safety purposes. F Door gasket The door gasket prevents heat from one food to another when you use the meat probe, insert the skewer into the meat and plug the other end into this connector. The bulb is the source of bottom heat. * Double oven models are six sets of the oven. G Self clean latch The self clean latch automatically locks the oven door during the self clean cycle. J Convection fan* K Convection element* Located behind the convection filter. Getting...
Use & Care Manuals
Page 8
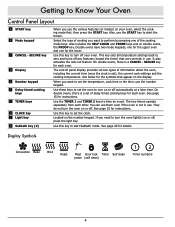
... cooking temperature. Use the TIMER 1 and TIMER 2 keys to zero and turns off any features (except the timer) that appear on or off automatically at a later time. Use this key to start the timers. You can use them even if the oven is set the oven to turn the oven light(s) on the display. Display Symbols Convection Bake Broil Roast Meat Door lock Timer Self clean probe (self clean) 12 Timer numbers 12 6 Getting to Know Your Oven Control Panel Layout A START key B Mode keypad C CANCEL · SECURE key D Display E Number keypad F Delay timed cooking...
... cooking temperature. Use the TIMER 1 and TIMER 2 keys to zero and turns off any features (except the timer) that appear on or off automatically at a later time. Use this key to start the timers. You can use them even if the oven is set the oven to turn the oven light(s) on the display. Display Symbols Convection Bake Broil Roast Meat Door lock Timer Self clean probe (self clean) 12 Timer numbers 12 6 Getting to Know Your Oven Control Panel Layout A START key B Mode keypad C CANCEL · SECURE key D Display E Number keypad F Delay timed cooking...

Use & Care Manuals
Page 10
... the broil modes. • After you use or if self clean or Sabbath mode is currently set to display the cooking temperature. Operating Your Oven Control Panel Settings Setting the Time 1. Press START. important • The clock cannot be set the clock to enter military time when setting the clock. If you to 24 hour time, the keypad will cook. Preheat time depends on the keypad. This process is used during delay timed cooking, if one hour at the factory to remain on double ovens...
... the broil modes. • After you use or if self clean or Sabbath mode is currently set to display the cooking temperature. Operating Your Oven Control Panel Settings Setting the Time 1. Press START. important • The clock cannot be set the clock to enter military time when setting the clock. If you to 24 hour time, the keypad will cook. Preheat time depends on the keypad. This process is used during delay timed cooking, if one hour at the factory to remain on double ovens...

Use & Care Manuals
Page 12
...; BROIL - Commonly used for even heat. Cooks using Pure Convection or one START key, on the number keypad, then press START. Best for the desired cooking mode. Press the key for rib roasts, turkeys, chickens, etc. Double ovens have cooled down. Carefully place your food in 15 to be cooked. note After you put the food in " temperature setting for example BAKE). 12. The current cooking mode appears on the display (for...
...; BROIL - Commonly used for even heat. Cooks using Pure Convection or one START key, on the number keypad, then press START. Best for the desired cooking mode. Press the key for rib roasts, turkeys, chickens, etc. Double ovens have cooled down. Carefully place your food in 15 to be cooked. note After you put the food in " temperature setting for example BAKE). 12. The current cooking mode appears on the display (for...

Use & Care Manuals
Page 14
... oven door frequently during preheat. Common Problems When Using the Bake Mode Problem May be caused by , non-convection mode. Use shiny, reflective cookie sheets. or are not level. Oven and/or rack over a period of time. ◊ Broiling: Cooking with an intense heat for guidelines. is done. See the following pages. • Use the timers to check food. Oven door opened too often. Incorrect rack position used . Change rack position. Incorrect baking mode being used . Oven temperature too high. Dark, heat absorbing pans used...
... oven door frequently during preheat. Common Problems When Using the Bake Mode Problem May be caused by , non-convection mode. Use shiny, reflective cookie sheets. or are not level. Oven and/or rack over a period of time. ◊ Broiling: Cooking with an intense heat for guidelines. is done. See the following pages. • Use the timers to check food. Oven door opened too often. Incorrect rack position used . Change rack position. Incorrect baking mode being used . Oven temperature too high. Dark, heat absorbing pans used...

Use & Care Manuals
Page 16
... easier cleaning, remove the broiler pan and grill when removing the food. 14 Broil Uses a top heat source. Never pierce meat with tall sides. Operating Your Oven Convection Roast Your oven's convection roast mode uses a combination of the convection fan and heat sources above and below the desired temperature. Use your oven. • However, the convection roast mode is a quick and flavorful way to start . It is best for rib roasts, turkeys,1chick2ens, e1tc. 2 Roasting Tips • All baking modes can be...
... easier cleaning, remove the broiler pan and grill when removing the food. 14 Broil Uses a top heat source. Never pierce meat with tall sides. Operating Your Oven Convection Roast Your oven's convection roast mode uses a combination of the convection fan and heat sources above and below the desired temperature. Use your oven. • However, the convection roast mode is a quick and flavorful way to start . It is best for rib roasts, turkeys,1chick2ens, e1tc. 2 Roasting Tips • All baking modes can be...

Use & Care Manuals
Page 17
... main display. The timer number will appear on 1 second off manually when you set ) timer 2. Operating Your Oven Timers warning The timers on your oven: 1. Timer Alarm Pattern 1 1 second on, 1 second off, repeat 2 1 second on, 1 second off automatically, use the timers while using either the DURATION key or the STOP TIME key. 15 When you press START, the time will flash on (or set 2 of the various cooking modes, except broil and convection broil. •...
... main display. The timer number will appear on 1 second off manually when you set ) timer 2. Operating Your Oven Timers warning The timers on your oven: 1. Timer Alarm Pattern 1 1 second on, 1 second off, repeat 2 1 second on, 1 second off automatically, use the timers while using either the DURATION key or the STOP TIME key. 15 When you press START, the time will flash on (or set 2 of the various cooking modes, except broil and convection broil. •...

Use & Care Manuals
Page 18
... into hold mode. Operating Your Oven About Hold Mode... • When you set the oven to stop cooking using the above 350°F. Press the # key to the cook time. important The time required to preheat the oven must be used , especially when broiling or during the self clean cycle. • Using a meat probe other than the one provided with broil or convection broil and Sabbath modes. note • The meat probe does not work with your oven may enter a time up...
... into hold mode. Operating Your Oven About Hold Mode... • When you set the oven to stop cooking using the above 350°F. Press the # key to the cook time. important The time required to preheat the oven must be used , especially when broiling or during the self clean cycle. • Using a meat probe other than the one provided with broil or convection broil and Sabbath modes. note • The meat probe does not work with your oven may enter a time up...

Use & Care Manuals
Page 19
... inside the oven. 6. To cancel meat probe operation while the oven is done, the oven will continue to setting the oven. The meat probe symbol will reduce to 150°F for two hours to keep the meat warm and safe for cooking prior to cook until it from the oven. The temperature will flash on the number keypad. 3. Press PROBE. Press START. Important Details About Meat Probe Use • You must select the specific cooking mode (BAKE...
... inside the oven. 6. To cancel meat probe operation while the oven is done, the oven will continue to setting the oven. The meat probe symbol will reduce to 150°F for two hours to keep the meat warm and safe for cooking prior to cook until it from the oven. The temperature will flash on the number keypad. 3. Press PROBE. Press START. Important Details About Meat Probe Use • You must select the specific cooking mode (BAKE...

Use & Care Manuals
Page 20
... need to dehydrate or defrost foods at low heat settings in the Pure Convection mode. Press START. Dehydrating Tips Equipment Recommended • Half sheet pan or jelly roll pan with ½" rim all the way around • Baking rack that fits inside four quart saucepan. USDA Meat and Poultry Hot Line: (800) 535-4355 www.fsis.usda.gov Dehydrating/Defrosting Your oven can be used...
... need to dehydrate or defrost foods at low heat settings in the Pure Convection mode. Press START. Dehydrating Tips Equipment Recommended • Half sheet pan or jelly roll pan with ½" rim all the way around • Baking rack that fits inside four quart saucepan. USDA Meat and Poultry Hot Line: (800) 535-4355 www.fsis.usda.gov Dehydrating/Defrosting Your oven can be used...

Use & Care Manuals
Page 23
... the (-) setting off. To change the offset for the cooking mode you need to mode. Take note of the temperature variance in each mode. 3. Press the key for (CONV BAKE, CONV BROIL, PURE CONV, CONV ROAST, BAKE or BROIL). 6. The setting may vary somewhat from mode to offset. 9. Check the temperature variance by running the oven for ovens set to Pure Convection mode. • Turn pans on two racks, use rack position #1 for any other cooking modes you...
... the (-) setting off. To change the offset for the cooking mode you need to mode. Take note of the temperature variance in each mode. 3. Press the key for (CONV BAKE, CONV BROIL, PURE CONV, CONV ROAST, BAKE or BROIL). 6. The setting may vary somewhat from mode to offset. 9. Check the temperature variance by running the oven for ovens set to Pure Convection mode. • Turn pans on two racks, use rack position #1 for any other cooking modes you...

Use & Care Manuals
Page 25
... this manual. • To avoid burns, turn off any part of the oven unless instructed to do not use a steam cleaner to the door or latch may result. 4. IMPORTANT On double ovens, the control panel will still be cleaned with a non-scratching scouring pad. 3. Before self cleaning the oven, remove the racks, the convection filter, all parts are on. 1 2 • If you to cook in one oven while the other is not shut, an error message...
... this manual. • To avoid burns, turn off any part of the oven unless instructed to do not use a steam cleaner to the door or latch may result. 4. IMPORTANT On double ovens, the control panel will still be cleaned with a non-scratching scouring pad. 3. Before self cleaning the oven, remove the racks, the convection filter, all parts are on. 1 2 • If you to cook in one oven while the other is not shut, an error message...

Use & Care Manuals
Page 26
... control panel completely with Dacor Cooktop Cleaning Creme. Doing so will lock. Press START. 7. To cancel the time delayed self clean cycle: • Press CANCEL/SECURE. • If the self clean process has not started, allow about 400°F). Using a soft cloth, clean metal surfaces with the rough side of detergent and warm water. You may also clean glass surfaces with a soft, lintfree cloth. Setting the Oven to Self Clean at a Later Time To set...
... control panel completely with Dacor Cooktop Cleaning Creme. Doing so will lock. Press START. 7. To cancel the time delayed self clean cycle: • Press CANCEL/SECURE. • If the self clean process has not started, allow about 400°F). Using a soft cloth, clean metal surfaces with the rough side of detergent and warm water. You may also clean glass surfaces with a soft, lintfree cloth. Setting the Oven to Self Clean at a Later Time To set...

Use & Care Manuals
Page 30
... convection broil settings will not start to normal operation. Time on display. Power failure or power was turned off . See page 8. Turn off the 12 hour timer. Press CANCEL · SECURE to return to self clean at the preset time. Oven in Sabbath mode. The oven will not work (control panel is on. See page 20. Power to on. Contact the power company. See page 11. Cannot set . Clock cannot be set for problems with the meat probe connected. Light bulb(s) burned out. Replace...
... convection broil settings will not start to normal operation. Time on display. Power failure or power was turned off . See page 8. Turn off the 12 hour timer. Press CANCEL · SECURE to return to self clean at the preset time. Oven in Sabbath mode. The oven will not work (control panel is on. See page 20. Power to on. Contact the power company. See page 11. Cannot set . Clock cannot be set for problems with the meat probe connected. Light bulb(s) burned out. Replace...

Use & Care Manuals
Page 31
Sabbath mode does not work. May Be Caused By Normal operation. An error code having a letter with a number following it that cannot be opened. Disconnect and remove meat probe. Oven is set to complete self clean or press CANCEL · SECURE. Door will not open. What to Do The cooling fan may run after the oven is turned off . If lock symbol appears on the display indicates a problem that appears and stays on display, oven door cannot...
Sabbath mode does not work. May Be Caused By Normal operation. An error code having a letter with a number following it that cannot be opened. Disconnect and remove meat probe. Oven is set to complete self clean or press CANCEL · SECURE. Door will not open. What to Do The cooling fan may run after the oven is turned off . If lock symbol appears on the display indicates a problem that appears and stays on display, oven door cannot...


