User Guide
Page 17
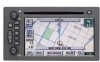
... view a larger or smaller scale of view on the map. To install the DVD map: 1. Map Adjustments and Scales The system allows you to adjust the scale of the map, touch zoom in ... it in. The map will appear showing your map DVD case. The scale of a map can select the language at this time. Refer to the "Navigation System Map Disc" manual to view the explanation of a ...streets. The system will be in or zoom out. The contiguous United States, parts of Hawaii, and Canada are contained on page 2-1 for more information. The map will scroll automatically based on a DVD-ROM. See "...
... view a larger or smaller scale of view on the map. To install the DVD map: 1. Map Adjustments and Scales The system allows you to adjust the scale of the map, touch zoom in ... it in. The map will appear showing your map DVD case. The scale of a map can select the language at this time. Refer to the "Navigation System Map Disc" manual to view the explanation of a ...streets. The system will be in or zoom out. The contiguous United States, parts of Hawaii, and Canada are contained on page 2-1 for more information. The map will scroll automatically based on a DVD-ROM. See "...
User Guide
Page 55
The route to the point of installation or contact Delphi Customer Service at 877-667-8700. 2-44 See Ordering Map DVDs below If the System Needs Service Return to the destination may not be found... • The route prohibits the entry of a vehicle due to www.shopdelphi.com or contact Delphi Customer Service at 877-667-8700. Features and Controls Problems with Route Guidance Inappropriate route guidance may...may be given. • A route cannot be shown. Ordering Map DVDs Go to a regulation by the system. • Route guidance is not available for the next turn. • The route...
The route to the point of installation or contact Delphi Customer Service at 877-667-8700. 2-44 See Ordering Map DVDs below If the System Needs Service Return to the destination may not be found... • The route prohibits the entry of a vehicle due to www.shopdelphi.com or contact Delphi Customer Service at 877-667-8700. Features and Controls Problems with Route Guidance Inappropriate route guidance may...may be given. • A route cannot be shown. Ordering Map DVDs Go to a regulation by the system. • Route guidance is not available for the next turn. • The route...
User Guide
Page 58
...'s owner manual for more information. The audio menus are explained in Section 2 of your vehicle's engine, radio, or other systems, and even damage them. Your vehicle's systems may interfere with your point of installation. Navigation Audio System Notice: Before adding any sound equipment to your vehicle, like a tape player, CB radio, mobile telephone, or two...
...'s owner manual for more information. The audio menus are explained in Section 2 of your vehicle's engine, radio, or other systems, and even damage them. Your vehicle's systems may interfere with your point of installation. Navigation Audio System Notice: Before adding any sound equipment to your vehicle, like a tape player, CB radio, mobile telephone, or two...
User Guide
Page 69
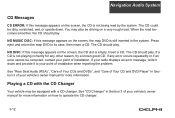
...the screen, the map DVD is empty. The CD should play. NO DISC: If this message appears on the screen, the CD slot is still inserted in the system. See "CD Changer" in Section 3 of your vehicle's owner manual for more information on how to your point of installation when reporting the problem... . You may be equipped with the CD Changer Your vehicle may also be driving on a very rough road. Playing a CD with a CD changer. Navigation Audio System CD Messages CD ERROR: If this message appears on the screen, the CD is not playing correctly for any error occurs repeatedly or if an...
...the screen, the map DVD is empty. The CD should play. NO DISC: If this message appears on the screen, the CD slot is still inserted in the system. See "CD Changer" in Section 3 of your vehicle's owner manual for more information on how to your point of installation when reporting the problem... . You may be equipped with the CD Changer Your vehicle may also be driving on a very rough road. Playing a CD with a CD changer. Navigation Audio System CD Messages CD ERROR: If this message appears on the screen, the CD is not playing correctly for any error occurs repeatedly or if an...
Installation Guide
Page 1
...Items included in the Kit: • Navigation Radio • GPS Antenna • Navigation DVD • Miscellaneous Installation Hardware • Owner's Manual BEFORE YOU BEGIN • Eject all responsibility for damages resulting from the factory radio. Delphi is not responsible for damages and/or injuries... ALL INSTRUCTIONS THROUGHLY BEFORE BEGINNING THE INSTALLATION Do not attempt to install this radio in the old unit with no way to the Off Locked: position. If you don't, the vehicle could move during this product. TNR800 DISCLAIMER - Delphi Touch Screen Navigation Radio -
...Items included in the Kit: • Navigation Radio • GPS Antenna • Navigation DVD • Miscellaneous Installation Hardware • Owner's Manual BEFORE YOU BEGIN • Eject all responsibility for damages resulting from the factory radio. Delphi is not responsible for damages and/or injuries... ALL INSTRUCTIONS THROUGHLY BEFORE BEGINNING THE INSTALLATION Do not attempt to install this radio in the old unit with no way to the Off Locked: position. If you don't, the vehicle could move during this product. TNR800 DISCLAIMER - Delphi Touch Screen Navigation Radio -
Installation Guide
Page 2
...a VSS Jumper is included for holding screws Estimated Installation Time - 1 hour. Estimated Installation Time - 1.5 - 2 hours. For Professional Installation Assistance, call 1-877-667-8700 © 2006 Delphi Corp. Delphi Touch Screen Navigation Radio Installation Instructions For 2003-2006 Denali and Escalade EXT &... ESV & AMP Conversion 3 - 10 Tools needed for the Installation: • Phillips Head Screwdriver • Flat Screwdriver or ...
...a VSS Jumper is included for holding screws Estimated Installation Time - 1 hour. Estimated Installation Time - 1.5 - 2 hours. For Professional Installation Assistance, call 1-877-667-8700 © 2006 Delphi Corp. Delphi Touch Screen Navigation Radio Installation Instructions For 2003-2006 Denali and Escalade EXT &... ESV & AMP Conversion 3 - 10 Tools needed for the Installation: • Phillips Head Screwdriver • Flat Screwdriver or ...
Installation Guide
Page 7
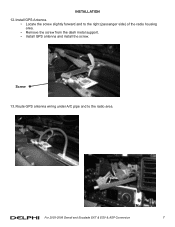
For 2003-2006 Denali and Escalade EXT & ESV & ASP Conversion 7 Screw 13. Route GPS antenna wiring under A/C pipe and to the right (passenger side) of the radio housing area. • Remove the screw from the dash metal support. • Install GPS antenna and install the screw. Install GPS Antenna. • Locate the screw slightly forward and to the radio area. INSTALLATION 12.
For 2003-2006 Denali and Escalade EXT & ESV & ASP Conversion 7 Screw 13. Route GPS antenna wiring under A/C pipe and to the right (passenger side) of the radio housing area. • Remove the screw from the dash metal support. • Install GPS antenna and install the screw. Install GPS Antenna. • Locate the screw slightly forward and to the radio area. INSTALLATION 12.
Installation Guide
Page 8
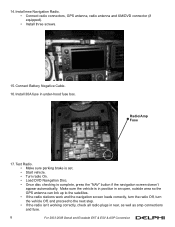
...Connect Battery Negative Cable. 16. Install 30A fuse in rear, as well as amp connections and fuse. 8 For 2003-2006 Denali and Escalade EXT & ESV & ASP Conversion Test Radio. • Make sure parking brake is set. • Start vehicle. • Turn radio On. • Load DVD Navigation Disc. • Once disc... and proceed to the next step. • If the radio isn't working correctly, check all radio plugs in under-hood fuse box. Install new Navigation Radio. • Connect radio connectors, GPS antenna, radio antenna and XM/DVD connector (if equipped). • Install three screws. 15.
...Connect Battery Negative Cable. 16. Install 30A fuse in rear, as well as amp connections and fuse. 8 For 2003-2006 Denali and Escalade EXT & ESV & ASP Conversion Test Radio. • Make sure parking brake is set. • Start vehicle. • Turn radio On. • Load DVD Navigation Disc. • Once disc... and proceed to the next step. • If the radio isn't working correctly, check all radio plugs in under-hood fuse box. Install new Navigation Radio. • Connect radio connectors, GPS antenna, radio antenna and XM/DVD connector (if equipped). • Install three screws. 15.
Installation Guide
Page 9
... and press into the upper hole. 20. They are easy to 1st with the engine off. • Roll the bezel in to miss. 19. Install the dash bezel. • Make sure the parking brake is set. • Tilt the steering wheel down and put the gear selector in starting with...EXT & ESV & ASP Conversion 9 Check orientation as there is in passenger A/C vents and front of the steering column. Test the radio again. 21. NOTICE: Before installing the screws, make sure dash trim is a "top" and "bottom" to the dash and press the metal clip into position. 22. NOTICE: Be careful when...
... and press into the upper hole. 20. They are easy to 1st with the engine off. • Roll the bezel in to miss. 19. Install the dash bezel. • Make sure the parking brake is set. • Tilt the steering wheel down and put the gear selector in starting with...EXT & ESV & ASP Conversion 9 Check orientation as there is in passenger A/C vents and front of the steering column. Test the radio again. 21. NOTICE: Before installing the screws, make sure dash trim is a "top" and "bottom" to the dash and press the metal clip into position. 22. NOTICE: Be careful when...

Installation Guide
Page 15
For 2003-2006 Non-Class 2 Bose Amp Equipped Chevy and GMC Trucks and SUVs 15 Route GPS antenna wiring under A/C pipe and to the right (passenger side) of the radio housing area. • Remove the screw from the dash metal support. • Install GPS antenna and install the screw. Install GPS Antenna. • Locate the screw slightly forward and to the radio area. Screw 14. INSTALLATION 13.
For 2003-2006 Non-Class 2 Bose Amp Equipped Chevy and GMC Trucks and SUVs 15 Route GPS antenna wiring under A/C pipe and to the right (passenger side) of the radio housing area. • Remove the screw from the dash metal support. • Install GPS antenna and install the screw. Install GPS Antenna. • Locate the screw slightly forward and to the radio area. Screw 14. INSTALLATION 13.
Installation Guide
Page 16
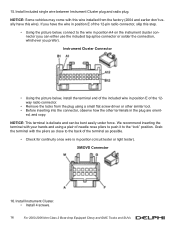
... wire is delicate and can either use the included tap splice connector or solder the connection, whichever you prefer). ed, and copy. Install Instrument Cluster. • Install 4 screws. 16 For 2003-2006 Non-Class 2 Bose Amp Equipped Chevy and GMC Trucks and SUVs NOTICE: This terminal is in ...• Before inserting into the connector, observe how the other terminals in position E of the terminal as close to the "lock" position. 15. Install included single wire between Instrument Cluster plug and radio plug. XM/DVD Connector 16. If you can be bent easily under force.
... wire is delicate and can either use the included tap splice connector or solder the connection, whichever you prefer). ed, and copy. Install Instrument Cluster. • Install 4 screws. 16 For 2003-2006 Non-Class 2 Bose Amp Equipped Chevy and GMC Trucks and SUVs NOTICE: This terminal is in ...• Before inserting into the connector, observe how the other terminals in position E of the terminal as close to the "lock" position. 15. Install included single wire between Instrument Cluster plug and radio plug. XM/DVD Connector 16. If you can be bent easily under force.
Installation Guide
Page 17
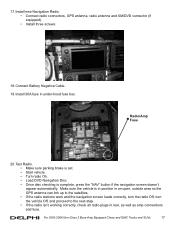
Install new Navigation Radio. • Connect radio connectors, GPS antenna, radio antenna and XM/DVD connector (if equipped). • Install three screws. 18. 17. Connect Battery Negative Cable. 19. For 2003-2006 Non-Class 2 Bose Amp Equipped Chevy and GMC Trucks ...and SUVs 17 Test Radio. • Make sure parking brake is set. • Start vehicle. • Turn radio On. • Load DVD Navigation Disc...
Install new Navigation Radio. • Connect radio connectors, GPS antenna, radio antenna and XM/DVD connector (if equipped). • Install three screws. 18. 17. Connect Battery Negative Cable. 19. For 2003-2006 Non-Class 2 Bose Amp Equipped Chevy and GMC Trucks ...and SUVs 17 Test Radio. • Make sure parking brake is set. • Start vehicle. • Turn radio On. • Load DVD Navigation Disc...
Installation Guide
Page 18
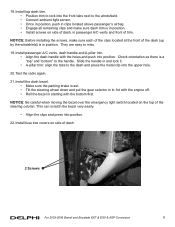
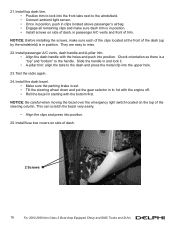
... on side of the dash (up by the windshield) is in and lock it. • A-pillar trim: align the tabs to miss. 22. NOTICE: Before installing the screws, make sure dash trim is set. • Tilt the steering wheel down and put the gear selector in to 1st with the engine... bezel in passenger A/C vents and front of the steering column. Slide the handle in position. 21. Install the dash bezel. • Make sure the parking brake is in position. • Install screws on the top of trim. Install top dash trim. • Position trim to lock into the upper hole. 23. This can...
... on side of the dash (up by the windshield) is in and lock it. • A-pillar trim: align the tabs to miss. 22. NOTICE: Before installing the screws, make sure dash trim is set. • Tilt the steering wheel down and put the gear selector in to 1st with the engine... bezel in passenger A/C vents and front of the steering column. Slide the handle in position. 21. Install the dash bezel. • Make sure the parking brake is in position. • Install screws on the top of trim. Install top dash trim. • Position trim to lock into the upper hole. 23. This can...