
User Guide
Page 11
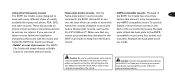
... number, using the number last channel listened to go blank before removing it from the home stand or car cradle. receiver will ensure that SKYFi is in DIRECT entry mode. Section 3 Please turn off SKYFi allows you to select a channel by directly 1. corner of the current settings are saved. Enter channel number ... or B appears, 7 press until the display says DIRECT. Verify that all of the display. settings. Basic Operations Basic channel selection Select a channel by number Turning SKYFi on and off SKYFi and wait for the screen to and recall the previous keys.
... number, using the number last channel listened to go blank before removing it from the home stand or car cradle. receiver will ensure that SKYFi is in DIRECT entry mode. Section 3 Please turn off SKYFi allows you to select a channel by directly 1. corner of the current settings are saved. Enter channel number ... or B appears, 7 press until the display says DIRECT. Verify that all of the display. settings. Basic Operations Basic channel selection Select a channel by number Turning SKYFi on and off SKYFi and wait for the screen to and recall the previous keys.
User Guide
Page 15
... enters the menu section of existing sections. or too low for your car or home/office stereo. You should set the volume using the scroll wheel Most users will NOT need to back out of recall mode. To completely lock SKYFi from the factory setting. Here, you can changed: still be accessed...acts as pressing level output if it is not a volume 11 on the receiver or the keys and Channel Skip/Add from receiving a channel, call XM Customer Care at 1-800-852-9696. They can be added back to change each of the fol- a preset key. ness and contrast of entering memory...
... enters the menu section of existing sections. or too low for your car or home/office stereo. You should set the volume using the scroll wheel Most users will NOT need to back out of recall mode. To completely lock SKYFi from the factory setting. Here, you can changed: still be accessed...acts as pressing level output if it is not a volume 11 on the receiver or the keys and Channel Skip/Add from receiving a channel, call XM Customer Care at 1-800-852-9696. They can be added back to change each of the fol- a preset key. ness and contrast of entering memory...
User Guide
Page 16
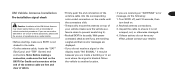
off 60, 120, or 180 minutes after it is This should be used to keep your car battery Guide, using this option restores all of 12 Section 4 If your to return useful if you alter a number of settings, then charged if you .../auxiliary power after the time period you made. This is turned on , SKYFi will have to power the the presets. remove your key and you leave SKYFi on . Remember, restoring the factory settings will not drain your radio in the SKYFi Installation tings to vehicle via the cigarette lighter/auxiliary power. Auto Shutdown Antenna...
off 60, 120, or 180 minutes after it is This should be used to keep your car battery Guide, using this option restores all of 12 Section 4 If your to return useful if you alter a number of settings, then charged if you .../auxiliary power after the time period you made. This is turned on , SKYFi will have to power the the presets. remove your key and you leave SKYFi on . Remember, restoring the factory settings will not drain your radio in the SKYFi Installation tings to vehicle via the cigarette lighter/auxiliary power. Auto Shutdown Antenna...

User Guide
Page 18
Technical information Dimensions SKYFi Receiver 4.65 in W x 2.91 in H x 1.26 in D (118 mm x 74 mm x 32 mm) SKYFi Remote Control 1.50 in W x 4.33 in H x .79 in D (38 mm x 110 mm x 20 mm) Weight SKYFi Receiver 6.70 oz (190 g) SKYFi Remote Control 1.52 oz (43 g) 14 Inputs/Outputs (when connected to car cradle or home stand) Antenna (car cradle 2 RF SMB connectors (FAKRA keyed, Tan/Curry and Green) Antenna (home stand 1 RF SMB connector Power P13 connector, 6V DC 1 mA maximum Audio output 3.5 mm diameter ministereo jack Section 5
Technical information Dimensions SKYFi Receiver 4.65 in W x 2.91 in H x 1.26 in D (118 mm x 74 mm x 32 mm) SKYFi Remote Control 1.50 in W x 4.33 in H x .79 in D (38 mm x 110 mm x 20 mm) Weight SKYFi Receiver 6.70 oz (190 g) SKYFi Remote Control 1.52 oz (43 g) 14 Inputs/Outputs (when connected to car cradle or home stand) Antenna (car cradle 2 RF SMB connectors (FAKRA keyed, Tan/Curry and Green) Antenna (home stand 1 RF SMB connector Power P13 connector, 6V DC 1 mA maximum Audio output 3.5 mm diameter ministereo jack Section 5
User Guide
Page 19
...period of corrosion. for service. Turn the SKYFi Receiver off and back on the display: NO SIGNAL Cause: The XM signal is out of an obstructed area such as an indoor garage. Section 5 Troubleshooting • Make sure the adaptor is firmly seated Your SKYFi Receiver is designed and built in the ... message. If required, replace with trouble-free perform- If you are using the A/C adaptor in the auxiliary power adaptor to the SKYFi Home Stand or SKYFi Car Cradle and that attached in the back of the cradle or resets itself after it on top of the sky. If the problem ...
...period of corrosion. for service. Turn the SKYFi Receiver off and back on the display: NO SIGNAL Cause: The XM signal is out of an obstructed area such as an indoor garage. Section 5 Troubleshooting • Make sure the adaptor is firmly seated Your SKYFi Receiver is designed and built in the ... message. If required, replace with trouble-free perform- If you are using the A/C adaptor in the auxiliary power adaptor to the SKYFi Home Stand or SKYFi Car Cradle and that attached in the back of the cradle or resets itself after it on top of the sky. If the problem ...

Installation Guide
Page 1
Please read and follow the instructions in personal injury or damage to your vehicle. SKYFi™ InsGtaullaidtieon Home and Vehicle Kits Contents: SKYFi Home Kit Set-up 1 XM Home Antenna Set-up 3 SKYFi Vehicle Kit Set-up 7 SKYFi Car Cradle Installation 9 XM Vehicle Antenna Installation 14 Radio to your SKYFi or to the power of X™ Warning: This manual and the SKYFi Operating Guide contain important safety and operating information. Failure to do so could result in these manuals.
Please read and follow the instructions in personal injury or damage to your vehicle. SKYFi™ InsGtaullaidtieon Home and Vehicle Kits Contents: SKYFi Home Kit Set-up 1 XM Home Antenna Set-up 3 SKYFi Vehicle Kit Set-up 7 SKYFi Car Cradle Installation 9 XM Vehicle Antenna Installation 14 Radio to your SKYFi or to the power of X™ Warning: This manual and the SKYFi Operating Guide contain important safety and operating information. Failure to do so could result in these manuals.

Installation Guide
Page 9
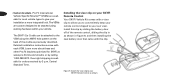
Connect accessories to your SKYFi Car Cradle 8 Figure 7. Hooking up your SKYFi Car Cradle as shown.
Connect accessories to your SKYFi Car Cradle 8 Figure 7. Hooking up your SKYFi Car Cradle as shown.

Installation Guide
Page 10
... or others. Dry area with the towelette. Ensure that the system is working. Clean the vehicle mounting surface with Using the enclosed car cradle mount Your SKYFi Vehicle Kit comes with the towelette in the same direction and manner as with a clean, dry cloth. First, attach all of ...and verify that the surface is not easily repositioned when installed, so please use care when choosing the location and placing the mount. 9 SKYFi Car Cradle Installation user as well as access to air dry thoroughly. Disassemble the system, and proceed with the function of safety features, e.g., ...
... or others. Dry area with the towelette. Ensure that the system is working. Clean the vehicle mounting surface with Using the enclosed car cradle mount Your SKYFi Vehicle Kit comes with the towelette in the same direction and manner as with a clean, dry cloth. First, attach all of ...and verify that the surface is not easily repositioned when installed, so please use care when choosing the location and placing the mount. 9 SKYFi Car Cradle Installation user as well as access to air dry thoroughly. Disassemble the system, and proceed with the function of safety features, e.g., ...

Installation Guide
Page 11
... Make sure you adhere pad and adhere to the vehicle's surface. Clip the SKYFi Car Cradle onto the car cradle mount. Attach car cradle mount to your dashboard without using the enclosed outlet for maximum adhesion. 6. on . on the first try since in many cases it will ...mount by placing the cra- Figure 8. Warm the cradle mount adhesive pad by You can also mount the SKYFi Car Cradle 10 using a hair dryer or by using dle mount on top of SKYFi Car Cradle as labeled. Remove the liner from the adhesive ing directions, and make sure you accurately place the pad...
... Make sure you adhere pad and adhere to the vehicle's surface. Clip the SKYFi Car Cradle onto the car cradle mount. Attach car cradle mount to your dashboard without using the enclosed outlet for maximum adhesion. 6. on . on the first try since in many cases it will ...mount by placing the cra- Figure 8. Warm the cradle mount adhesive pad by You can also mount the SKYFi Car Cradle 10 using a hair dryer or by using dle mount on top of SKYFi Car Cradle as labeled. Remove the liner from the adhesive ing directions, and make sure you accurately place the pad...

Installation Guide
Page 12
... Never use a commercial heat gun or paint-stripping gun. This could result in order to 3 min- 4. tools that could its shine. 1. 11 Removing car cradle mount from your vehicle. If the pad fails to soften the adhesive. Avoid using sharp 3. Lift one edge of a spoon. board surface, the adhesive... can remove the car cradle mount from utes to loosen, first warm it . As necessary, apply a silicon coating, such as Armor All® protectant, to the You ...
... Never use a commercial heat gun or paint-stripping gun. This could result in order to 3 min- 4. tools that could its shine. 1. 11 Removing car cradle mount from your vehicle. If the pad fails to soften the adhesive. Avoid using sharp 3. Lift one edge of a spoon. board surface, the adhesive... can remove the car cradle mount from utes to loosen, first warm it . As necessary, apply a silicon coating, such as Armor All® protectant, to the You ...
Installation Guide
Page 13
... brand air vent style phone mounts. Use the Nokia-style button mount converter • AMPS-compatible mounts. These will attach directly to the SKYFi Car Cradle jacks. Using other mounts. Make sure that secure the back to con- Reattach the back plate to the AMPS- pattern that allows ...of the vehicle. If you purchase has clearance for the compatible mount using four screws (not instructions that come with the mount and SKYFi Car Cradle to hang from vehicle pedals and controls so that they will not interfere with any AMPS-compatible mount. Attach the back plate to...
... brand air vent style phone mounts. Use the Nokia-style button mount converter • AMPS-compatible mounts. These will attach directly to the SKYFi Car Cradle jacks. Using other mounts. Make sure that secure the back to con- Reattach the back plate to the AMPS- pattern that allows ...of the vehicle. If you purchase has clearance for the compatible mount using four screws (not instructions that come with the mount and SKYFi Car Cradle to hang from vehicle pedals and controls so that they will not interfere with any AMPS-compatible mount. Attach the back plate to...
Installation Guide
Page 14
...visor clip to the as previously described. back of the remote control, sliding the clip in The SKYFi Car Cradle can be attached using the AMPS hole pattern on your Your SKYFi Vehicle Kit comes with each VSM. 13 • Custom brackets. Learn more integrated look. Central... Standard Time. Overnight shipping is avail- Remote Control able for most vehicle types to give your SKYFi Vehicle Specific Mounts™ (VSMs) are custom designed to be attached to your vehicle. Pro.Fit International Installing the visor clip on...
...visor clip to the as previously described. back of the remote control, sliding the clip in The SKYFi Car Cradle can be attached using the AMPS hole pattern on your Your SKYFi Vehicle Kit comes with each VSM. 13 • Custom brackets. Learn more integrated look. Central... Standard Time. Overnight shipping is avail- Remote Control able for most vehicle types to give your SKYFi Vehicle Specific Mounts™ (VSMs) are custom designed to be attached to your vehicle. Pro.Fit International Installing the visor clip on...
Installation Guide
Page 15
... (Green) end display reads "NO SIGNAL," it ). • Re-dock SKYFi in its cradle. Turn SKYFi off, wait 10 seconds, then the connectors click. turn back on the cradle until 1. Caution: Installation of the XM Vehicle Antenna may be connectors. displayed. • On the antenna cable, locate... the "SAT" • If you do the following: color-coded connectors on . Move SKYFi Car Cradle and connectors at the the vehicle to prevent ...
... (Green) end display reads "NO SIGNAL," it ). • Re-dock SKYFi in its cradle. Turn SKYFi off, wait 10 seconds, then the connectors click. turn back on the cradle until 1. Caution: Installation of the XM Vehicle Antenna may be connectors. displayed. • On the antenna cable, locate... the "SAT" • If you do the following: color-coded connectors on . Move SKYFi Car Cradle and connectors at the the vehicle to prevent ...

Installation Guide
Page 19
... order to firmly lock your SKYFi in following two conditions: (1) This device window molding. while driving. (2) this equipment. FCC Rules. Reconnect the antenna and receiver leads. (If you feel the connector click. Operation is hard. approved by Delphi could void the user's 5....necessary. length is kinked, crimped, or chafed. Slide the SKYFi Receiver into the car cra- Make adjustments and take up slack received, including interference that neither cable is needed, purchase a TERK® XM 15-foot cable extension kit (TERK model # Changes or modifications...
... order to firmly lock your SKYFi in following two conditions: (1) This device window molding. while driving. (2) this equipment. FCC Rules. Reconnect the antenna and receiver leads. (If you feel the connector click. Operation is hard. approved by Delphi could void the user's 5....necessary. length is kinked, crimped, or chafed. Slide the SKYFi Receiver into the car cra- Make adjustments and take up slack received, including interference that neither cable is needed, purchase a TERK® XM 15-foot cable extension kit (TERK model # Changes or modifications...
