
User Guide
Page 16
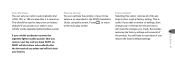
... power. Remember, restoring the factory settings will have to reset them if you cigarette lighter/auxiliary power after you power your radio in the SKYFi Installation tings to their original factory setting. Press to return useful if you alter a number of settings, then charged if ... the presets. You will erase all of the set your radio to automatically shut You can optimize the position of your home Selecting this screen. Auto Shutdown Antenna Aiming Factory Default You can set - remove your key and you leave SKYFi on . antenna, as described in your battery.
... power. Remember, restoring the factory settings will have to reset them if you cigarette lighter/auxiliary power after you power your radio in the SKYFi Installation tings to their original factory setting. Press to return useful if you alter a number of settings, then charged if ... the presets. You will erase all of the set your radio to automatically shut You can optimize the position of your home Selecting this screen. Auto Shutdown Antenna Aiming Factory Default You can set - remove your key and you leave SKYFi on . antenna, as described in your battery.

User Guide
Page 18
Technical information Dimensions SKYFi Receiver 4.65 in W x 2.91 in H x 1.26 in D (118 mm x 74 mm x 32 mm) SKYFi Remote Control 1.50 in W x 4.33 in H x .79 in D (38 mm x 110 mm x 20 mm) Weight SKYFi Receiver 6.70 oz (190 g) SKYFi Remote Control 1.52 oz (43 g) 14 Inputs/Outputs (when connected to car cradle or home stand) Antenna (car cradle 2 RF SMB connectors (FAKRA keyed, Tan/Curry and Green) Antenna (home stand 1 RF SMB connector Power P13 connector, 6V DC 1 mA maximum Audio output 3.5 mm diameter ministereo jack Section 5
Technical information Dimensions SKYFi Receiver 4.65 in W x 2.91 in H x 1.26 in D (118 mm x 74 mm x 32 mm) SKYFi Remote Control 1.50 in W x 4.33 in H x .79 in D (38 mm x 110 mm x 20 mm) Weight SKYFi Receiver 6.70 oz (190 g) SKYFi Remote Control 1.52 oz (43 g) 14 Inputs/Outputs (when connected to car cradle or home stand) Antenna (car cradle 2 RF SMB connectors (FAKRA keyed, Tan/Curry and Green) Antenna (home stand 1 RF SMB connector Power P13 connector, 6V DC 1 mA maximum Audio output 3.5 mm diameter ministereo jack Section 5
User Guide
Page 19
... cradle or stand. If the problem persists, make sure it is plugged SKYFi and cannot turn it on the display: NO SIGNAL Cause: The XM signal is properly seated in your home or office, make sure your antenna is clean and free of the adaptor and please follow these troubleshooting steps:... examining it is left unpowered stand. If you are using SKYFi at the outlet. • Make sure ...
... cradle or stand. If the problem persists, make sure it is plugged SKYFi and cannot turn it on the display: NO SIGNAL Cause: The XM signal is properly seated in your home or office, make sure your antenna is clean and free of the adaptor and please follow these troubleshooting steps:... examining it is left unpowered stand. If you are using SKYFi at the outlet. • Make sure ...
Installation Guide
Page 1
SKYFi™ InsGtaullaidtieon Home and Vehicle Kits Contents: SKYFi Home Kit Set-up 1 XM Home Antenna Set-up 3 SKYFi Vehicle Kit Set-up 7 SKYFi Car Cradle Installation 9 XM Vehicle Antenna Installation 14 Radio to your vehicle. Please read and follow the instructions in personal injury or damage to your SKYFi or to the power of X™ Warning: This manual and the SKYFi Operating Guide contain important safety and operating information. Failure to do so could result in these manuals.
SKYFi™ InsGtaullaidtieon Home and Vehicle Kits Contents: SKYFi Home Kit Set-up 1 XM Home Antenna Set-up 3 SKYFi Vehicle Kit Set-up 7 SKYFi Car Cradle Installation 9 XM Vehicle Antenna Installation 14 Radio to your vehicle. Please read and follow the instructions in personal injury or damage to your SKYFi or to the power of X™ Warning: This manual and the SKYFi Operating Guide contain important safety and operating information. Failure to do so could result in these manuals.
Installation Guide
Page 2
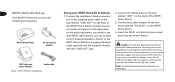
... must be a 6V, 1000mA DC adaptor and must contain a unified polarity- SKYFi Home Kit components. Connect the XM Antenna to use with your SKYFi Home Kit as follows: 1. Alternatively, you need to the jack labeled "ANT" on the SKYFi Home Stand. 4. Note: See SKYFi Operating Guide for important user information Connecting an incorrect input device may...
... must be a 6V, 1000mA DC adaptor and must contain a unified polarity- SKYFi Home Kit components. Connect the XM Antenna to use with your SKYFi Home Kit as follows: 1. Alternatively, you need to the jack labeled "ANT" on the SKYFi Home Stand. 4. Note: See SKYFi Operating Guide for important user information Connecting an incorrect input device may...

Installation Guide
Page 3
ized yet). Next, change channels again. If no damage is not author- If the message still appears, contact your SKYFi Home Stand as shown. 2 2 If the "ANTENNA" message remains, power down the radio, unplug the antenna, and look for any obvious damage. 5. nection is secure and completely pushed in. Connect accessories to 0 if the receiver is detected, reconnect the antenna, turn the unit back on, and change channels (from 0 to 1 or from 1 to your retailer. 3 1 Figure 2. After powering up, if the display reads "ANTENNA," check that the antenna con-
ized yet). Next, change channels again. If no damage is not author- If the message still appears, contact your SKYFi Home Stand as shown. 2 2 If the "ANTENNA" message remains, power down the radio, unplug the antenna, and look for any obvious damage. 5. nection is secure and completely pushed in. Connect accessories to 0 if the receiver is detected, reconnect the antenna, turn the unit back on, and change channels (from 0 to 1 or from 1 to your retailer. 3 1 Figure 2. After powering up, if the display reads "ANTENNA," check that the antenna con-

Installation Guide
Page 4
... use . Press the menu button on the SKYFi Receiver and select the "Antenna Aiming" option. Use SKYFi's signal-strength meter to help you optimize the antenna's position. 3 XM Home Antenna Set-up Basic signal-strength indicator Antenna Aiming signal-strength indicator Aiming your XM Home Antenna If the SKYFi display says "NO SIGNAL," the antenna needs to figure 4 will appear. 2. A screen...
... use . Press the menu button on the SKYFi Receiver and select the "Antenna Aiming" option. Use SKYFi's signal-strength meter to help you optimize the antenna's position. 3 XM Home Antenna Set-up Basic signal-strength indicator Antenna Aiming signal-strength indicator Aiming your XM Home Antenna If the SKYFi display says "NO SIGNAL," the antenna needs to figure 4 will appear. 2. A screen...

Installation Guide
Page 5
... the 4 the menu screen. a south-facing window or outdoors with the SKYFi home system as described earlier in order to receive XM's signal through standard home walls or a roof. Home Kit is a high-gain antenna that comes with a clear view of XM's na until you receive the strongest possible satellites and/or, depending on...
... the 4 the menu screen. a south-facing window or outdoors with the SKYFi home system as described earlier in order to receive XM's signal through standard home walls or a roof. Home Kit is a high-gain antenna that comes with a clear view of XM's na until you receive the strongest possible satellites and/or, depending on...
Installation Guide
Page 6
...different 1. and to the south/ Outdoor installation or indoor wall mounting small enough to locate the antenna the antenna location with the antenna pivot at the satellite: a 50-foot cable extension (Delphi model number SA10006) from the wall/base where there is not sufficient to fit in figure ... extension until the signal strength is properly installed. Turn the base of the antenna so that is a strong XM signal, purchase Aiming" screen. Tilt the antenna away from your SKYFi retailer. 2. Set antenna flat against its base on a Up to the south if you use as...
...different 1. and to the south/ Outdoor installation or indoor wall mounting small enough to locate the antenna the antenna location with the antenna pivot at the satellite: a 50-foot cable extension (Delphi model number SA10006) from the wall/base where there is not sufficient to fit in figure ... extension until the signal strength is properly installed. Turn the base of the antenna so that is a strong XM signal, purchase Aiming" screen. Tilt the antenna away from your SKYFi retailer. 2. Set antenna flat against its base on a Up to the south if you use as...
Installation Guide
Page 7
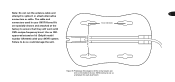
The cable and connectors used in your SKYFi system. Photocopy this diagram of the screw-locator pattern on the bottom of your XM Antenna to ensure that they will work with your SKYFi Home Kit 1.6 in (40 mm) are specially chosen and attached at the factory to use as a template for wall attachment. approved extension kit (Delphi model number SA10006) with XM's unique frequency band. Failure to splice it or attach alternative connectors or cable. Note: Do not cut the antenna cable and 6 attempt to do so could damage the unit. 1.4 in (35 mm) Figure 5. Use an XM-
The cable and connectors used in your SKYFi system. Photocopy this diagram of the screw-locator pattern on the bottom of your XM Antenna to ensure that they will work with your SKYFi Home Kit 1.6 in (40 mm) are specially chosen and attached at the factory to use as a template for wall attachment. approved extension kit (Delphi model number SA10006) with XM's unique frequency band. Failure to splice it or attach alternative connectors or cable. Note: Do not cut the antenna cable and 6 attempt to do so could damage the unit. 1.4 in (35 mm) Figure 5. Use an XM-

Installation Guide
Page 10
... then repeat this position should be installed as access to allow the optimum er, power source, and antenna-cable route. The adhesive used on a leather surface. SKYFi viewing position for the primary correctly place the SKYFi Receiver may result in figure 7 (page 8). Dry the area with a car cradle mount, which can be placed...
... then repeat this position should be installed as access to allow the optimum er, power source, and antenna-cable route. The adhesive used on a leather surface. SKYFi viewing position for the primary correctly place the SKYFi Receiver may result in figure 7 (page 8). Dry the area with a car cradle mount, which can be placed...
Installation Guide
Page 13
...button mounts. Attach the back plate to the SKYFi Car Cradle jacks. The SKYFi Car Cradle will not interfere with feature, remove the two screws in the SKYFi Vehicle Kit to control the vehicle. Caution: Be sure to route the power cord, antenna cord, and adaptor/modulator cord away from ...the button included). Failure to Belkin brand air vent style phone mounts. Caution: Connect only appropriate input devices to the AMPS- The back of Pro.Fit® UltiMount™. To use one of 12 the SKYFi Car Cradle has...
...button mounts. Attach the back plate to the SKYFi Car Cradle jacks. The SKYFi Car Cradle will not interfere with feature, remove the two screws in the SKYFi Vehicle Kit to control the vehicle. Caution: Be sure to route the power cord, antenna cord, and adaptor/modulator cord away from ...the button included). Failure to Belkin brand air vent style phone mounts. Caution: Connect only appropriate input devices to the AMPS- The back of Pro.Fit® UltiMount™. To use one of 12 the SKYFi Car Cradle has...
Installation Guide
Page 15
... unsure of these actions do the following: color-coded connectors on . Turn SKYFi off, wait 10 seconds, then the connectors click. Caution: Installation of the XM Vehicle Antenna may be connectors. Move SKYFi Car Cradle and connectors at the the vehicle to ensure it may require special... tools as well as knowledge of debris. end of the antenna cable are docked in an connection, make ...
... unsure of these actions do the following: color-coded connectors on . Turn SKYFi off, wait 10 seconds, then the connectors click. Caution: Installation of the XM Vehicle Antenna may be connectors. Move SKYFi Car Cradle and connectors at the the vehicle to ensure it may require special... tools as well as knowledge of debris. end of the antenna cable are docked in an connection, make ...

Installation Guide
Page 16
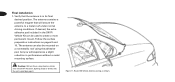
.... ductive (metal) surface of -sight obstruc- feet. tions such as roof racks, luggage boxes, etc. to consider positioning the antenna offset from the molding of the Figure 10 shows three typical mounting In these instances, it will be free of mechanical (outward-open...- outside, on the highest location of your XM Vehicle Antenna allows mounting on a con- Figure 10. locations. 15 Positioning and pre-application • The antenna should be kept from the vehicle centerline. or soft-top convertibles with nonmetallic rooftops. ...
.... ductive (metal) surface of -sight obstruc- feet. tions such as roof racks, luggage boxes, etc. to consider positioning the antenna offset from the molding of the Figure 10 shows three typical mounting In these instances, it will be free of mechanical (outward-open...- outside, on the highest location of your XM Vehicle Antenna allows mounting on a con- Figure 10. locations. 15 Positioning and pre-application • The antenna should be kept from the vehicle centerline. or soft-top convertibles with nonmetallic rooftops. ...
Installation Guide
Page 17
cable will come into contact with a rough metal opening, use a rubber grommet to route the cable from this Tan/Curry antenna connectors may be the vehicle manufacturer whenever feasible. • Once you have a desired antenna location, • To ease routing of the cable, the Green and • Use pre-existing wiring channels created...
cable will come into contact with a rough metal opening, use a rubber grommet to route the cable from this Tan/Curry antenna connectors may be the vehicle manufacturer whenever feasible. • Once you have a desired antenna location, • To ease routing of the cable, the Green and • Use pre-existing wiring channels created...
Installation Guide
Page 18
... a nonmetallic roof using food or drinks near the SKYFi Receiver. Figure 11. The antenna contains a powerful magnet that the antenna is in the SKYFi Vehicle Kit can also be used to a metal roof under normal driving conditions. The antenna can be mounted on pages 9 and 10. Route XM Vehicle Antenna wiring as shown. If desired, the extra...
... a nonmetallic roof using food or drinks near the SKYFi Receiver. Figure 11. The antenna contains a powerful magnet that the antenna is in the SKYFi Vehicle Kit can also be used to a metal roof under normal driving conditions. The antenna can be mounted on pages 9 and 10. Route XM Vehicle Antenna wiring as shown. If desired, the extra...

Installation Guide
Page 19
... following two conditions: (1) This device window molding. Work the antenna cable under the rear- Make adjustments and take up slack received, including interference that neither cable is needed, purchase a TERK® XM 15-foot cable extension kit (TERK model # Changes or modifications not ... operation. approved by Delphi could void the user's 5. Reconnect the antenna and receiver leads. (If you feel the connector click. Push down on the locking tab in back in place may not cause harmful interference, and may where necessary. Slide the SKYFi Receiver into the car...
... following two conditions: (1) This device window molding. Work the antenna cable under the rear- Make adjustments and take up slack received, including interference that neither cable is needed, purchase a TERK® XM 15-foot cable extension kit (TERK model # Changes or modifications not ... operation. approved by Delphi could void the user's 5. Reconnect the antenna and receiver leads. (If you feel the connector click. Push down on the locking tab in back in place may not cause harmful interference, and may where necessary. Slide the SKYFi Receiver into the car...
