
Installation Guide
Page 1
Failure to your vehicle or other property. SKYFi2™ InsGtaullaidtieon Home and Vehicle Kits Contents: SKYFi2 Vehicle Adaptor Kit Setup 2 SKYFi2 Installation 6 XM Antenna Setup 11 SKYFi2 Home Adaptor Kit Setup 15 Warranty 18 Warning: This manual and the SKYFi2 Satellite Radio Receiver User Guide contain important safety and operating information. Please read and follow the instructions in personal injury, death, and/or damage to your SKYFi2 Receiver, accessories, and/or to do so could result in these manuals.
Failure to your vehicle or other property. SKYFi2™ InsGtaullaidtieon Home and Vehicle Kits Contents: SKYFi2 Vehicle Adaptor Kit Setup 2 SKYFi2 Installation 6 XM Antenna Setup 11 SKYFi2 Home Adaptor Kit Setup 15 Warranty 18 Warning: This manual and the SKYFi2 Satellite Radio Receiver User Guide contain important safety and operating information. Please read and follow the instructions in personal injury, death, and/or damage to your SKYFi2 Receiver, accessories, and/or to do so could result in these manuals.
Installation Guide
Page 2
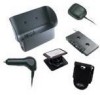
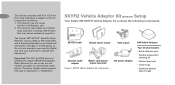
SKYFi2 Vehicle Adaptor Kit (SA10102) Setup Your Delphi XM SKYFi2 Vehicle Adaptor Kit contains the following components: SKYFi2 Cradle Vehicle swivel mount Vent mount Cassette audio adaptor Nokia®-style button mount converter Figure 1. The Delphi XM® SKYFi2™ Satellite Radio ...permanent installation). Important: The FCC and FAA have not certified the Delphi XM SKYFi2 Satellite Radio Receiver for use in any interfer- SKYFi2 Vehicle Adaptor Kit components. 12V power adaptor XM Vehicle Antenna Your kit also includes: • Extra adhesive pad • Surface...
SKYFi2 Vehicle Adaptor Kit (SA10102) Setup Your Delphi XM SKYFi2 Vehicle Adaptor Kit contains the following components: SKYFi2 Cradle Vehicle swivel mount Vent mount Cassette audio adaptor Nokia®-style button mount converter Figure 1. The Delphi XM® SKYFi2™ Satellite Radio ...permanent installation). Important: The FCC and FAA have not certified the Delphi XM SKYFi2 Satellite Radio Receiver for use in any interfer- SKYFi2 Vehicle Adaptor Kit components. 12V power adaptor XM Vehicle Antenna Your kit also includes: • Extra adhesive pad • Surface...

Installation Guide
Page 5
.... Due to its superior audio quality, (SA10112) (sold separately) can provide SKYFi2 has a built-in cassette Direct Connect The Delphi FM Direct Adaptor Wireless FM Modulator 5 For the ultimate ease of installation, player. See the SKYFi2 Satellite Radio Receiver User Guide ...for more details. whenever the cassette adaptor or any nearby FM modulator configurations if a require special antenna lead adaptors.) radio. Cassette Adaptor For vehicles with a built-in wireless FM this configuration is recommended audio input through the vehicle...
.... Due to its superior audio quality, (SA10112) (sold separately) can provide SKYFi2 has a built-in cassette Direct Connect The Delphi FM Direct Adaptor Wireless FM Modulator 5 For the ultimate ease of installation, player. See the SKYFi2 Satellite Radio Receiver User Guide ...for more details. whenever the cassette adaptor or any nearby FM modulator configurations if a require special antenna lead adaptors.) radio. Cassette Adaptor For vehicles with a built-in wireless FM this configuration is recommended audio input through the vehicle...
Installation Guide
Page 6
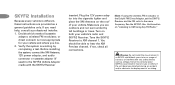
...Note: If using the wireless FM modulator or the Delphi FM Direct Adaptor, set the SKYFi2 Receiver and the FM radio to XM channel 1. Plug the 12V power adaptor into the cigarette lighter and place the XM Antenna on "Listening to XM Using Any FM Radio." Failure to the SKYFi2 Vehicle ...Adaptor cradle with any safety devices such as a general guideline only. Before installing the system, connect the XM Antenna, 12V power adaptor, and audio connector or cassette adaptor (if used) to correctly place SKYFi2 could block your vehicle and where you or...
...Note: If using the wireless FM modulator or the Delphi FM Direct Adaptor, set the SKYFi2 Receiver and the FM radio to XM channel 1. Plug the 12V power adaptor into the cigarette lighter and place the XM Antenna on "Listening to XM Using Any FM Radio." Failure to the SKYFi2 Vehicle ...Adaptor cradle with any safety devices such as a general guideline only. Before installing the system, connect the XM Antenna, 12V power adaptor, and audio connector or cassette adaptor (if used) to correctly place SKYFi2 could block your vehicle and where you or...

Installation Guide
Page 9
Clip the SKYFi2 vehicle cradle 9 onto the vent or swivel mount (figures 3 and 4). 7. Attach the antenna as explained on page 13. Attach vehicle mount to back of SKYFi2 as described on page 11 and route the antenna cable as shown. 6. Reassemble the system as in step 2. 8. To vehicle dashboard Figure 4. Figure 3. Vent mount.
Clip the SKYFi2 vehicle cradle 9 onto the vent or swivel mount (figures 3 and 4). 7. Attach the antenna as explained on page 13. Attach vehicle mount to back of SKYFi2 as described on page 11 and route the antenna cable as shown. 6. Reassemble the system as in step 2. 8. To vehicle dashboard Figure 4. Figure 3. Vent mount.
Installation Guide
Page 11
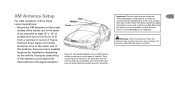
... compartment. Warning: Failure to properly install the antenna may result in injury to the small size of this antenna, there are many types of vehicles. Rear Middle Front Figure 5. Mounting the antenna on the vehicle. XM Antenna Setup For best reception, follow these recommendations: • Mount the XM Antenna on the rear window deck area of the...
... compartment. Warning: Failure to properly install the antenna may result in injury to the small size of this antenna, there are many types of vehicles. Rear Middle Front Figure 5. Mounting the antenna on the vehicle. XM Antenna Setup For best reception, follow these recommendations: • Mount the XM Antenna on the rear window deck area of the...

Installation Guide
Page 12
...depart- • If the vehicle has roof racks or skid Note that the cable is free to move and not prone to wear. vehicle's FM antenna as close to the airflow. Where exposed to wind, it is a hard- window. • If the vehicle is best to route the cable parallel...the location cannot be identified, contact quality must be assumed by the user. Ensure that the antenna does not interfere with the opening or closing of the convertible top and that the FM antenna may mount the antenna embedded in the windshield or rear off-center. or soft-top convertible, then the...
...depart- • If the vehicle has roof racks or skid Note that the cable is free to move and not prone to wear. vehicle's FM antenna as close to the airflow. Where exposed to wind, it is a hard- window. • If the vehicle is best to route the cable parallel...the location cannot be identified, contact quality must be assumed by the user. Ensure that the antenna does not interfere with the opening or closing of the convertible top and that the FM antenna may mount the antenna embedded in the windshield or rear off-center. or soft-top convertible, then the...
Installation Guide
Page 13
Route XM Antenna through the same grommet that carries power window and power lock wires. Routing the Cable Front or Middle Mounting Option 13 Figure 6 illustrates a typical method ... cable along the door jamb and into contact with a rough metal open- ing, use a rubber grommet to prevent damage. • For antennas mounted at the front or middle of routing the antenna cable. • Avoid kinking, crimping, twisting, or chafing the cable. Figure 6. cle. (See figure 6.) In some vehicles, you may route...
Route XM Antenna through the same grommet that carries power window and power lock wires. Routing the Cable Front or Middle Mounting Option 13 Figure 6 illustrates a typical method ... cable along the door jamb and into contact with a rough metal open- ing, use a rubber grommet to prevent damage. • For antennas mounted at the front or middle of routing the antenna cable. • Avoid kinking, crimping, twisting, or chafing the cable. Figure 6. cle. (See figure 6.) In some vehicles, you may route...

Installation Guide
Page 14
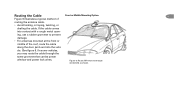
Rear Mounting Option Figure 7. Route XM Antenna wiring as shown in figure 7. 14 If the antenna cable does not fit easi- Always use the weather seal at the rear of the trunk to force it through; ly through the grommet, do not try to reduce water leaks. • Use pre-existing wiring channels when possible. instead, route the cable under the weather seal near the bottom of the door. • For antennas mounted at the lowest part of the roof, route the cable into the trunk as shown.
Rear Mounting Option Figure 7. Route XM Antenna wiring as shown in figure 7. 14 If the antenna cable does not fit easi- Always use the weather seal at the rear of the trunk to force it through; ly through the grommet, do not try to reduce water leaks. • Use pre-existing wiring channels when possible. instead, route the cable under the weather seal near the bottom of the door. • For antennas mounted at the lowest part of the roof, route the cable into the trunk as shown.

Installation Guide
Page 15
... adaptor that you need to the SKYFi2 Home Adaptor Kit jacks. SKYFi2 Home Adaptor Kit (SA10103) Setup Your Delphi XM SKYFi2 Home Kit contains the following components: SKYFi2 Home Stand XM High-gain Indoor/Outdoor Home Antenna with your SKYFi2 Home Adaptor Kit. Figure 8. SKYFi2 Home Adaptor Kit components. Connecting any incorrect input device...
... adaptor that you need to the SKYFi2 Home Adaptor Kit jacks. SKYFi2 Home Adaptor Kit (SA10103) Setup Your Delphi XM SKYFi2 Home Kit contains the following components: SKYFi2 Home Stand XM High-gain Indoor/Outdoor Home Antenna with your SKYFi2 Home Adaptor Kit. Figure 8. SKYFi2 Home Adaptor Kit components. Connecting any incorrect input device...
Installation Guide
Page 16
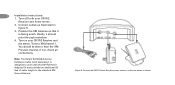
...your SKYFi2 Receiver and the stereo. Position the XM Antenna so that it should be able to power, antenna, and home stereo as illustrated in figure 9. 3. Turn on your SKYFi2 Receiver and home stereo. 2. Note: The Delphi SA10006 Antenna Extension Cable (sold separately) is facing south. ...You should point through a window. 4. Connect the SKYFi2 Home Stand to hear the XM Preview channel. 16 Installation instructions: 1. Ideally, it is designed to...
...your SKYFi2 Receiver and the stereo. Position the XM Antenna so that it should be able to power, antenna, and home stereo as illustrated in figure 9. 3. Turn on your SKYFi2 Receiver and home stereo. 2. Note: The Delphi SA10006 Antenna Extension Cable (sold separately) is facing south. ...You should point through a window. 4. Connect the SKYFi2 Home Stand to hear the XM Preview channel. 16 Installation instructions: 1. Ideally, it is designed to...

Installation Guide
Page 17
... you press the "menu" button Figure 10. Press the "XM" button to select the "Antenna Aiming" option. Find the position that gives 17 For best reception, aim the home antenna by following these instructions: 1. Use the scroll wheel to confirm selection. Aiming the XM Home Antenna change. the strongest signal strength (at least two bars...
... you press the "menu" button Figure 10. Press the "XM" button to select the "Antenna Aiming" option. Find the position that gives 17 For best reception, aim the home antenna by following these instructions: 1. Use the scroll wheel to confirm selection. Aiming the XM Home Antenna change. the strongest signal strength (at least two bars...

