Light Fix
Page 5
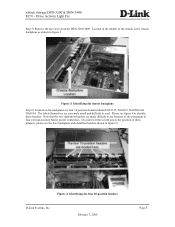
Drive Activity Light Fix Step 5) Remove the top cover from the DSN-3200/3400. Located in the middle of the chassis is the chassis backplane as shown in figure 5) Figure 4: Identifying the four 10-position headers D-Link Systems, Inc. Figure 3: Identifying the chassis backplane Step 6) Located on the backplane are extremely small and difficult to read... position of four (4) four-position Molex power connectors. (In order to better orient you to see the bare backplane and identified headers shown in figure 3. xStack Storage DSN-3200 & DSN-3400 ECN -
Drive Activity Light Fix Step 5) Remove the top cover from the DSN-3200/3400. Located in the middle of the chassis is the chassis backplane as shown in figure 5) Figure 4: Identifying the four 10-position headers D-Link Systems, Inc. Figure 3: Identifying the chassis backplane Step 6) Located on the backplane are extremely small and difficult to read... position of four (4) four-position Molex power connectors. (In order to better orient you to see the bare backplane and identified headers shown in figure 3. xStack Storage DSN-3200 & DSN-3400 ECN -
Light Fix
Page 6
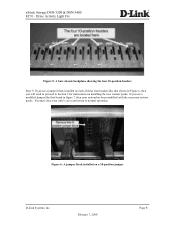
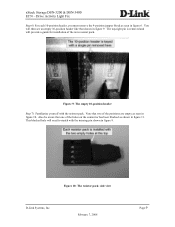
...xStack Storage DSN-3200 & DSN-3400 ECN - If you see a jumper block installed on each of these four headers like that found in Figure 6, then you see a modified jumper like that shown in figure 7, then your unit's cover and return to Section 2 for instructions on a 10-position jumper D-Link Systems, Inc. February 7, 2008 Page 6 Drive... Activity Light Fix Figure 5: A bare chassis backplane showing the four 10-position headers Step 7) If you will need to proceed...
...xStack Storage DSN-3200 & DSN-3400 ECN - If you see a jumper block installed on each of these four headers like that found in Figure 6, then you see a modified jumper like that shown in figure 7, then your unit's cover and return to Section 2 for instructions on a 10-position jumper D-Link Systems, Inc. February 7, 2008 Page 6 Drive... Activity Light Fix Figure 5: A bare chassis backplane showing the four 10-position headers Step 7) If you will need to proceed...

Light Fix
Page 7
Drive Activity Light Fix Figure 7: A resistor pack installed on a 10-position jumper. February 7, 2008 Page 7 D-Link Systems, Inc. xStack Storage DSN-3200 & DSN-3400 ECN -
Drive Activity Light Fix Figure 7: A resistor pack installed on a 10-position jumper. February 7, 2008 Page 7 D-Link Systems, Inc. xStack Storage DSN-3200 & DSN-3400 ECN -
Light Fix
Page 8
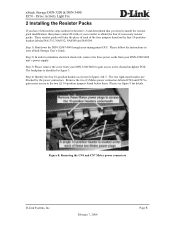
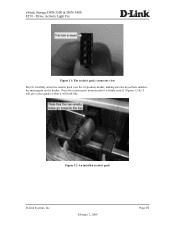
...outlined in your reseller to install the resistor pack modification, then please contact D-Link or your xStack Storage User's Guide. Figure 8: Removing the CN4 and CN7 Molex power connectors D-Link Systems, Inc. The two right-most headers are blocked by the power connectors... cords from your management GUI. xStack Storage DSN-3200 & DSN-3400 ECN - Drive Activity Light Fix 2 Installing the Resistor Packs If you need to obtain the four (4) necessary resistor packs. The backplane is identified in figures 4 & 5. Step 4) Identify the four 10-position headers as shown in figure...
...outlined in your reseller to install the resistor pack modification, then please contact D-Link or your xStack Storage User's Guide. Figure 8: Removing the CN4 and CN7 Molex power connectors D-Link Systems, Inc. The two right-most headers are blocked by the power connectors... cords from your management GUI. xStack Storage DSN-3200 & DSN-3400 ECN - Drive Activity Light Fix 2 Installing the Resistor Packs If you need to obtain the four (4) necessary resistor packs. The backplane is identified in figures 4 & 5. Step 4) Identify the four 10-position headers as shown in figure...
Light Fix
Page 9
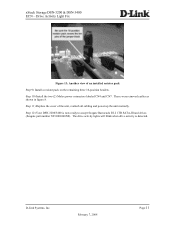
... header like that shown in figure 9. Figure 10: The resistor pack: side view D-Link Systems, Inc. February 7, 2008 Page 9 Note that one of the holes on the connector has been blocked as shown in figure 10. xStack Storage DSN-3200 & DSN-3400 ECN - Drive Activity Light Fix Step 6) For each 10-position header, you must remove the 4-position jumper .... The top-right pin is removed and will provide a guide for installation of the positions are empty as seen in figure 9. Figure 9: The empty 10-position header Step 7) Familiarize yourself with the missing pin shown in figure 6.
... header like that shown in figure 9. Figure 10: The resistor pack: side view D-Link Systems, Inc. February 7, 2008 Page 9 Note that one of the holes on the connector has been blocked as shown in figure 10. xStack Storage DSN-3200 & DSN-3400 ECN - Drive Activity Light Fix Step 6) For each 10-position header, you must remove the 4-position jumper .... The top-right pin is removed and will provide a guide for installation of the positions are empty as seen in figure 9. Figure 9: The empty 10-position header Step 7) Familiarize yourself with the missing pin shown in figure 6.
Light Fix
Page 10
Drive Activity Light Fix Figure 11: The resistor pack: connector view Step 8) Carefully orient the resistor pack over the 10-position header, making sure the keyed hole matches the missing pin on the header. Press the resistor pack inwards until it will give you a guide to what it is firmly seated. Figures 12 & 13 will look like. Figure 12: An installed resistor pack D-Link Systems, Inc. February 7, 2008 Page 10 xStack Storage DSN-3200 & DSN-3400 ECN -
Drive Activity Light Fix Figure 11: The resistor pack: connector view Step 8) Carefully orient the resistor pack over the 10-position header, making sure the keyed hole matches the missing pin on the header. Press the resistor pack inwards until it will give you a guide to what it is firmly seated. Figures 12 & 13 will look like. Figure 12: An installed resistor pack D-Link Systems, Inc. February 7, 2008 Page 10 xStack Storage DSN-3200 & DSN-3400 ECN -
Light Fix
Page 11
... remaining three 10-position headers. The drive activity lights will blink when drive activity is now ready to accept Seagate Barracuda ES.2 1TB SATA-II hard drives (Seagate part number ST31000340NS). D-Link Systems, Inc. Step 12) Your DSN-3200/3400 is detected. February 7, 2008 Page 11 Step 10) Install the two (2) Molex power connectors labeled CN4 and CN7. xStack Storage DSN-3200 & DSN-3400...
... remaining three 10-position headers. The drive activity lights will blink when drive activity is now ready to accept Seagate Barracuda ES.2 1TB SATA-II hard drives (Seagate part number ST31000340NS). D-Link Systems, Inc. Step 12) Your DSN-3200/3400 is detected. February 7, 2008 Page 11 Step 10) Install the two (2) Molex power connectors labeled CN4 and CN7. xStack Storage DSN-3200 & DSN-3400...