

User Manual
Page 6
The main functions include 12 items, which are located on the left-hand side of the screen, and the display window will be on the right-hand side. Software Management DFL-80 management tool: Web User Interface The main menu functions are : Administrator, Configuration, Address, Service, Schedule, Policy, VPN, Virtual Server, Log, Alarm, Statistics, and Status. 6
The main functions include 12 items, which are located on the left-hand side of the screen, and the display window will be on the right-hand side. Software Management DFL-80 management tool: Web User Interface The main menu functions are : Administrator, Configuration, Address, Service, Schedule, Policy, VPN, Virtual Server, Log, Alarm, Statistics, and Status. 6

User Manual
Page 80
.... In the DMZ To External window, locate the name of policy desired to make a VPN connection. 80 VPN The DFL-80 Firewall's VPN (Virtual Private Network) is set up a Virtual Private Network (VPN), you do not need to configure an Access Policy to enable encryption. Just fill in the ... ends must use the same Preshare key and IPSec lifetime to be removed and click its corresponding Remove option in the following settings: VPN Name, Source Subnet, Destination Gateway, Destination Subnet, Authentication Method, Preshare key, Encapsulation and IPSec lifetime. Removing a DMZ To External Policy...
.... In the DMZ To External window, locate the name of policy desired to make a VPN connection. 80 VPN The DFL-80 Firewall's VPN (Virtual Private Network) is set up a Virtual Private Network (VPN), you do not need to configure an Access Policy to enable encryption. Just fill in the ... ends must use the same Preshare key and IPSec lifetime to be removed and click its corresponding Remove option in the following settings: VPN Name, Source Subnet, Destination Gateway, Destination Subnet, Authentication Method, Preshare key, Encapsulation and IPSec lifetime. Removing a DMZ To External Policy...

User Manual
Page 81
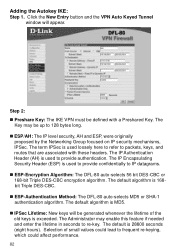
...The external interface IP address of traffic has been exchanged. Configure: Connect, Disconnect, Modify and Delete. 81 PSK/RSA: The IKE VPN must be up to create a VPN connection using Autokey IKE. Autokey IKE This chapter describes steps to 128 bytes long. ! Accessing the Autokey IKE window: Click IPSec... Autokey under the VPN menu to be defined with two firewall devices, IKE allows new keys to enter the Autokey IKE window. The name must be generated ...
...The external interface IP address of traffic has been exchanged. Configure: Connect, Disconnect, Modify and Delete. 81 PSK/RSA: The IKE VPN must be up to create a VPN connection using Autokey IKE. Autokey IKE This chapter describes steps to 128 bytes long. ! Accessing the Autokey IKE window: Click IPSec... Autokey under the VPN menu to be defined with two firewall devices, IKE allows new keys to enter the Autokey IKE window. The name must be generated ...
User Manual
Page 82
Step 2: ! ESP-Authentication Method: The DFL-80 auto-selects MD5 or SHA-1 authentication algorithm. Selection of the old keys is exceeded. Click the New Entry button and the VPN Auto Keyed Tunnel window will be generated whenever the lifetime of small values could lead to packets, keys, and routes that ...to 128 bytes long. ! The IP Encapsulating Security Header (ESP) is used to provide confidentially to provide authentication. ESP-Encryption Algorithm: The DFL-80 auto-selects 56 bit DES-CBC or 168-bit Triple DES-CBC encryption algorithm. ESP/AH: The IP level security, AH and ESP, ...
Step 2: ! ESP-Authentication Method: The DFL-80 auto-selects MD5 or SHA-1 authentication algorithm. Selection of the old keys is exceeded. Click the New Entry button and the VPN Auto Keyed Tunnel window will be generated whenever the lifetime of small values could lead to packets, keys, and routes that ...to 128 bytes long. ! The IP Encapsulating Security Header (ESP) is used to provide confidentially to provide authentication. ESP-Encryption Algorithm: The DFL-80 auto-selects 56 bit DES-CBC or 168-bit Triple DES-CBC encryption algorithm. ESP/AH: The IP level security, AH and ESP, ...

User Manual
Page 83
..., locate the name of policy desired to be made between the two Firewalls and the Status field will change to Connect. 83 Connecting the VPN connection: Once all the policy is set up correctly with the correct settings, click on the Connect option in the Configure field. The Status... field will change to save modifications. If the remote Firewall is created with the VPN active, the VPN connection will be modified and click its corresponding Modify option in new settings. Step 3: Click OK to indicate Connecting. Step 2: In the...
..., locate the name of policy desired to be made between the two Firewalls and the Status field will change to Connect. 83 Connecting the VPN connection: Once all the policy is set up correctly with the correct settings, click on the Connect option in the Configure field. The Status... field will change to save modifications. If the remote Firewall is created with the VPN active, the VPN connection will be modified and click its corresponding Modify option in new settings. Step 3: Click OK to indicate Connecting. Step 2: In the...

User Manual
Page 85
...- Client IP Range- 192.66.255.1-254 Displays the IP address range for authentication. ! User Name- Displays the PPTP Client's IP address for authentication. ! Select VPN > PPTP Server. !
...- Client IP Range- 192.66.255.1-254 Displays the IP address range for authentication. ! User Name- Displays the PPTP Client's IP address for authentication. ! Select VPN > PPTP Server. !

User Manual
Page 86
... a predetermined period of time. Step 4. Click Modify after the Client IP Range. Enable PPTP- Configure this device to disconnect to the PPTP server. ! Step 3. Select VPN > PPTP Server. Disable PPTP- minutes- Client IP Range Enter the IP range allocated for PPTP Client to connect to the PPTP Server when there is...
... a predetermined period of time. Step 4. Click Modify after the Client IP Range. Enable PPTP- Configure this device to disconnect to the PPTP server. ! Step 3. Select VPN > PPTP Server. Disable PPTP- minutes- Client IP Range Enter the IP range allocated for PPTP Client to connect to the PPTP Server when there is...

User Manual
Page 87
... to cancel modifi cations 87 Step 3. User name: Specify the PPTP client. IP Address:Enter the PPTP Client IP address. Adding PPTP Server Step 1. Select VPN > PPTP Server. Step 2.
... to cancel modifi cations 87 Step 3. User name: Specify the PPTP client. IP Address:Enter the PPTP Client IP address. Adding PPTP Server Step 1. Select VPN > PPTP Server. Step 2.

User Manual
Page 88
Modifying PPTP Server Step 1. Click OK to save modifications or click Cancel to modify. Enter appropriate settings. Select VPN > PPTP Server. In the PPTP Server window, find the PPTP server that you want to cancel modifica tions 88 Click Configure and click Modify. Step 4. Step 3. Step 2.
Modifying PPTP Server Step 1. Click OK to save modifications or click Cancel to modify. Enter appropriate settings. Select VPN > PPTP Server. In the PPTP Server window, find the PPTP server that you want to cancel modifica tions 88 Click Configure and click Modify. Step 4. Step 3. Step 2.

User Manual
Page 89
Click Configure and click remove. In the PPTP Server window, find the PPTP server that you want to exit without removal. 89 Select VPN > PPTP Server. Step 3. Removing PPTP Server Step 1. Click OK to remove the PPTP server or click Cancel to modify. Step 2.
Click Configure and click remove. In the PPTP Server window, find the PPTP server that you want to exit without removal. 89 Select VPN > PPTP Server. Step 3. Removing PPTP Server Step 1. Click OK to remove the PPTP server or click Cancel to modify. Step 2.

User Manual
Page 90
Server Address: Displays the PPTP Server IP addresses.. ! PPTP Client Entering the PPTP Client window Step 1. Uptime: Displays the connection time between PPTP Server and PPTP client. ! Configure: Click Modify to modify the PPTP Client settings or click Remove to remove the item. 90 User Name: Displays the PPTP Client user's name for authentication. ! Select VPN > PPTP Client. ! Client IP: Displays the PPTP Client's IP address for authentication. ! Status: Displays current connection status between PPTP Server and Client. !
Server Address: Displays the PPTP Server IP addresses.. ! PPTP Client Entering the PPTP Client window Step 1. Uptime: Displays the connection time between PPTP Server and PPTP client. ! Configure: Click Modify to modify the PPTP Client settings or click Remove to remove the item. 90 User Name: Displays the PPTP Client user's name for authentication. ! Select VPN > PPTP Client. ! Client IP: Displays the PPTP Client's IP address for authentication. ! Status: Displays current connection status between PPTP Server and Client. !

User Manual
Page 91
IP Address: Enter the PPTP Client IP address. minutes: Configure this device to disconnect to the PPTP server. Select VPN > PPTP Client. ! Password: Specify the PPTP client password. ! Server Address: Enter the PPTP Server's IP address. ! Netmask: Enter the PPTP ... activity for details. Remote Server: Single Machine: Check to connect to transmit over the connection. ! Auto-Connect when sending packet through the link: Check to enable the auto-connection whenever there's packet to single computer. Auto-Disconnect if idle ... To keep the line always connected,...
IP Address: Enter the PPTP Client IP address. minutes: Configure this device to disconnect to the PPTP server. Select VPN > PPTP Client. ! Password: Specify the PPTP client password. ! Server Address: Enter the PPTP Server's IP address. ! Netmask: Enter the PPTP ... activity for details. Remote Server: Single Machine: Check to connect to transmit over the connection. ! Auto-Connect when sending packet through the link: Check to enable the auto-connection whenever there's packet to single computer. Auto-Disconnect if idle ... To keep the line always connected,...

User Manual
Page 92
Modifying PPTP Client Step 1. Step 2. Enter appropriate settings. Click Configure and click Modify. Click OK to save modifications or click Cancel to modify. Step 4. Select VPN > PPTP Client. Step 3. In the PPTP Client window, find the PPTP server that you want to cancel modifi cations 92
Modifying PPTP Client Step 1. Step 2. Enter appropriate settings. Click Configure and click Modify. Click OK to save modifications or click Cancel to modify. Step 4. Select VPN > PPTP Client. Step 3. In the PPTP Client window, find the PPTP server that you want to cancel modifi cations 92

User Manual
Page 93
Step 3. Click Configure and click remove. In the PPTP Client window, find the PPTP client that you want to exit without removal. 93 Select VPN > PPTP Client. Step 2. Click OK to remove the PPTP client or click Cancel to modify. Removing PPTP Client Step 1.
Step 3. Click Configure and click remove. In the PPTP Client window, find the PPTP client that you want to exit without removal. 93 Select VPN > PPTP Client. Step 2. Click OK to remove the PPTP client or click Cancel to modify. Removing PPTP Client Step 1.
User Manual
Page 97
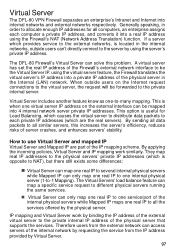
...networks, is opposite to use Virtual Server and mapped IP Virtual Server and Mapped IP are the real servers). Virtual Server The DFL-80 VPN Firewall separates an enterprise's Intranet and Internet into a private IP address of the internal network by requesting the service from the IP... address provided by using the Firewall's NAT (Network Address Translation) function. The DFL-80 Firewall's Virtual Server can access servers of the physical server in the internal networks, outside users on the external interface can 't directly...
...networks, is opposite to use Virtual Server and mapped IP Virtual Server and Mapped IP are the real servers). Virtual Server The DFL-80 VPN Firewall separates an enterprise's Intranet and Internet into a private IP address of the internal network by requesting the service from the IP... address provided by using the Firewall's NAT (Network Address Translation) function. The DFL-80 Firewall's Virtual Server can access servers of the physical server in the internal networks, outside users on the external interface can 't directly...
User Manual
Page 107
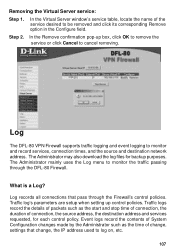
In the Remove confirmation pop-up control policies. Log The DFL-80 VPN Firewall supports traffic logging and event logging to cancel removing. Step 2. The Administrator mainly uses the Log menu to log on, etc. 107 Removing the... control policies. The Administrator may also download the log files for each control policy. Log records all connections that change , settings that pass through the DFL-80 Firewall. In the Virtual Server window's service table, locate the name of connection, the source address, the destination address and services requested, for backup ...
In the Remove confirmation pop-up control policies. Log The DFL-80 VPN Firewall supports traffic logging and event logging to cancel removing. Step 2. The Administrator mainly uses the Log menu to log on, etc. 107 Removing the... control policies. The Administrator may also download the log files for each control policy. Log records all connections that change , settings that pass through the DFL-80 Firewall. In the Virtual Server window's service table, locate the name of connection, the source address, the destination address and services requested, for backup ...
User Manual
Page 120
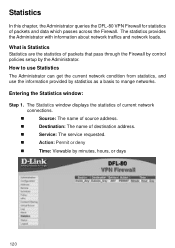
... of current network connections. ! The Statistics window displays the statistics of source address. ! Action: Permit or deny ! Statistics In this chapter, the Administrator queries the DFL-80 VPN Firewall for statistics of destination address. ! What is Statistics Statistics are the statistics of packets that pass through the Firewall by control policies setup by...
... of current network connections. ! The Statistics window displays the statistics of source address. ! Action: Permit or deny ! Statistics In this chapter, the Administrator queries the DFL-80 VPN Firewall for statistics of destination address. ! What is Statistics Statistics are the statistics of packets that pass through the Firewall by control policies setup by...


