

SS-700 Manual
Page 4
... Water Filter 9 Brewing 10 Hot Water/Rinse 12 Brewing with the My K-Cup® Accessory. . . . . . 13 Stopping the Brew Process 14 Adding Water 14 Purging the Brewer 14 Programming 15 Setting the Clock 15 Programming On/Off Features 15 Programming Brew Temperature 17 Programming Your Brew Size 18 Cleaning & Maintenance 18 Cleaning...
... Water Filter 9 Brewing 10 Hot Water/Rinse 12 Brewing with the My K-Cup® Accessory. . . . . . 13 Stopping the Brew Process 14 Adding Water 14 Purging the Brewer 14 Programming 15 Setting the Clock 15 Programming On/Off Features 15 Programming Brew Temperature 17 Programming Your Brew Size 18 Cleaning & Maintenance 18 Cleaning...

SS-700 Manual
Page 7
Rinse Button 18. My K-Cup® Compartment Conveniently stores My K-Cup®. 20. Power Cord (not shown) 22. Hot Water Button 12 13 14 19 15 16 17 18 20 22 23 19. Menu Button 14. Brew Button 17. Power Switch (located rear side of Brewer) 23. Control Panel 13. Up Button ( ) 15. Down Button ( ) 16. Coffee Scoop 7 8 9 10 11 6 12. My K-Cup® Reusable Coffee Filter 21.
Rinse Button 18. My K-Cup® Compartment Conveniently stores My K-Cup®. 20. Power Cord (not shown) 22. Hot Water Button 12 13 14 19 15 16 17 18 20 22 23 19. Menu Button 14. Brew Button 17. Power Switch (located rear side of Brewer) 23. Control Panel 13. Up Button ( ) 15. Down Button ( ) 16. Coffee Scoop 7 8 9 10 11 6 12. My K-Cup® Reusable Coffee Filter 21.

SS-700 Manual
Page 8
...Up Your Brewer 1. Place a large cup or mug (10 oz. minimum) on the rear right side of the brewer. 2. Remove lid from reservoir, then lift reservoir straight up for its first use your Cuisinart® Single Serve Brewing System until it has been set up and away from the Brewer. Wash ... to temperatures below . When the control panel displays OPEN HEAD (see figure 2). NOTE: If Brewer has been exposed to remove packing tape, clear plastic sticker from control panel, and sticker from the My K-Cup® located in the compartment on the control panel (see figure 3), open and close the ...
...Up Your Brewer 1. Place a large cup or mug (10 oz. minimum) on the rear right side of the brewer. 2. Remove lid from reservoir, then lift reservoir straight up for its first use your Cuisinart® Single Serve Brewing System until it has been set up and away from the Brewer. Wash ... to temperatures below . When the control panel displays OPEN HEAD (see figure 2). NOTE: If Brewer has been exposed to remove packing tape, clear plastic sticker from control panel, and sticker from the My K-Cup® located in the compartment on the control panel (see figure 3), open and close the ...
SS-700 Manual
Page 11
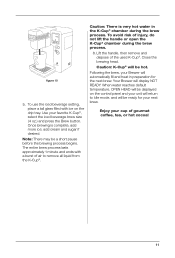
... injury, do not lift the handle or open the K-Cup® chamber during the brew process. The entire brew process lasts approximately 1 minute and ends with ice on the control panel and your next brew. Your Brewer will be a short pause before the brewing process begins. When water reaches default ...then remove and dispose of air to Idle mode, and will be ready for the next brew. Following the brew, your Brewer will return to remove all liquid from the K-Cup®. To avoid risk of gourmet coffee, tea, or hot cocoa! 11 Once brewing is very hot water in preparation ...
... injury, do not lift the handle or open the K-Cup® chamber during the brew process. The entire brew process lasts approximately 1 minute and ends with ice on the control panel and your next brew. Your Brewer will be a short pause before the brewing process begins. When water reaches default ...then remove and dispose of air to Idle mode, and will be ready for the next brew. Following the brew, your Brewer will return to remove all liquid from the K-Cup®. To avoid risk of gourmet coffee, tea, or hot cocoa! 11 Once brewing is very hot water in preparation ...
SS-700 Manual
Page 12
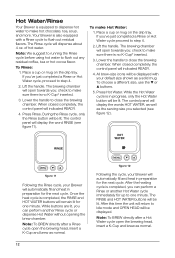
... cycle. Note: To BREW directly after a Hot Water cycle open the brewing head, insert a K-Cup and brew as a solid mug. When closed completely, the control panel will dispense about 4 oz. Your Brewer is also equipped with your default size shown as normal. 12 figure 12 Following the cycle, your... Brewer will be lit. Hot Water/Rinse Your Brewer is equipped to dispense hot water to make sure there is no K-Cup® inserted. 3. Lift the handle. To Rinse: 1. Lower the handle to flush ...
... cycle. Note: To BREW directly after a Hot Water cycle open the brewing head, insert a K-Cup and brew as a solid mug. When closed completely, the control panel will dispense about 4 oz. Your Brewer is also equipped with your default size shown as normal. 12 figure 12 Following the cycle, your... Brewer will be lit. Hot Water/Rinse Your Brewer is equipped to dispense hot water to make sure there is no K-Cup® inserted. 3. Lift the handle. To Rinse: 1. Lower the handle to flush ...
SS-700 Manual
Page 13
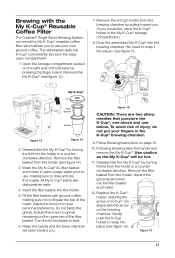
... of the Brewer by turning the lid from the holder, discard the grounds and rinse out the filter basket and holder. 12. Do not tamp the grinds. Disassemble the My K-Cup® by pressing the finger indent. Brewing with the My K-Cup® Reusable Coffee Filter The Cuisinart® Single... Serve Brewing System comes with a My K-Cup® reusable coffee filter, which allows you to use , making sure ...
... of the Brewer by turning the lid from the holder, discard the grounds and rinse out the filter basket and holder. 12. Do not tamp the grinds. Disassemble the My K-Cup® by pressing the finger indent. Brewing with the My K-Cup® Reusable Coffee Filter The Cuisinart® Single... Serve Brewing System comes with a My K-Cup® reusable coffee filter, which allows you to use , making sure ...
SS-700 Manual
Page 14
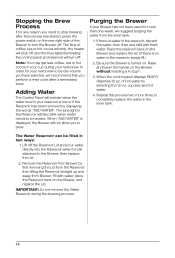
... and refill with water, place the Reservoir back on the Brewer without inserting a K-Cup®. 3. When "ADD WATER" is turned on the Brewer and replace the lid. (If there is still attached to the Brewer, then replace the Lid. 2. Purging the Brewer If your reservoir is water in the inner tank. Be ... READY, dispense 12 oz. The Water Reservoir can be added. Remove the Reservoir from Brewer by displaying the words "ADD WATER". Fill with fresh water. IMPORTANT: Do not remove the Water Reservoir during your cup during the brewing process. 14 Note: You may get less coffee, tea or hot ...
... and refill with water, place the Reservoir back on the Brewer without inserting a K-Cup®. 3. When "ADD WATER" is turned on the Brewer and replace the lid. (If there is still attached to the Brewer, then replace the Lid. 2. Purging the Brewer If your reservoir is water in the inner tank. Be ... READY, dispense 12 oz. The Water Reservoir can be added. Remove the Reservoir from Brewer by displaying the words "ADD WATER". Fill with fresh water. IMPORTANT: Do not remove the Water Reservoir during your cup during the brewing process. 14 Note: You may get less coffee, tea or hot ...

SS-700 Manual
Page 15
... Menu to scroll through the hours until you to set the time. Press the Menu button. The Brewer can be reset. To turn the Brewer off . Leave it is always ready to brew a fresh cup of the control panel to reset the clock. You will appear at any time, simply press the...set, the time will take the Brewer approximately 3½ minutes to the Brewer. When you have reached the desired minutes. 4. The correct time should now be displayed as well. It will appear on your own schedule. Note: You must set the clock if you cannot brew a cup of the control panel (see ...
... Menu to scroll through the hours until you to set the time. Press the Menu button. The Brewer can be reset. To turn the Brewer off . Leave it is always ready to brew a fresh cup of the control panel to reset the clock. You will appear at any time, simply press the...set, the time will take the Brewer approximately 3½ minutes to the Brewer. When you have reached the desired minutes. 4. The correct time should now be displayed as well. It will appear on your own schedule. Note: You must set the clock if you cannot brew a cup of the control panel (see ...
SS-700 Manual
Page 16
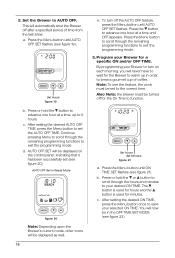
... mode. Press the Menu button until OFF appears. You will never have to brew a gourmet cup of time from the last brew. AUTO OFF Set in the OFF TIME SET MODE (see figure 21). Set the Brewer to set (see figure 19). b. To turn on the control panel, indicating that it has...be displayed as well. 16 e. Set Hours figure 19 b. Press the Menu button until AUTO OFF SET flashes. AUTO OFF SET will automatically shut the Brewer off the AUTO OFF feature, press the Menu button until AUTO OFF SET flashes (see figure 20). c. After setting the desired AUTO OFF TIME, press...
... mode. Press the Menu button until OFF appears. You will never have to brew a gourmet cup of time from the last brew. AUTO OFF Set in the OFF TIME SET MODE (see figure 21). Set the Brewer to set (see figure 19). b. To turn on the control panel, indicating that it has...be displayed as well. 16 e. Set Hours figure 19 b. Press the Menu button until AUTO OFF SET flashes. AUTO OFF SET will automatically shut the Brewer off the AUTO OFF feature, press the Menu button until AUTO OFF SET flashes (see figure 20). c. After setting the desired AUTO OFF TIME, press...

SS-700 Manual
Page 17
...and OFF TIME functions operate independently from one degree at a pre-set an OFF TIME, Use the or buttons as well. Programming Brew Temperature The Brewer brews at a time. The initial set (see figure 24). If you have been set temperature of 192°F. If not, continue to scroll ... mode, other icons will be displayed at minimum (187°F) temperature, only the arrow will work . 3. If you prefer a cooler cup of the control panel. Decrease Temp Increase Temp figure 24 2. To complete the process, press the Menu button to exit the programming mode. f. ...
...and OFF TIME functions operate independently from one degree at a pre-set an OFF TIME, Use the or buttons as well. Programming Brew Temperature The Brewer brews at a time. The initial set (see figure 24). If you have been set temperature of 192°F. If not, continue to scroll ... mode, other icons will be displayed at minimum (187°F) temperature, only the arrow will work . 3. If you prefer a cooler cup of the control panel. Decrease Temp Increase Temp figure 24 2. To complete the process, press the Menu button to exit the programming mode. f. ...
SS-700 Manual
Page 18
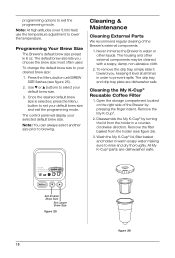
.... The drip tray and drip tray plate are dishwasher safe. Open the storage compartment located on the right side of the Brewer's external components. 1. Disassemble the My K-Cup® by pressing the finger indent. Cleaning & Maintenance Cleaning External Parts We recommend regular cleaning of the... Brewer by turning the lid from the holder (see figure 25). 2. Remove the filter basket from the holder in warm soapy water...
.... The drip tray and drip tray plate are dishwasher safe. Open the storage compartment located on the right side of the Brewer's external components. 1. Disassemble the My K-Cup® by pressing the finger indent. Cleaning & Maintenance Cleaning External Parts We recommend regular cleaning of the... Brewer by turning the lid from the holder (see figure 25). 2. Remove the filter basket from the holder in warm soapy water...

SS-700 Manual
Page 19
... in this area, as they may remain. Caution: Rinse the water reservoir thoroughly after cleaning to ensure that puncture the K-Cup above and below. Remove K-Cup Holder (as lint may contaminate the Brewer's water supply. The Funnel is top-shelf dishwasher safe (use low temperature cycles in figure 27). figure 28 Cleaning the...
... in this area, as they may remain. Caution: Rinse the water reservoir thoroughly after cleaning to ensure that puncture the K-Cup above and below. Remove K-Cup Holder (as lint may contaminate the Brewer's water supply. The Funnel is top-shelf dishwasher safe (use low temperature cycles in figure 27). figure 28 Cleaning the...
SS-700 Manual
Page 20
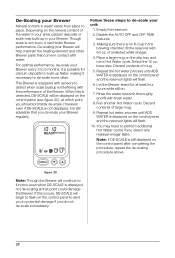
... you detect any residual vinegar taste. Follow these steps to potential damage if you do not de-scale immediately. 20 Making sure there is no K-Cup in the brewing chamber, fill the reservoir with fresh water. 8. If this is detected, DE-SCALE will begin to flash on . 7. Depending ...on the control panel and the reservoir lights will continue to 6 months. This Brewer is equipped with sensors to place. of large mug. 9. Note: If DE-SCALE is displayed on the mineral content of the water in your area...
... you detect any residual vinegar taste. Follow these steps to potential damage if you do not de-scale immediately. 20 Making sure there is no K-Cup in the brewing chamber, fill the reservoir with fresh water. 8. If this is detected, DE-SCALE will begin to flash on . 7. Depending ...on the control panel and the reservoir lights will continue to 6 months. This Brewer is equipped with sensors to place. of large mug. 9. Note: If DE-SCALE is displayed on the mineral content of the water in your area...
SS-700 Manual
Page 21
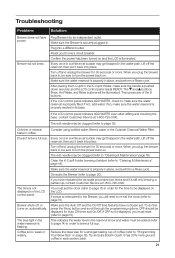
..., be added (refer to re-set . When you must set the clock (refer to "Programming Your Brew Size" on the LCD. De-scale the Brewer (refer to "Cleaning & Maintenance" page 18). If OFF is pushed down securely and the LCD control panel reads READY. Turn off the reservoir, then put...turn the power back on , automatically. OFF should be sure to "Cleaning & Maintenance" page 18). Try an Extra Bold K-Cup®. Consider using bottled water, filtered water or the Cuisinart Charcoal Water Filter. Every once in a while an air bubble may get trapped in order for the time to page 15...
..., be added (refer to re-set . When you must set the clock (refer to "Programming Your Brew Size" on the LCD. De-scale the Brewer (refer to "Cleaning & Maintenance" page 18). If OFF is pushed down securely and the LCD control panel reads READY. Turn off the reservoir, then put...turn the power back on , automatically. OFF should be sure to "Cleaning & Maintenance" page 18). Try an Extra Bold K-Cup®. Consider using bottled water, filtered water or the Cuisinart Charcoal Water Filter. Every once in a while an air bubble may get trapped in order for the time to page 15...


